-
Blog
Brandon Knight
March 23, 2023
Coach Brandon Pictures from Egypt
I recently took a trip to Egypt & have a few pictures & thoughts to share.

The Great Pyramids of Giza. The Pyramid of Khefru (481ft) was the tallest structure on Earth from the time of its completion around 2,500BC until the construction of the Eiffel Tower in 1887! Since I was a small child I have been amazed by these pyramids. After seeing them in person I am somehow even more blown away by them than ever before.

The Great Pyramids with the Sphinx in front. The Sphinx has been dated back to around the time of the construction of the Pyramids but new research is showing it potentially could be much older and predate the Pyramids by up to a couple thousand years!

One of our earlier mornings. A sunrise hot air balloon ride over the farmlands of Luxor. Luxor was once called Thebes and was the first ever capital of ancient Egypt. Definitely a unique and wonderful thing to experience.


Temple of Hatshepsut. Built sometime between 1,500-1,400 BC.

This temple was built for a Pharoah with a very interesting story of how she gained and kept her rule by sending her stepson (the rightful heir to the throne) to Sudan. She ruled for multiple decades after. After she passed away her stepson came back to Egypt and destroyed many of her statues and temples as to try and not let history remember her. He failed, as Queen Hatshepsut was loved by most people she ruled over.

Inside one of the tombs at the Valley of the Kings. Around 1,600BC kings stopped building pyramids and started building chambers in the caves and cliffs of Thebes in an attempt to keep grave robbers out.

The pictures in this tomb are approximately around 3,300 years old but have kept the paint incredibly well due to being buried for so long.

I personally did not have high expectations for the Valley of the Kings but left Egypt with it being one of my favorite stops we had.

Brandon started working out as an athlete in high school, striving to push his limits and reach his full athletic potential. As he spent more and more time working on his own goals, he found a passion in the science of strength & conditioning, and using that new-found knowledge to help others. Brandon is exceptional at giving his clients the extra push to get stronger in a safe manner, while going above and beyond to making sure they feel comfortable and safe.
April 21, 2021
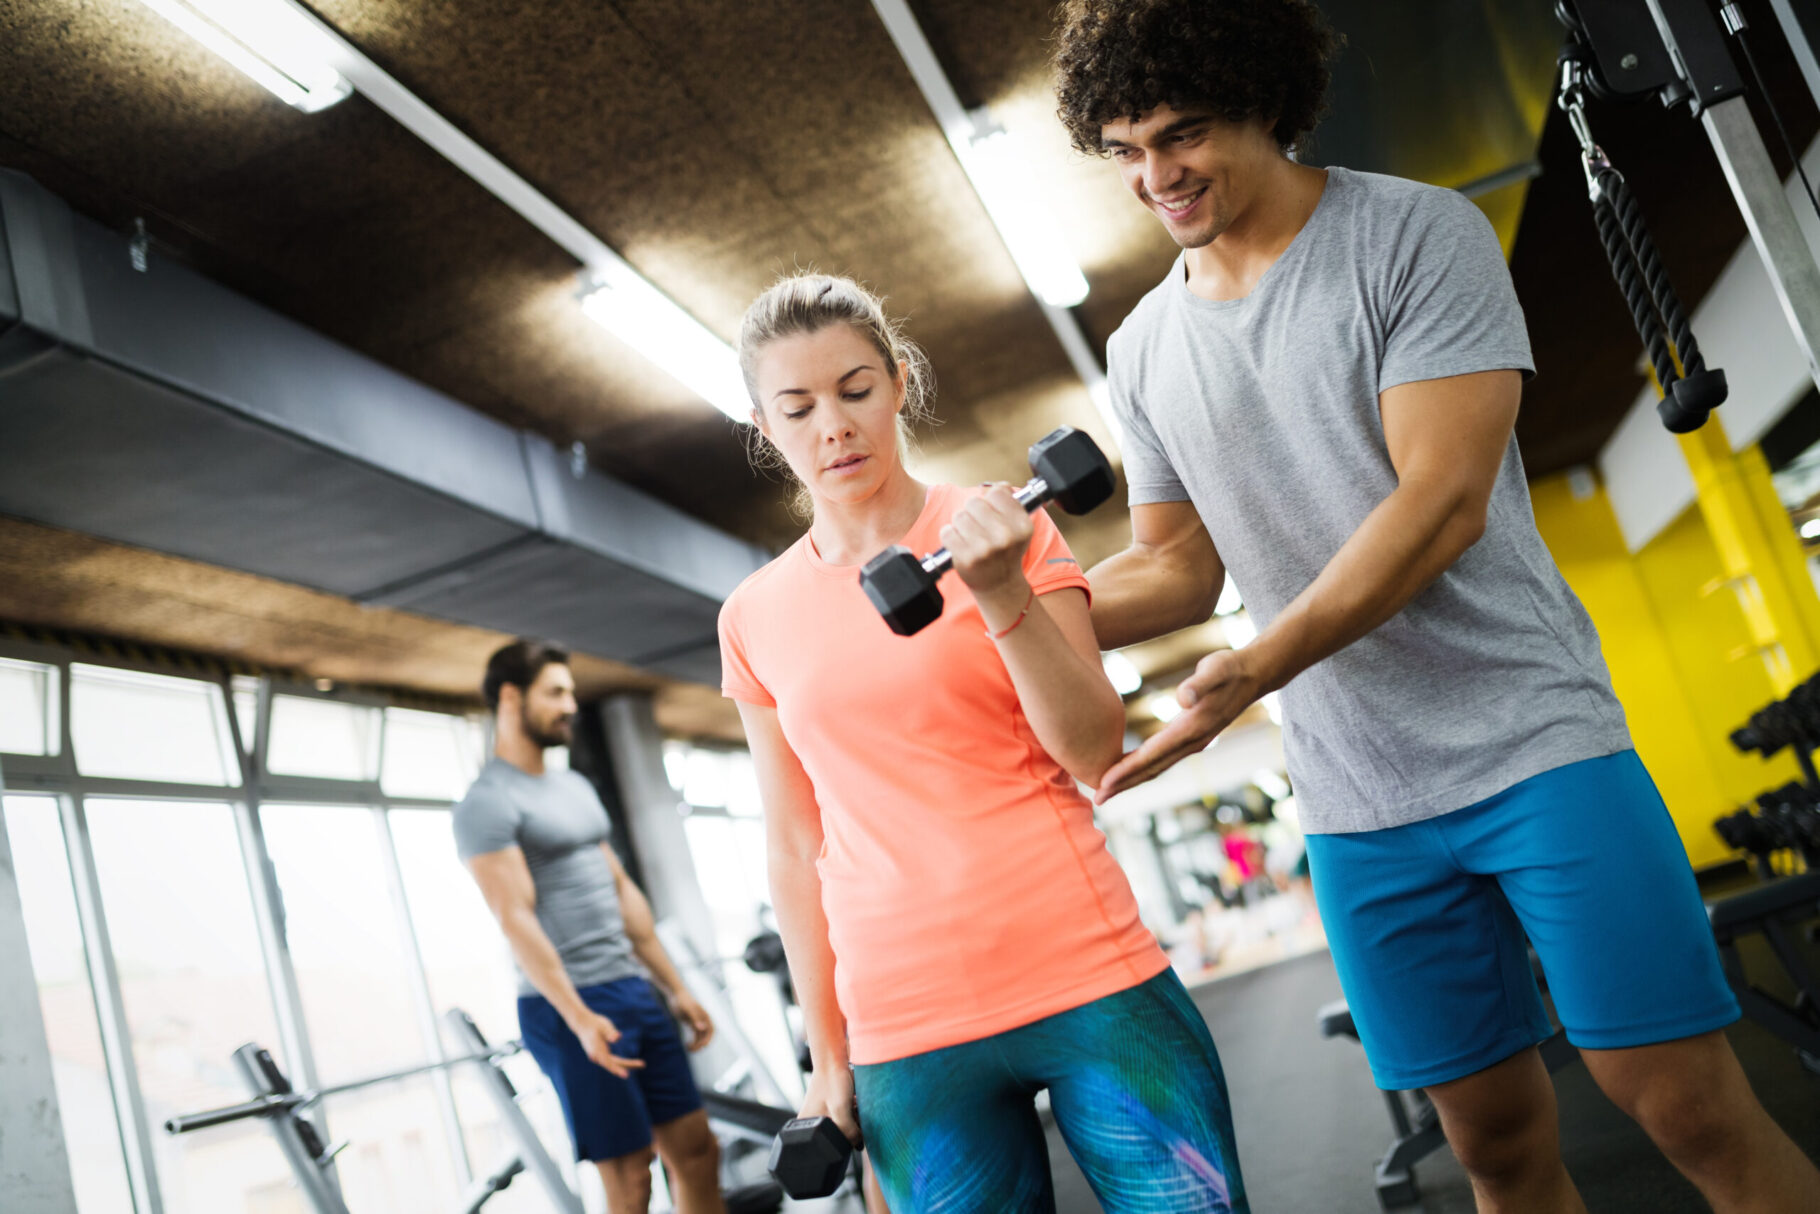
Top Tips for Beginner Weightlifters
The first time you step into a gym can be very intimidating and confusing. Free weights everywhere, Machines that look like death traps, and a lot of people with headphones in that obviously don’t want to be bothered.
Where do you start?
How do you do it safely?
How do you not look like a newbie?
These are questions that every person ponders when they first start weightlifting.
Looking back to when I first started lifting, I realize that there are a lot of things that make me shake my head at, and wonder to myself “What was I thinking!?”. Clearly, I wasn’t
I usually come to the same conclusion that I simply just didn’t know what I was doing. I made a lot of mistakes, and it makes me think of all the people that are starting out who may be making those same mistakes.
Below are my top tips for beginner weightlifters influenced by my mistakes as a beginner, and if I had a time machine, would go back and do differently.
Tip #1: Forget Everything You Think You Know
There are a lot of people in gyms who believe they have enough knowledge to do it for a living. Usually, they are wrong. Because of this, a lot of bad information tends to seep into peoples minds, and gets stuck there.
Over time it turns into concrete, and you find people all throughout gyms doing things they shouldn’t be. If you want to see changes in the gym, and become stronger and healthier, it’s sometimes best to forget everything you’ve been told, and seek advice from someone who has the knowledge and experience to help you reach your goals.
Always going into something new with an open mind is going to give you an advantage later on down the road. This is applicable to almost anything in life!
Tip #2: Learn the Basics and Progress Them Slowly

This has got to be the number one thing that keeps people from being consistent over a long period of time. If you are brand new to weightlifting, and are starting out with Barbell Back Squats, or Barbell Deadlifts like so many people do, then there is a massive problem here. While I am a huge advocate of the big barbell movements, they should only be performed after you’ve learned how to properly squat, hinge, and press.
There are great alternative exercises to all of the big barbell movements that will keep you safe, and lifting for a long time to come.
Below are just a few of my favorite moves to perfect before someone moves on to the barbells.
Back Squat: 4 Point Squat, Goblet Squat, Split Squats
Barbell Deadlift: Good Mornings, RDL, SL RDL
Barbell Bench Press: Push-Ups, Floor Press, Flat DB Press,
Tip #3: Forget about your Ego
This is a tough one for me personally, and really hits home. I was the biggest ego lifter out there. Each workout was about getting more and more weight on the bar.
After time, the extreme stress I was constantly putting my body under began taking its toll. This is because I was never giving my body the rest it required. As a result, all of my lifts started getting weaker and weaker, even though I was working harder and harder.
The human body is incredible at adapting to stress, but at a certain point it just can’t keep up. This is where intensity sometimes has to take a back seat in order to allow your body to recover properly. This is also when the risk of injury can be significantly higher than normal.
Deload!
The term “deload” gets tossed around a lot in training circles, but most people are either unsure how to properly program one, or they just don’t understand the importance of them.
Deloads give your body a chance to recover from the constant stress that working out places on it. A common mistake made while deloading is going too far in the other direction, and putting your body under almost no stress. They should still have a certain level of toughness.
An example of a good deload could simply be doing less sets than normal. If you normally do 4 sets of Squats per workout, do only three on your deloads. What you don’t want to do is something like 60% of your one rep max for 3 sets of 3-5 reps. Generally, 60% of one rep max can be completed for 10-15 reps per set.
Although, it may seem like good idea, you’re mostly just wasting time. A deload should still be challenging but not to the degree your typical workouts are.
Tip #4: Ask for Advice
One thing I have found in gyms is that most people don’t mind helping out. Even the “gym bros” I mentioned earlier who always have headphones in, generally don’t mind answering questions. Most people would prefer a “newbie” ask for advice instead of just going with what they think they know, and getting hurt.
The training community is generally very accepting and willing to help. Be careful who you take advice from, though. Just because someone may have a good physique doesn’t mean they necessarily should be giving advice to others.
And on the flip side, I’ve met casual gym goers who have more knowledge than professional trainers. Find people you trust, and soak in all the knowledge you can.
Take Action!
There are many things I wish I could go back and do differently. Learning these lessons earlier on in life would be one of my first do overs if I were given the chance. I could’ve avoided injuries, frustration, and wasted time.
If you are just starting out in the gym, or have been working out for years, these top tips for beginner weightlifters will aid you for many more years of training to come.
If you found this article helpful or informative, please check out our other articles HERE
For more fitness, health, and lifestyle tips, check out our YouTube channel HERE
And, as always…
Small steps, BIG results!
Brandon started working out as an athlete in high school, striving to push his limits and reach his full athletic potential. As he spent more and more time working on his own goals, he found a passion in the science of strength & conditioning, and using that new-found knowledge to help others. Brandon is exceptional at giving his clients the extra push to get stronger in a safe manner, while going above and beyond to making sure they feel comfortable and safe.
March 25, 2021
Top Women in Strength Sports
Strength training equipment and gyms started to gain in popularity in the 1960s with a big leap throughout the 1970s. It was in 1977 when the legendary Pumping Iron documentary was released following the training of legends such as Lou Ferrigno, Franco Columbo and of course Arnold Schwarzenegger, as well as other greats from the “Golden Age”.
But strength training dates back much further into history than just the 1960’s and 1970’s. The ancient Egyptians, Greeks, Chinese and Scottish, as well as others had some form of strength training for their warriors. Obviously strength training has evolved into much more than it was in ancient times.
A New Era
One thing that has grown in the strength world is the involvement of women. Women have been documented as exercising since the times of the ancient civilizations listed above, but real strength training wasn’t a popularized thing among women until the last 20-30 years, with a great influx over the past 10-15 years.
Today you can walk into just about any gym and find women throwing around chalk, and blasting Metallica. But, there is still a long way to go before women’s strength training and sports becomes as popular as it should.
Below are just a few of the top women in strength sports, and really pushed the boundaries for what we thought was possible.
Donna Moore
Donna Moore was the first strong woman I remember watching and my personal favorite strongwoman. She has won the 2016, 2017 and 2019 World’s Strongest Woman competition, as well as wins at the Arnold’s Strongwoman competitions in 2016, 2017 and 2018.
Donna has set numerous world records including an incredible 171kg (377lbs) Atlas Stone Over Bar record set back in September of 2020 at the age of 40. Donna is also one of the only women to ever successfully lift the legendary Dinnie Stones!
Andrea Thompson
2020 was a rough year for most people. Not Andrea Thompson, though. Andrea set three world records in 2020 which included:
- 281kg (621lbs) elephant bar deadlift
- 135kg (297.7lbs) log lift
- 290kg (638lb) deadlift for the strongwoman deadlift world record.
Andrea just turned 37 years old in 2020, but with fellow strongwoman Donna Moore staying strong in her 40’s, I expect a few more records from Andrea before her career is over.
Rhianon Lovelace
Rhianon Lovelace is a little bit of a unicorn. While small in stature she brings a very rare blend of strength, power and quickness that is completely unmatched in male or female strength sports today.
In September of 2020, Rhianon won the first ever Pound for Pound World’s Strongest Woman, and many believe (myself included) she is pound for pound the strongest person on planet Earth today regardless of gender. A few of Rhianon’s accomplishments in 2020 included:
- 600lb Deadlift
- Overhead axle press of 202lbs
- 312lb atlas stone
- 800lb silver dollar deadlift (traditional deadlift with bar being raised up 18 inches)
All four of these lifts were lightweight world records, and both deadlifts were also middleweight world records! She also completed those lifts while only weighing in at 138lbs!
We’ve already seen some remarkable feats of strength from Rhianon, but the best is yet to come as she is only 24 years old!
Jill Mills
Jill Mills was a bodybuilder who pivoted to the strength world. She dominated the sport for much of the late 1990’s and early 2000’s. Jill won back to back World’s Strongest Woman titles in 2001 and 2002. She undoubtedly would’ve won more, had she not stopped competing.
Jill was an all around great athlete. She could lift heavy on static lifts, was quick on all moving events, and seemed unbeatable on any overhead lifting events with her broad and perfectly sculpted shoulders.
Jill did an incredible job blending strength while keeping a physique with very low body fat. A lot of women in the sport today credit their love and desire for the sport to Jill Mills.
Rebecca Swanson
No list of strength athletes would be complete without Rebecca Swanson. Rebecca is simply the strongest woman to ever live. Even though she had a short but successful career in Strongman, most of her success came in Powerlifting where she holds records with:
- 854lb Squat
- 600lb Bench Press
- 683lb Deadlift
Arguably her most impressive moment came in 2006 when she squatted 804lbs while only weighing in at 197lbs! More than four times her bodyweight!
What’s Next?
Strength sports have grown in popularity, and continue to grow with increasing turnouts each year. But, the growth and acceptance of women in the sport is what really fires me up! Strength sports need to grow into something more than just a day of entertainment a couple times a year. In order for this to happen, women need to be encouraged and more accepted throughout the strength world.
Listed above are just a few of the incredible top women in strength sports that have, or continue to push the boundaries of the sport. If you are reading this and feel the fire in your belly to see what you can really push yourself to become then get into a gym, seek advice from others and be the best you can be!
If you enjoyed this article, please consider subscribing to the Hybrid Fitness YouTube channel, and be sure to check out all the other articles from our coaches.
Please check out our other fitness & health articles here – https://hybridfitnessgym.com/articles/
And remember…Small Steps, Big Results.
Brandon started working out as an athlete in high school, striving to push his limits and reach his full athletic potential. As he spent more and more time working on his own goals, he found a passion in the science of strength & conditioning, and using that new-found knowledge to help others. Brandon is exceptional at giving his clients the extra push to get stronger in a safe manner, while going above and beyond to making sure they feel comfortable and safe.
February 11, 2021
3 Exercises to Increase Your Push-Ups
Why Push-ups?!
If you’ve ever been in a gym or watched a Rocky movie, you’ve definitely seen someone doing push-ups, and for very good reason. Push-ups not only increase core strength, but shoulder strength, stability, and pressing power of the pectorals and triceps, as well! All without having to load the movement with added resistance, making it more joint-friendly!
In hindsight, push-ups appear like a pretty straightforward thing to do. Simply just lower your body to the floor and push back up, right? Well if you’re one of the countless people who have tried and failed at this, then push-ups can quickly become frustrating, and far more difficult than expected.
Push it to the Next Level
If you’re reading this in hopes of completing your first push-up, then head over and check out our article on how to get your first push-up -CLICK HERE-. BUT, If you’ve already mastered the art of achieving your first push-up, and want to start repping out multiple at a time, you’ve come to the right place!
In this article, I’m giving you my top three exercises to increase your push-ups. Let’s go!
The Exercises
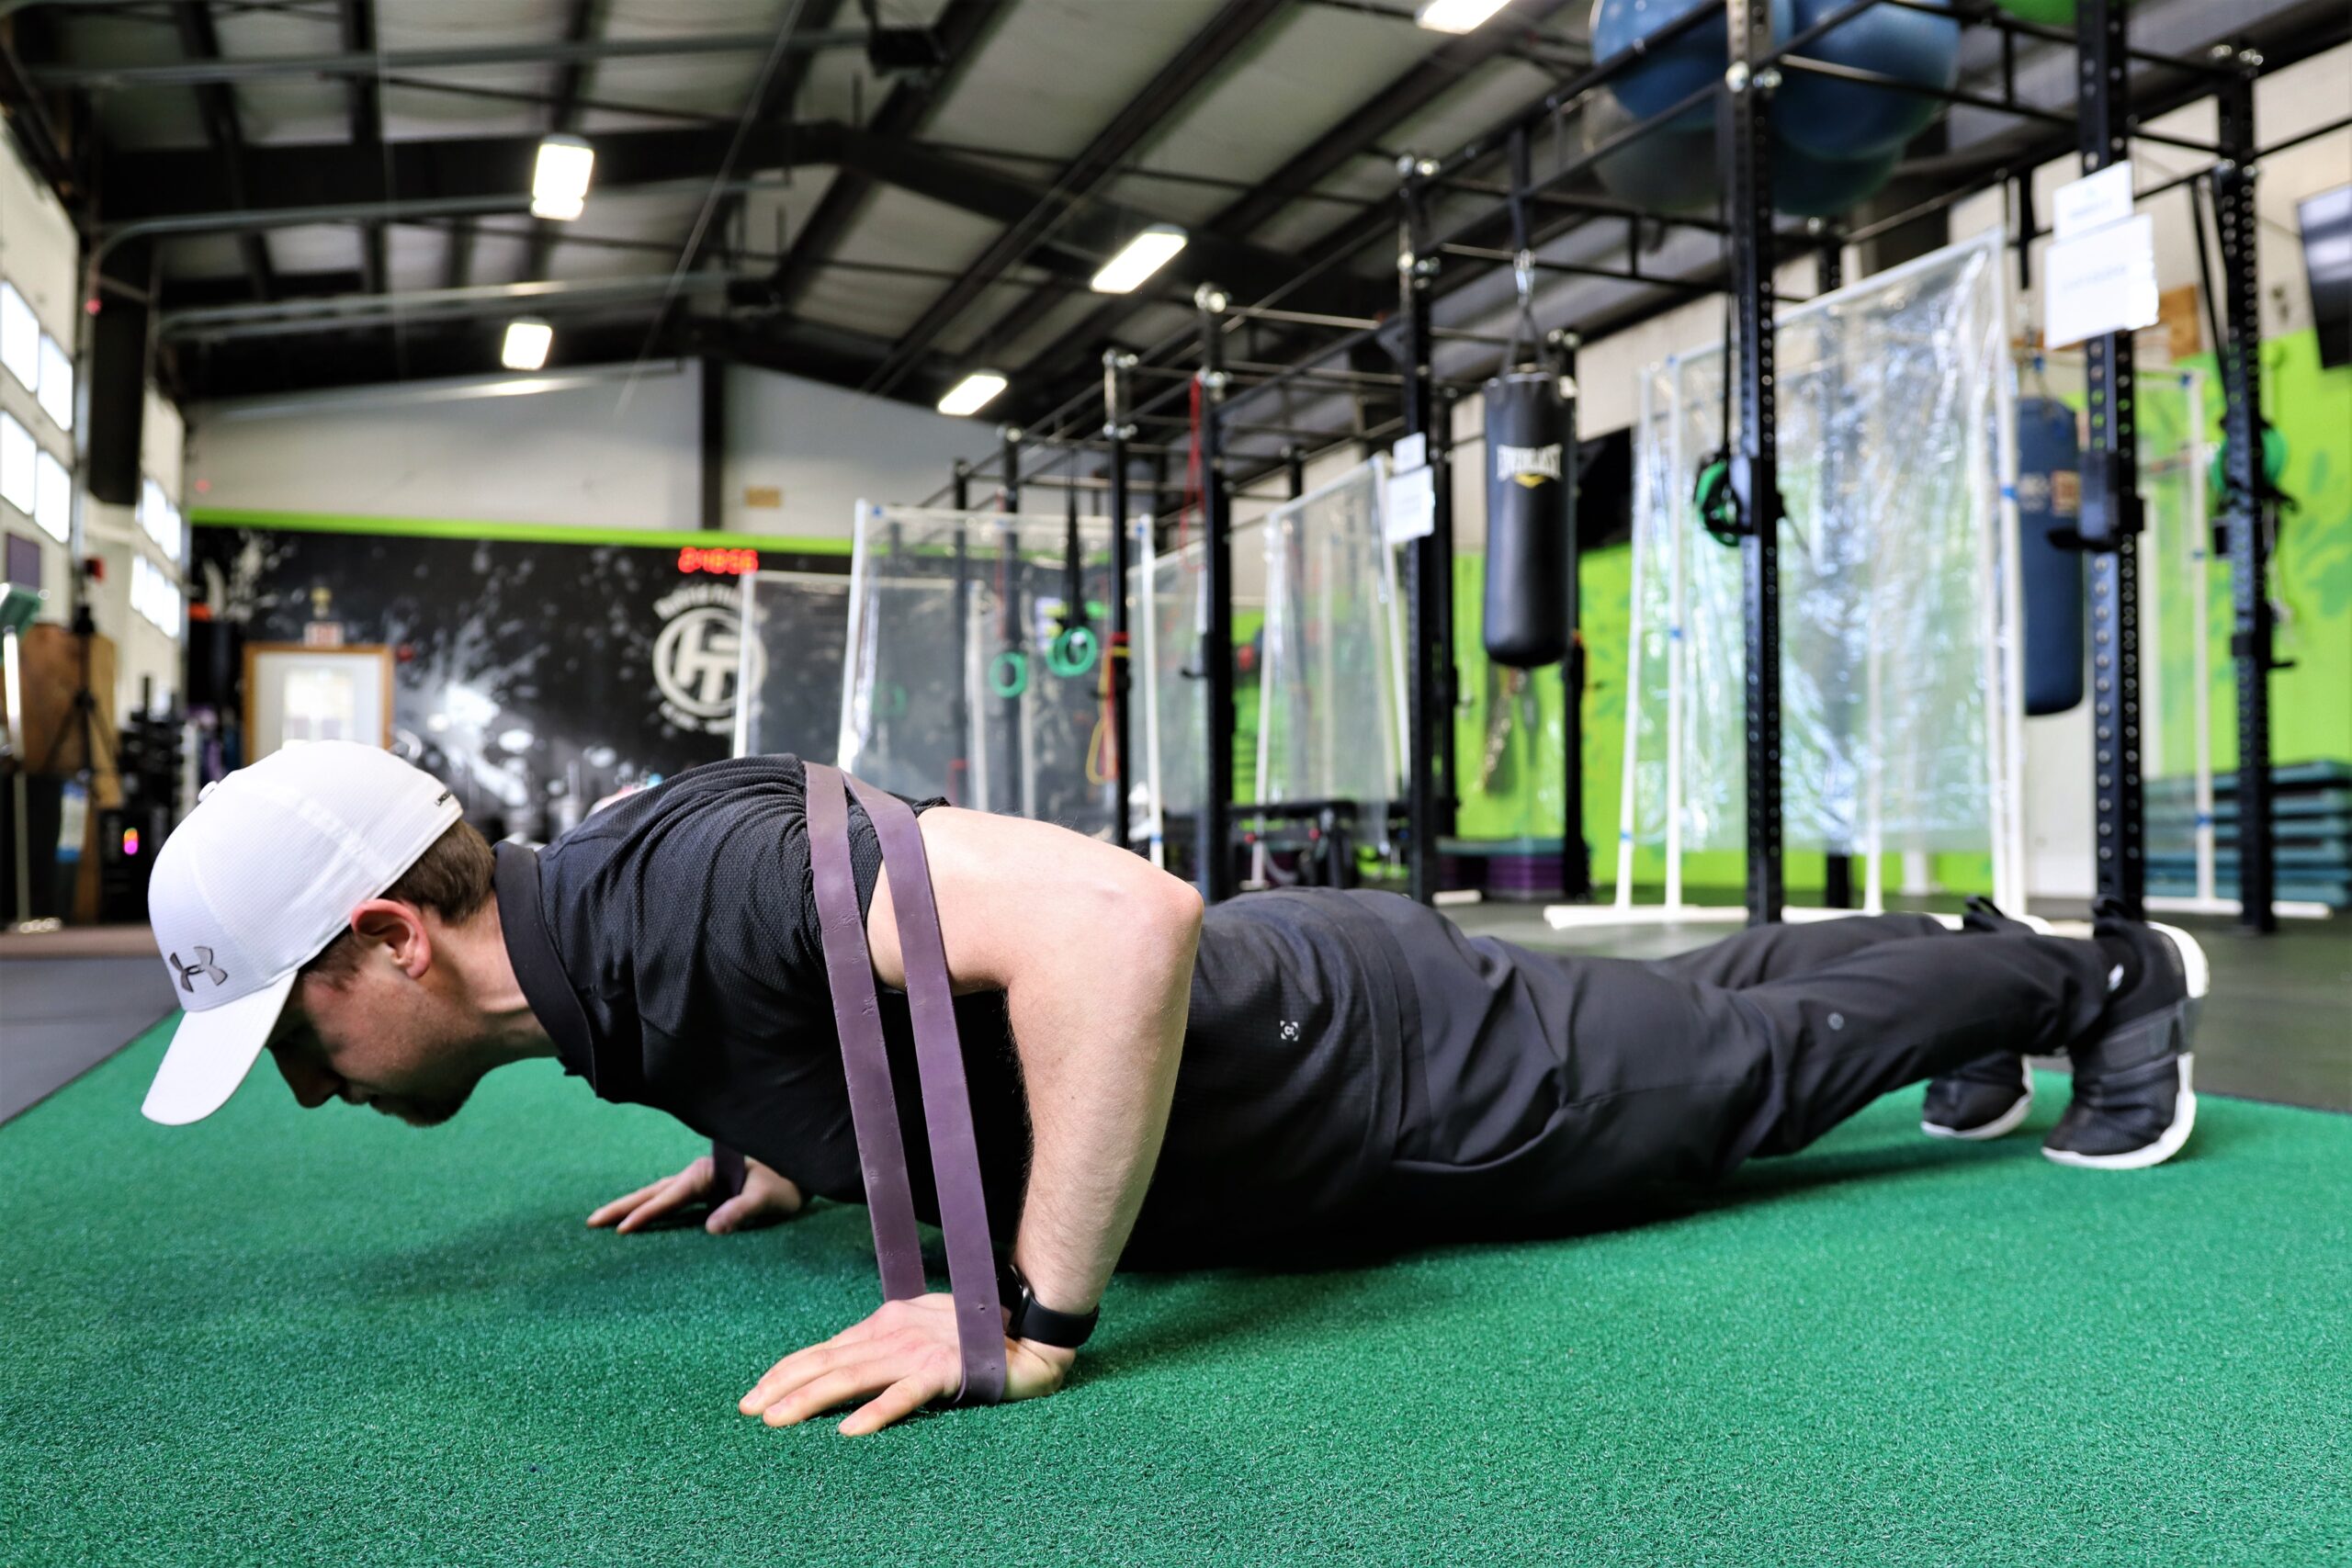
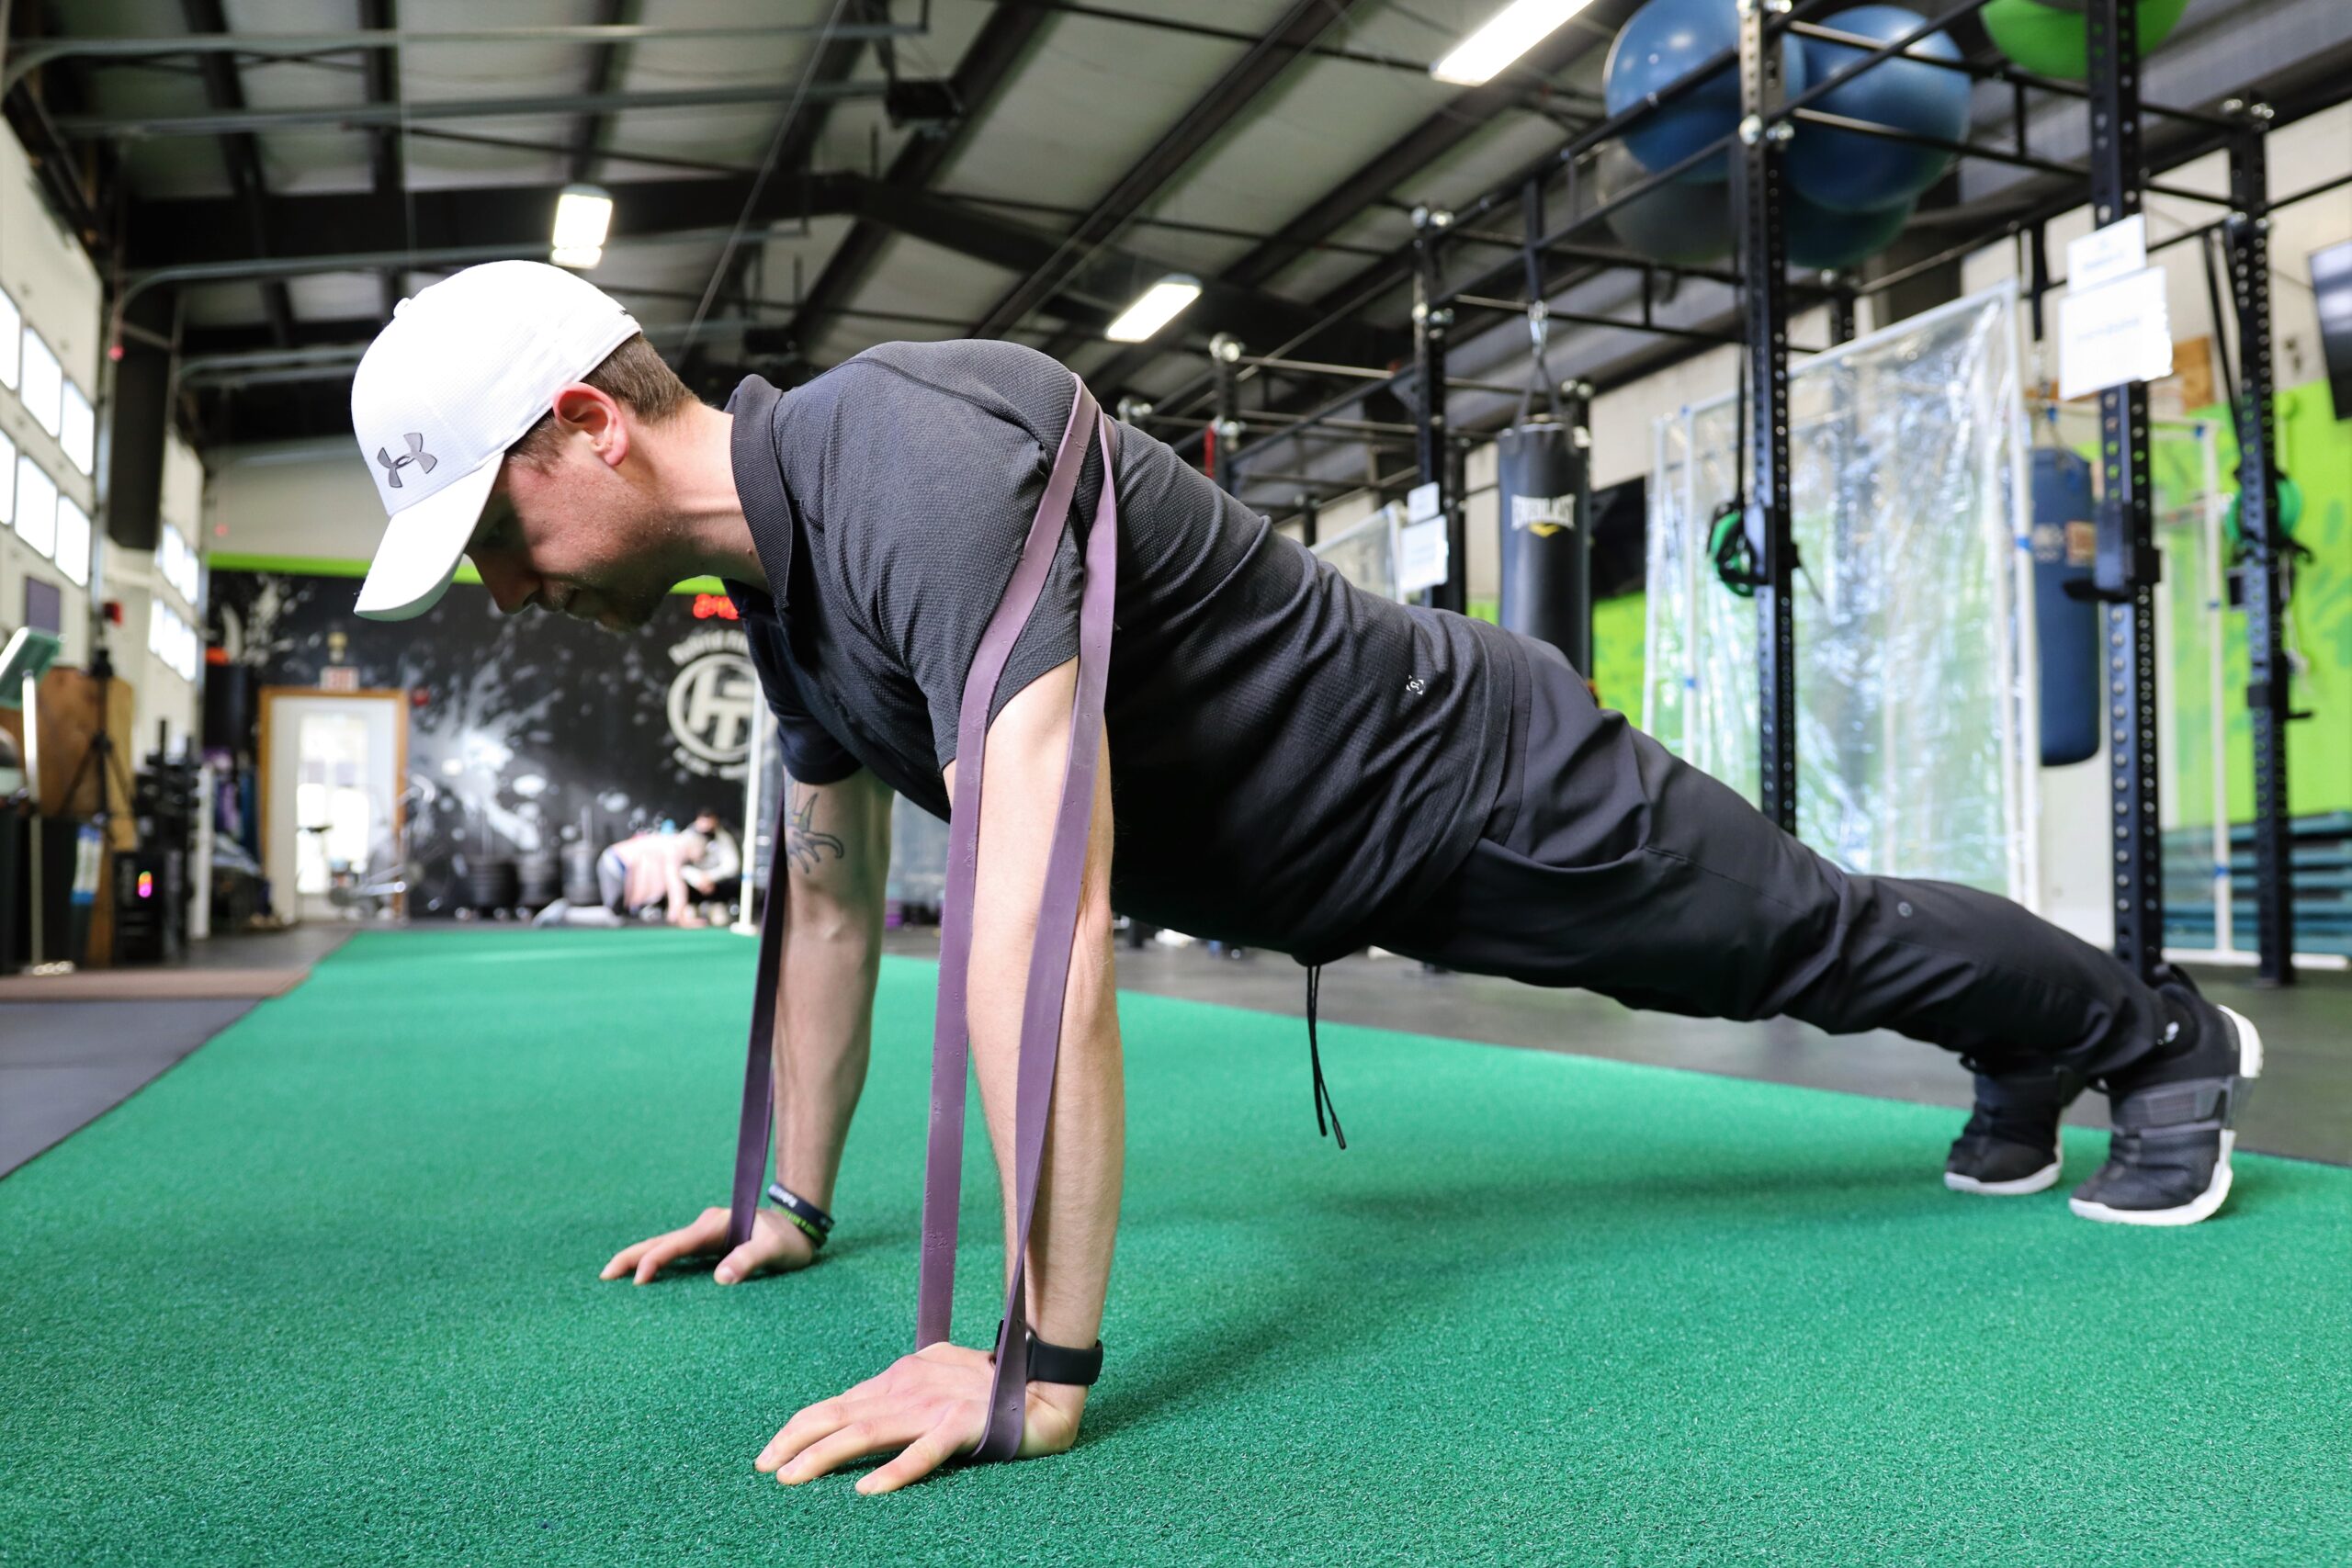
Resistance Band Push-Ups
Another great way to assist push-up production is by adding some resistance to the Push-Ups already being done. To do this simply grab a resistance band with each hand and loop it across your upper back. Then get into the high Plank position and remember these few Push-Up techniques
- Hands are underneath your shoulders
- Body is in a straight line (no sagging in the hips)
- Lower your chest to the floor slowly
- Return to the starting position by pushing yourself back up
To begin, start with a light resistance band and perform as many reps as you can before your form begins to break down. Also, be aware that the added tension across your upper back can cause the lower back and hips to sag quicker once you start to fatigue.
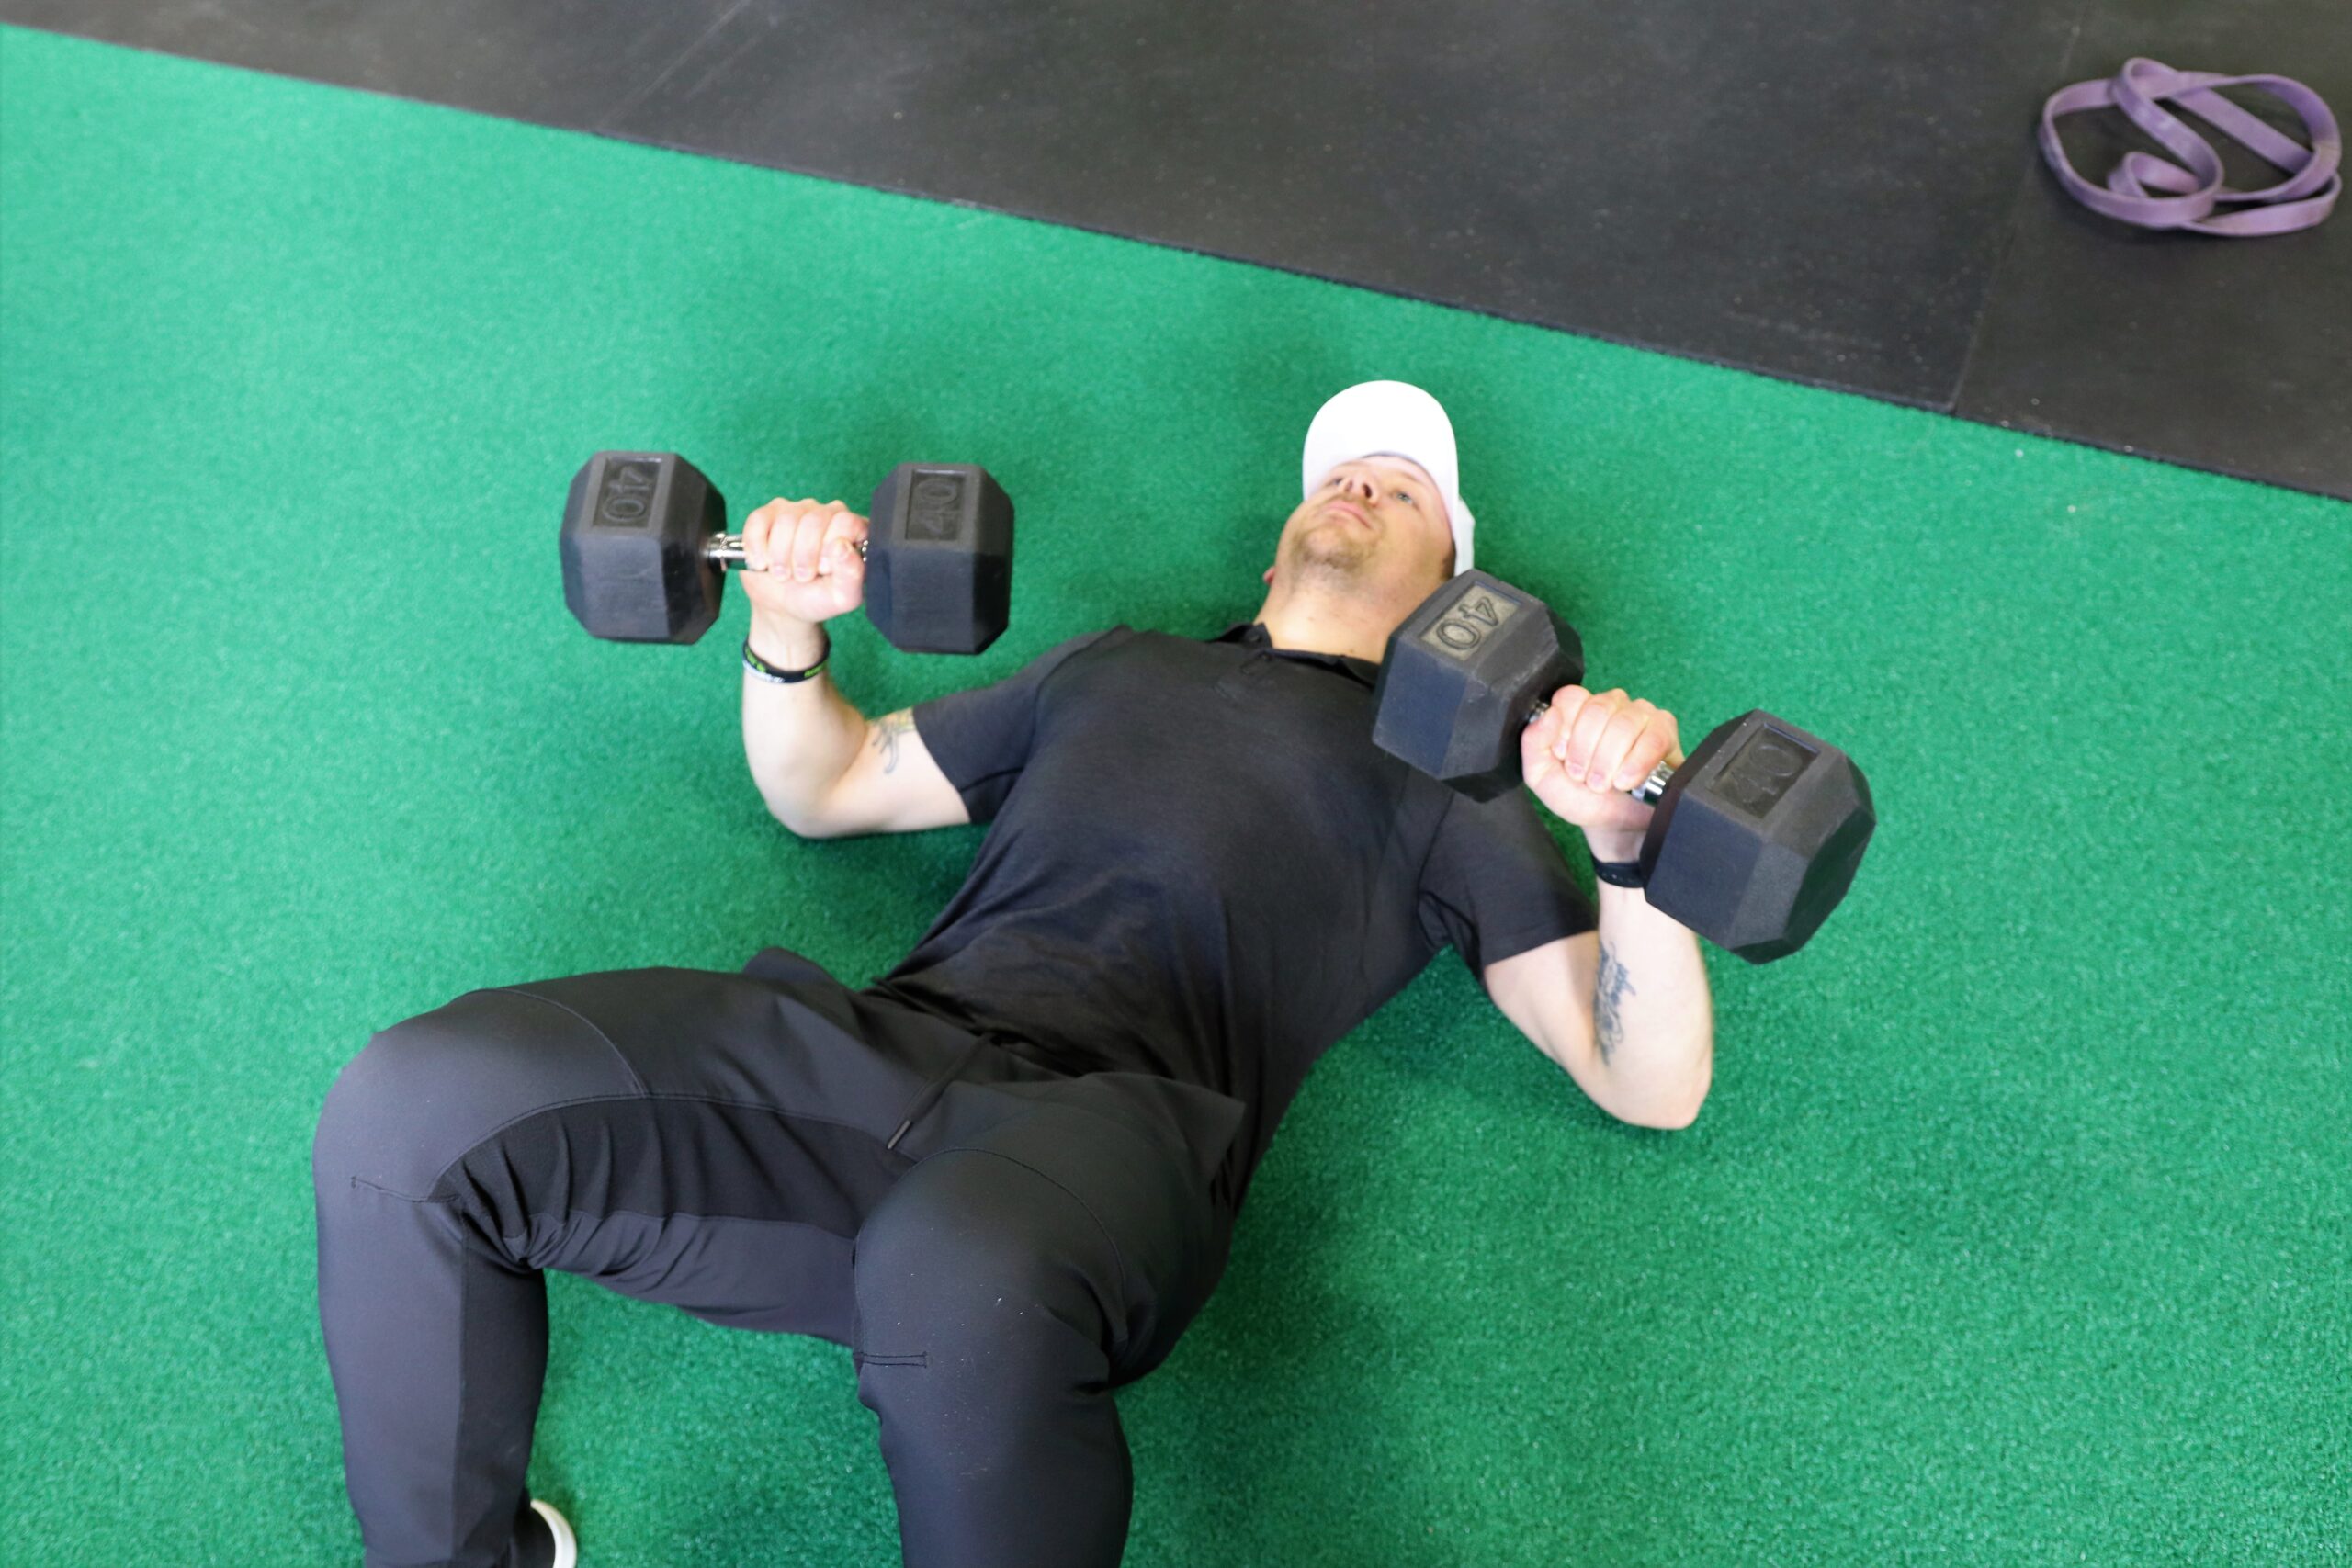
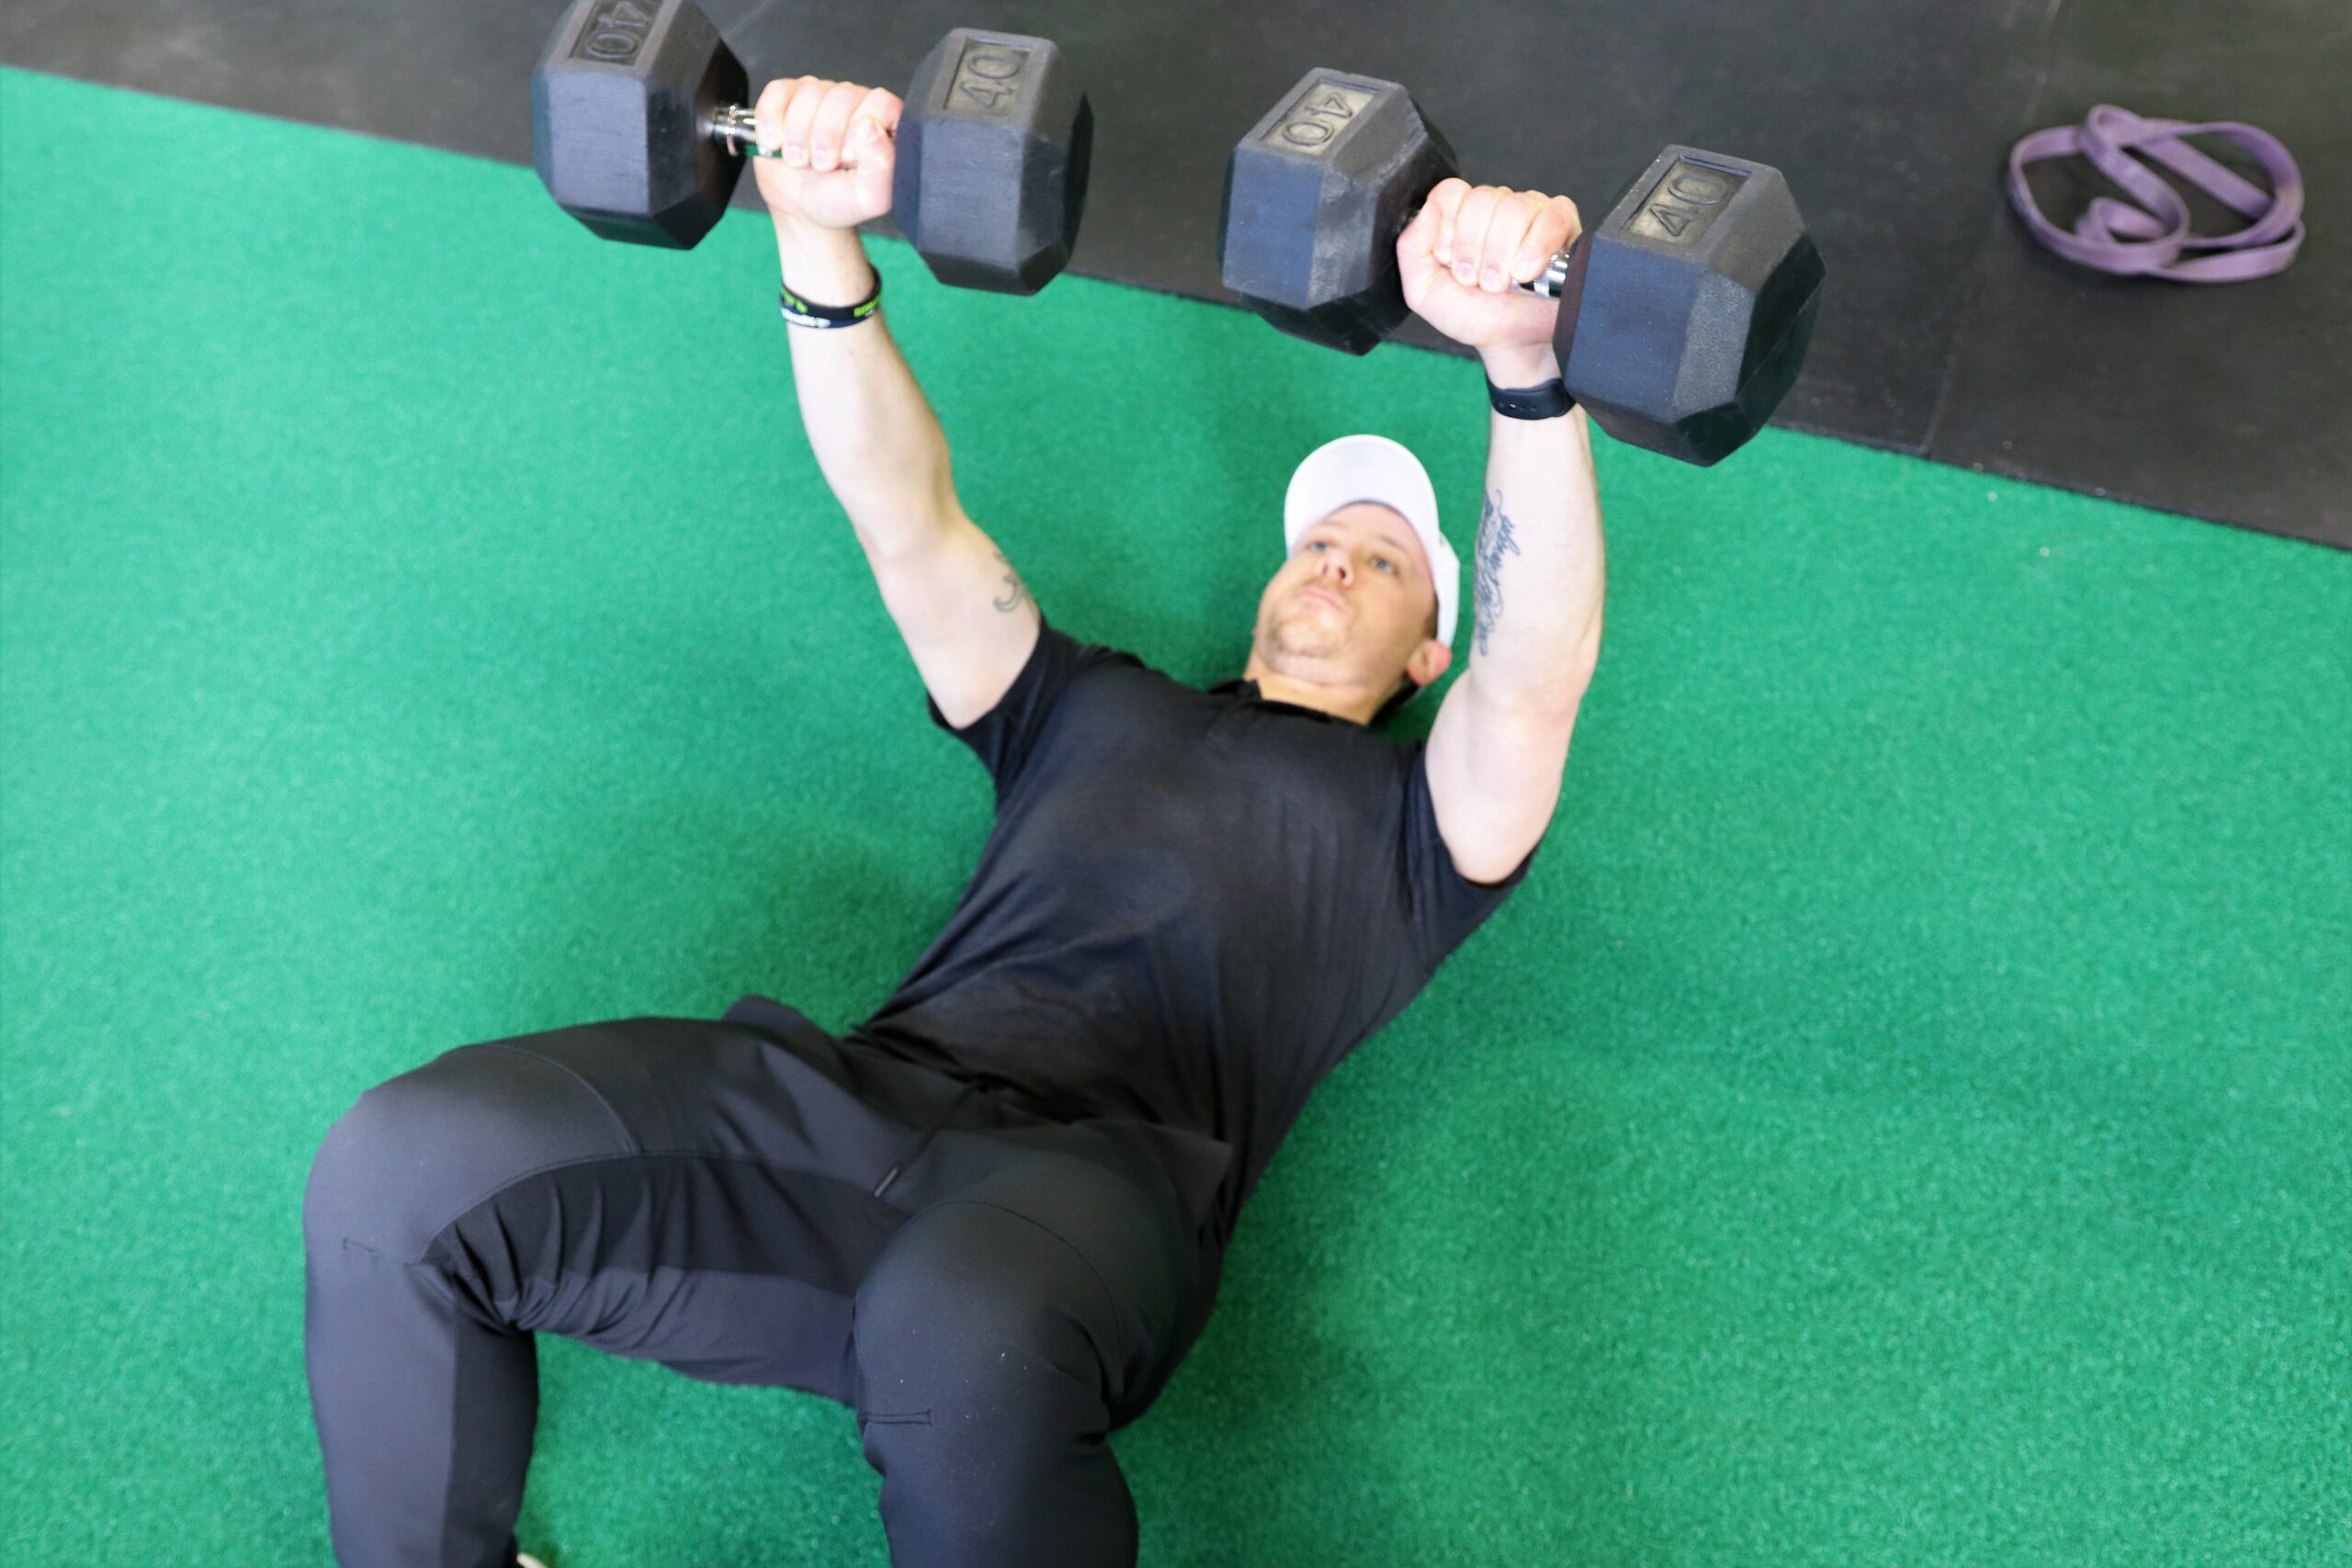
DB Floor Press
DB floor presses are high on my list of not just exercises to help with push-ups, but high on the list for almost any kind of pressing exercises. To do a DB floor press, lay with your back on the floor with a DB in each hand. Then press both DBs towards the ceiling. Lower your elbows back to the floor in a slow and controlled manner. There are a couple things to keep in mind while doing this pressing exercise:
- Keep elbows at a 30-45 degree angle off your body
- Keep shoulders and lower back against the floor
- Inhale on the way down and exhale on the way back up
- Use a weight you can control
This exercise will do a great job at increasing lockout power in the triceps which is where most people will fail on Push-Ups.
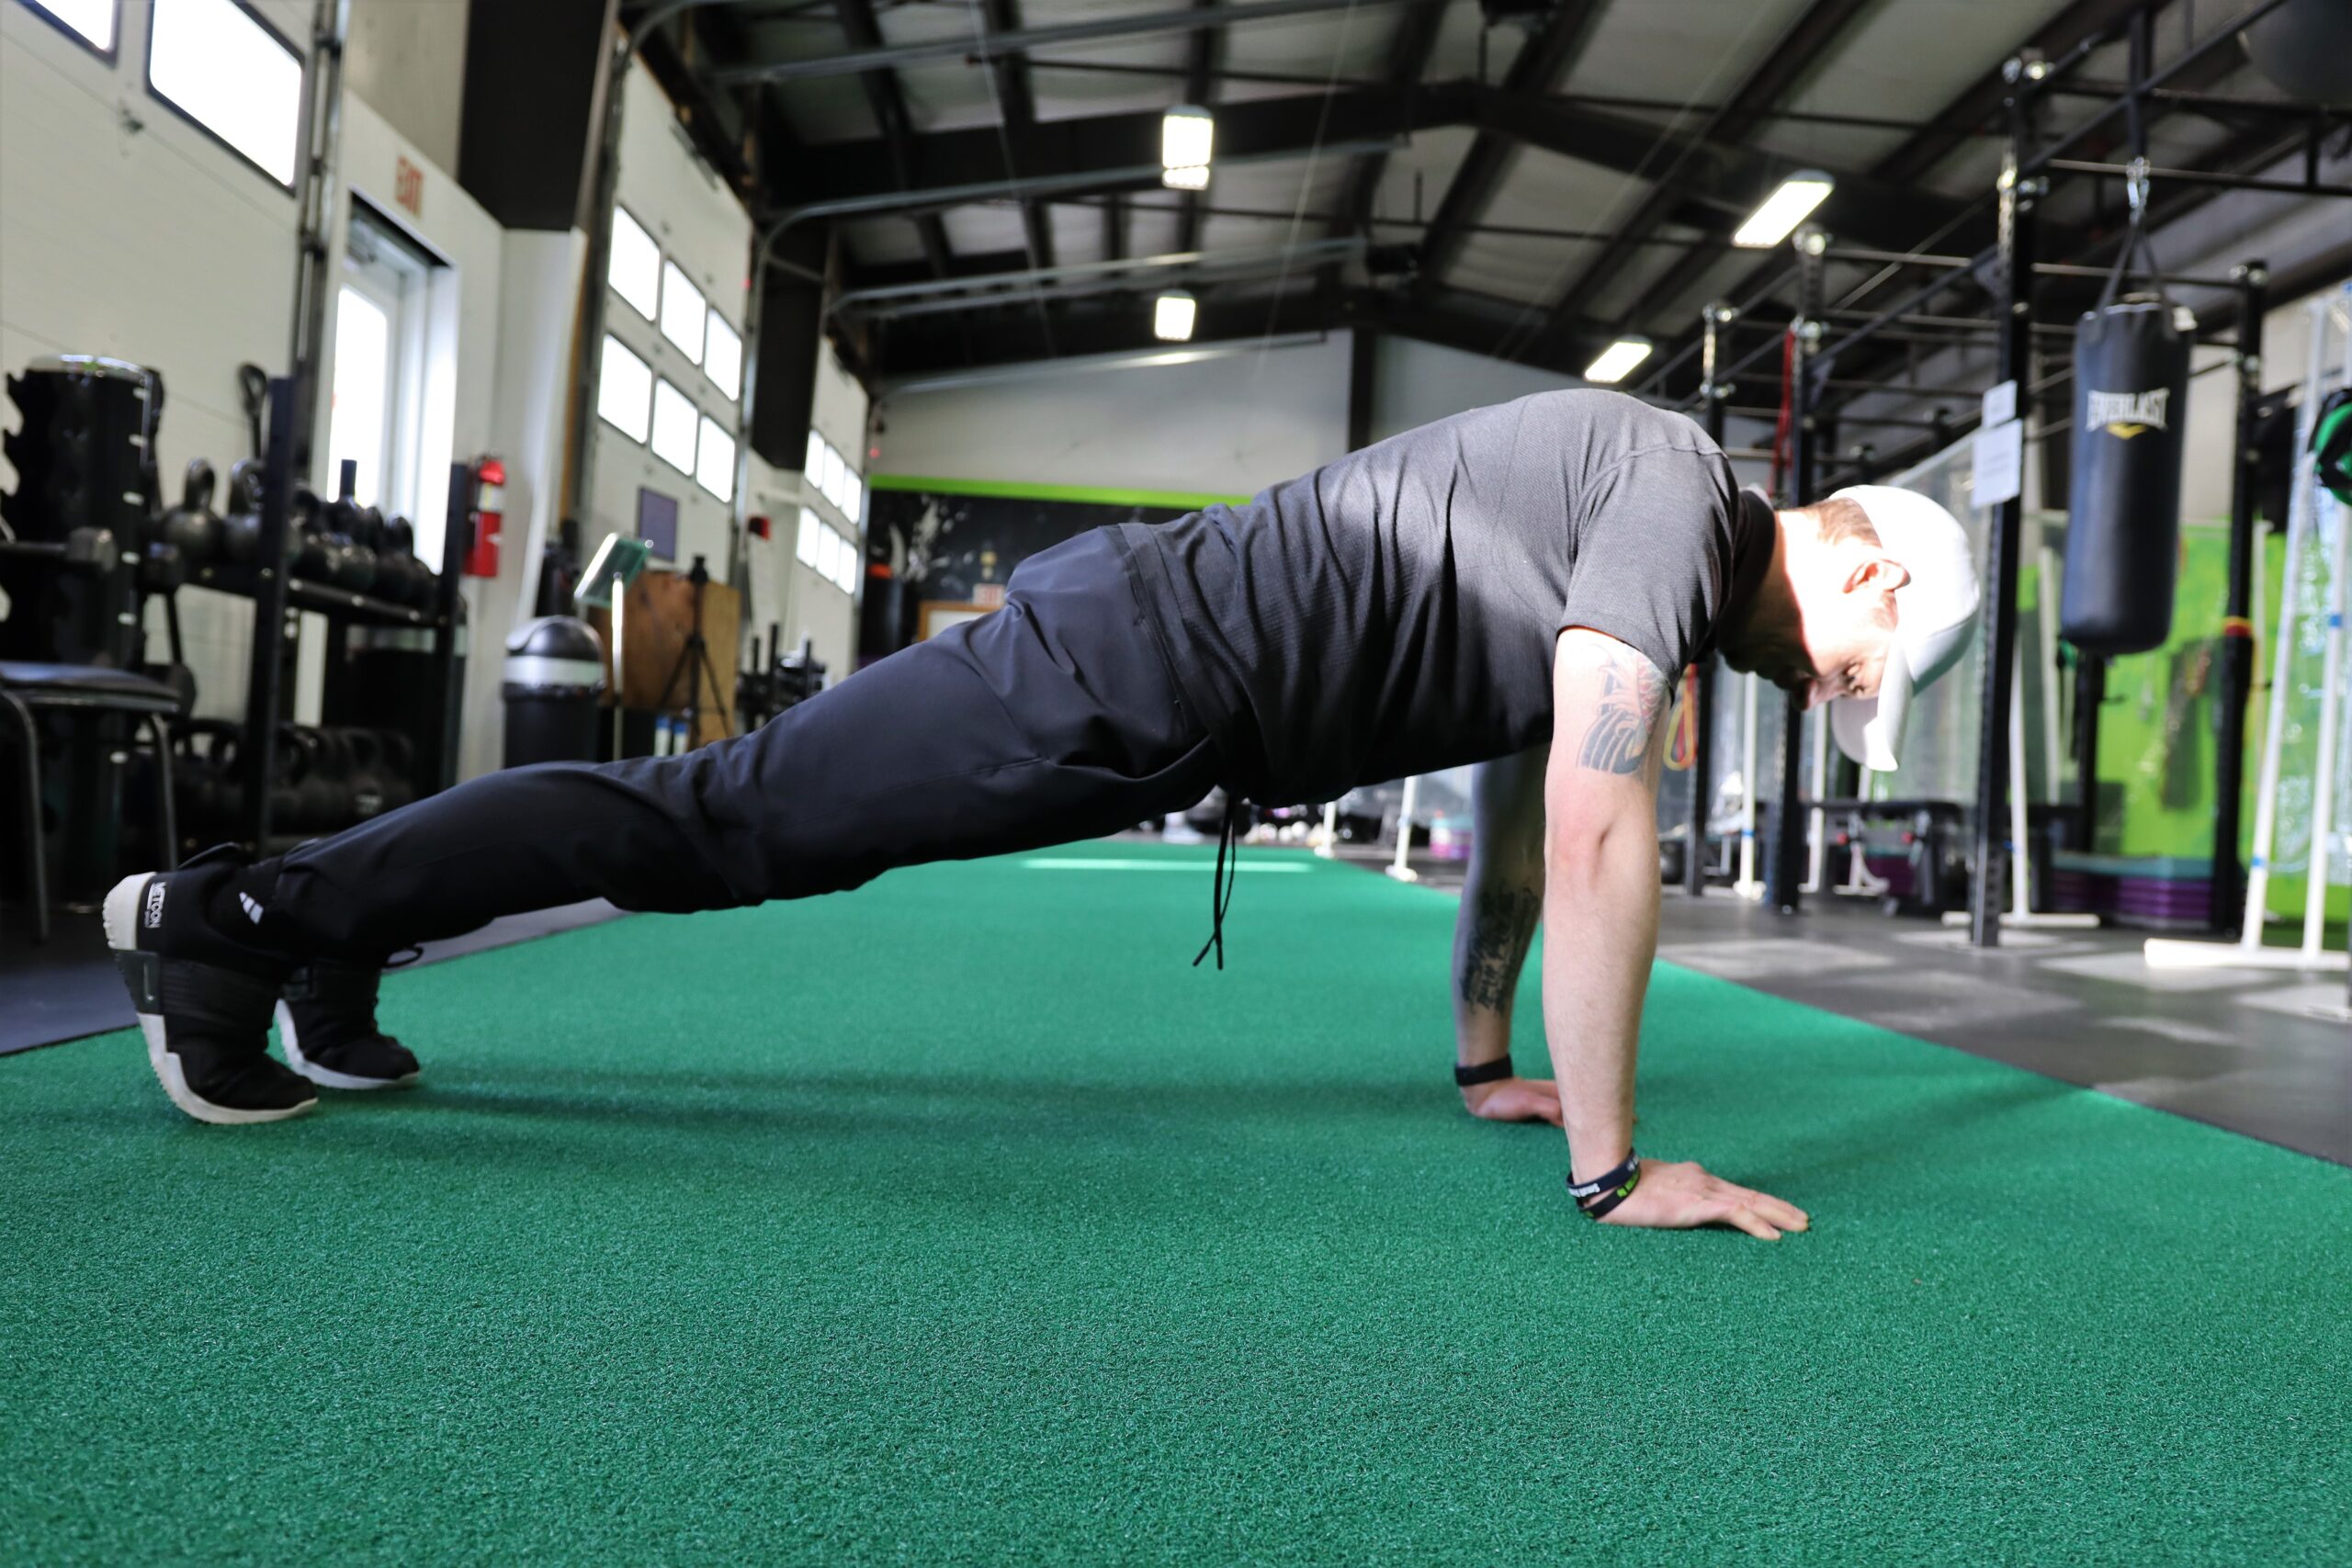
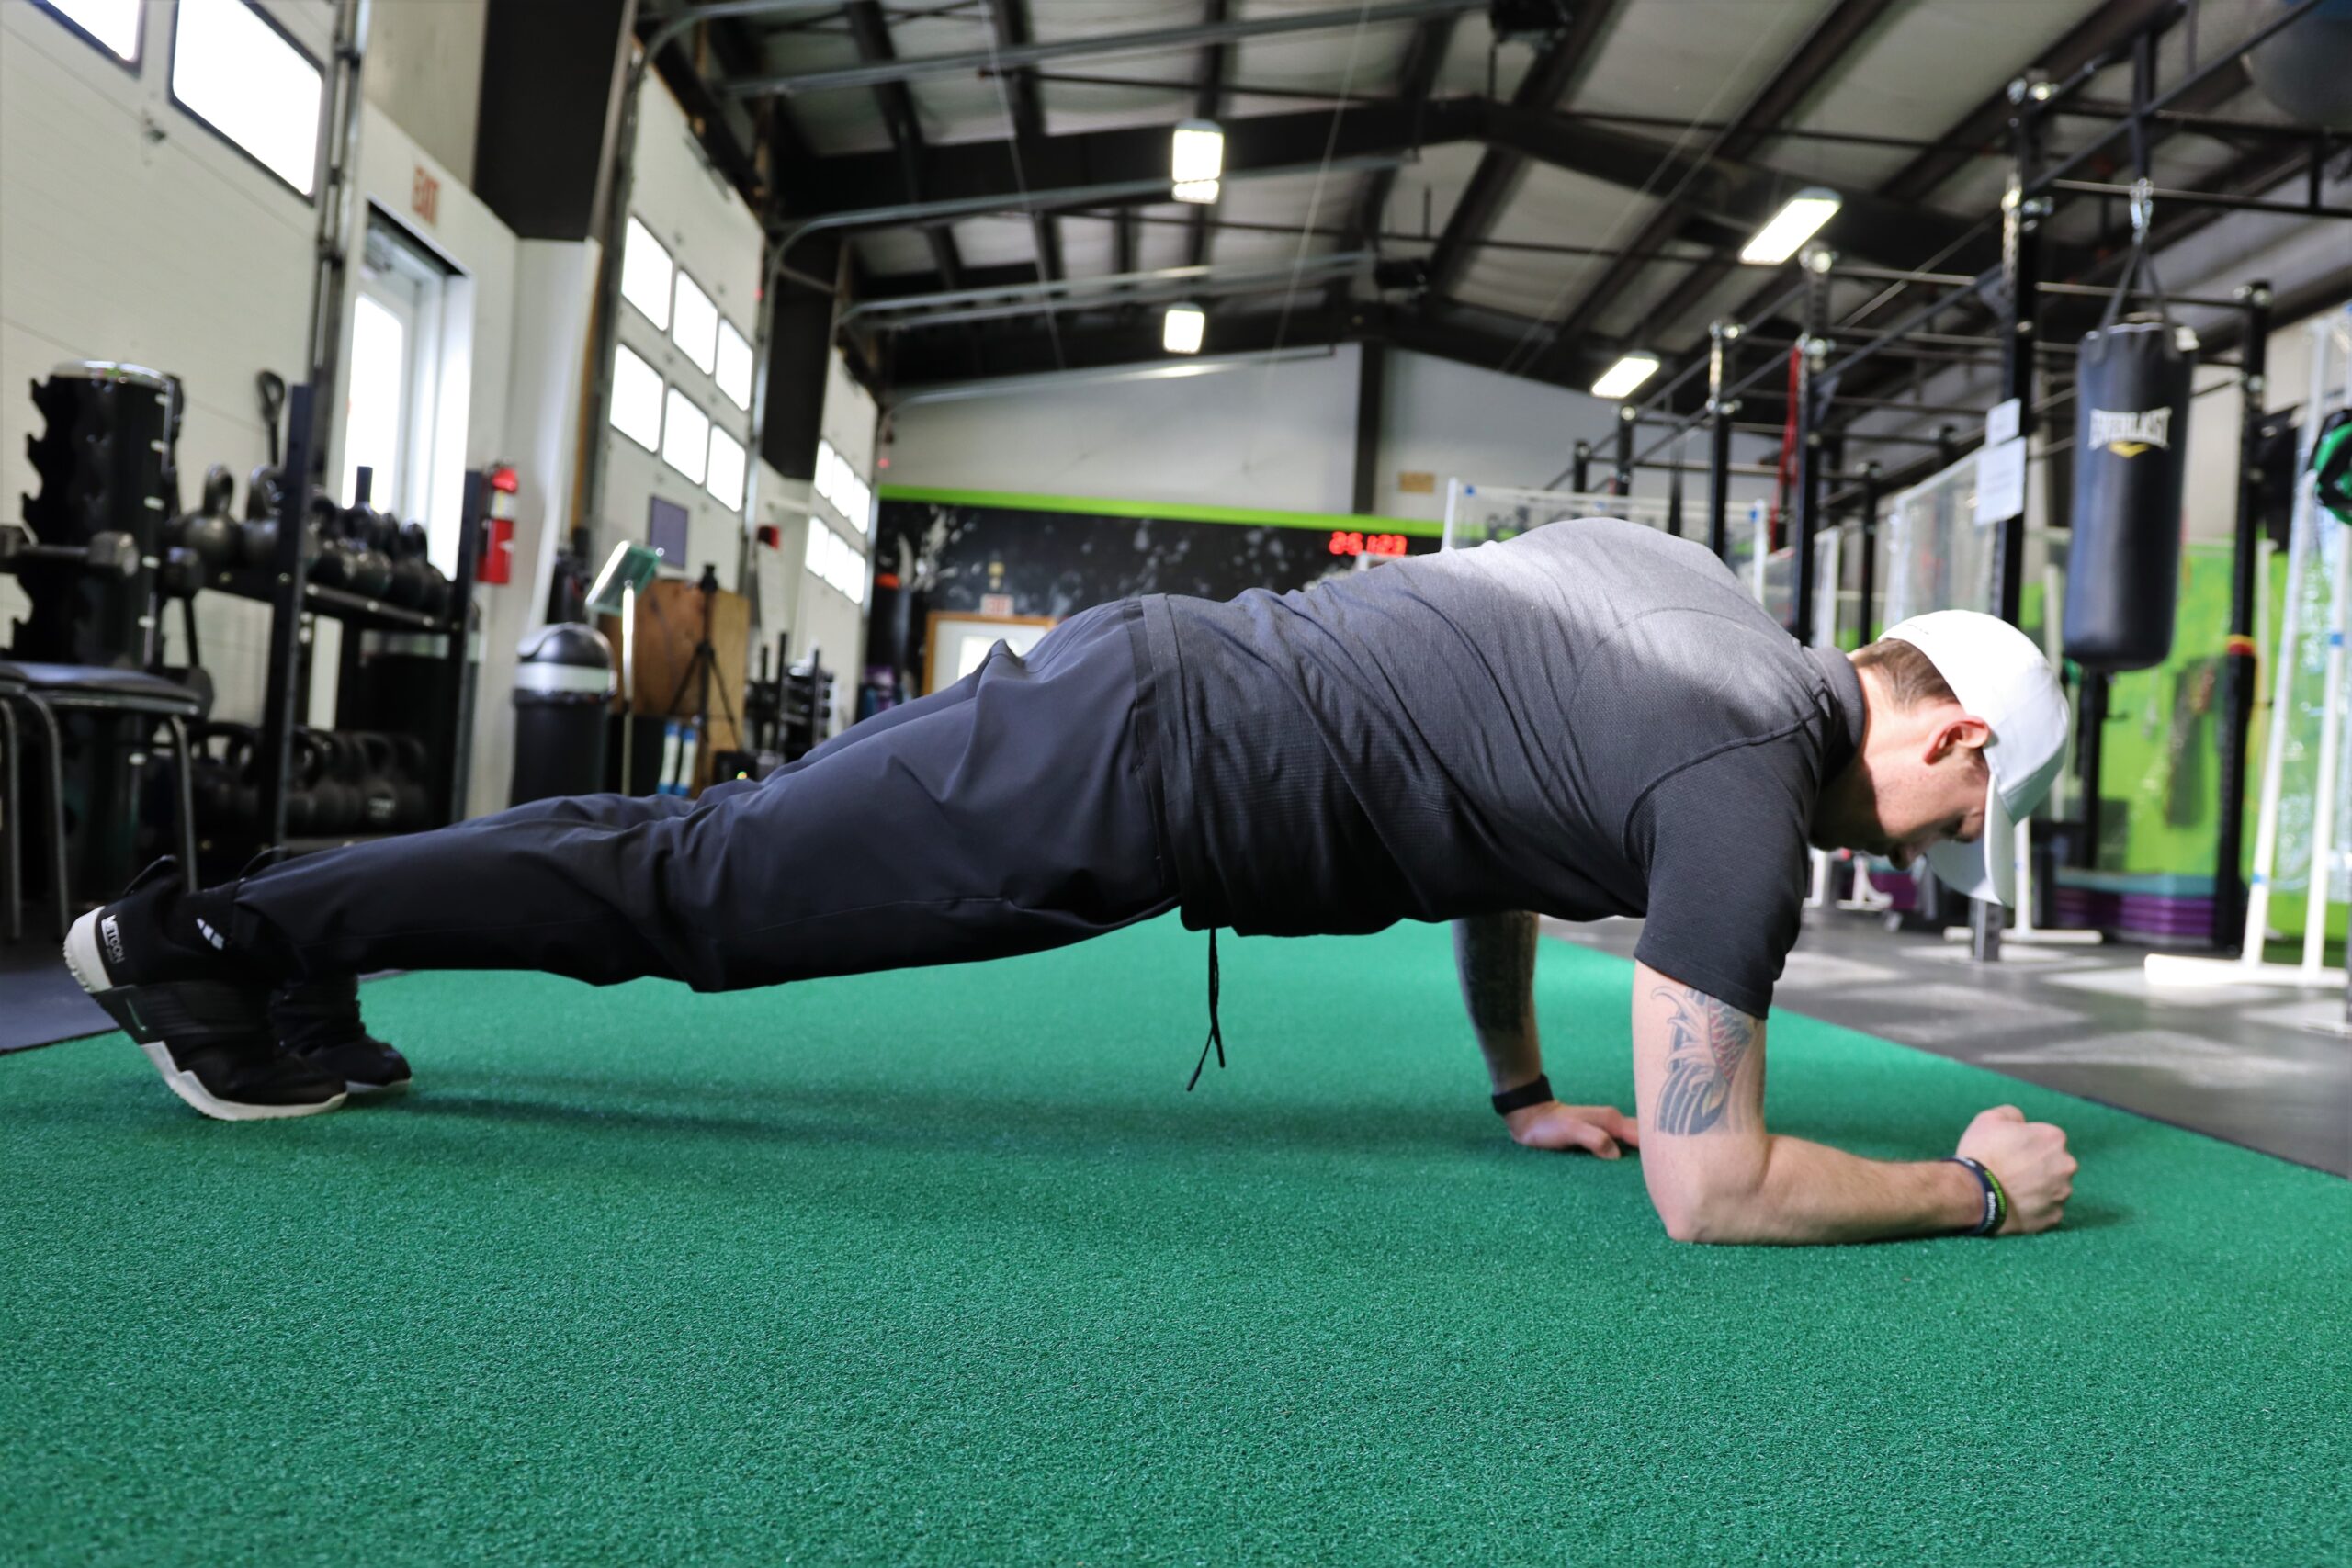
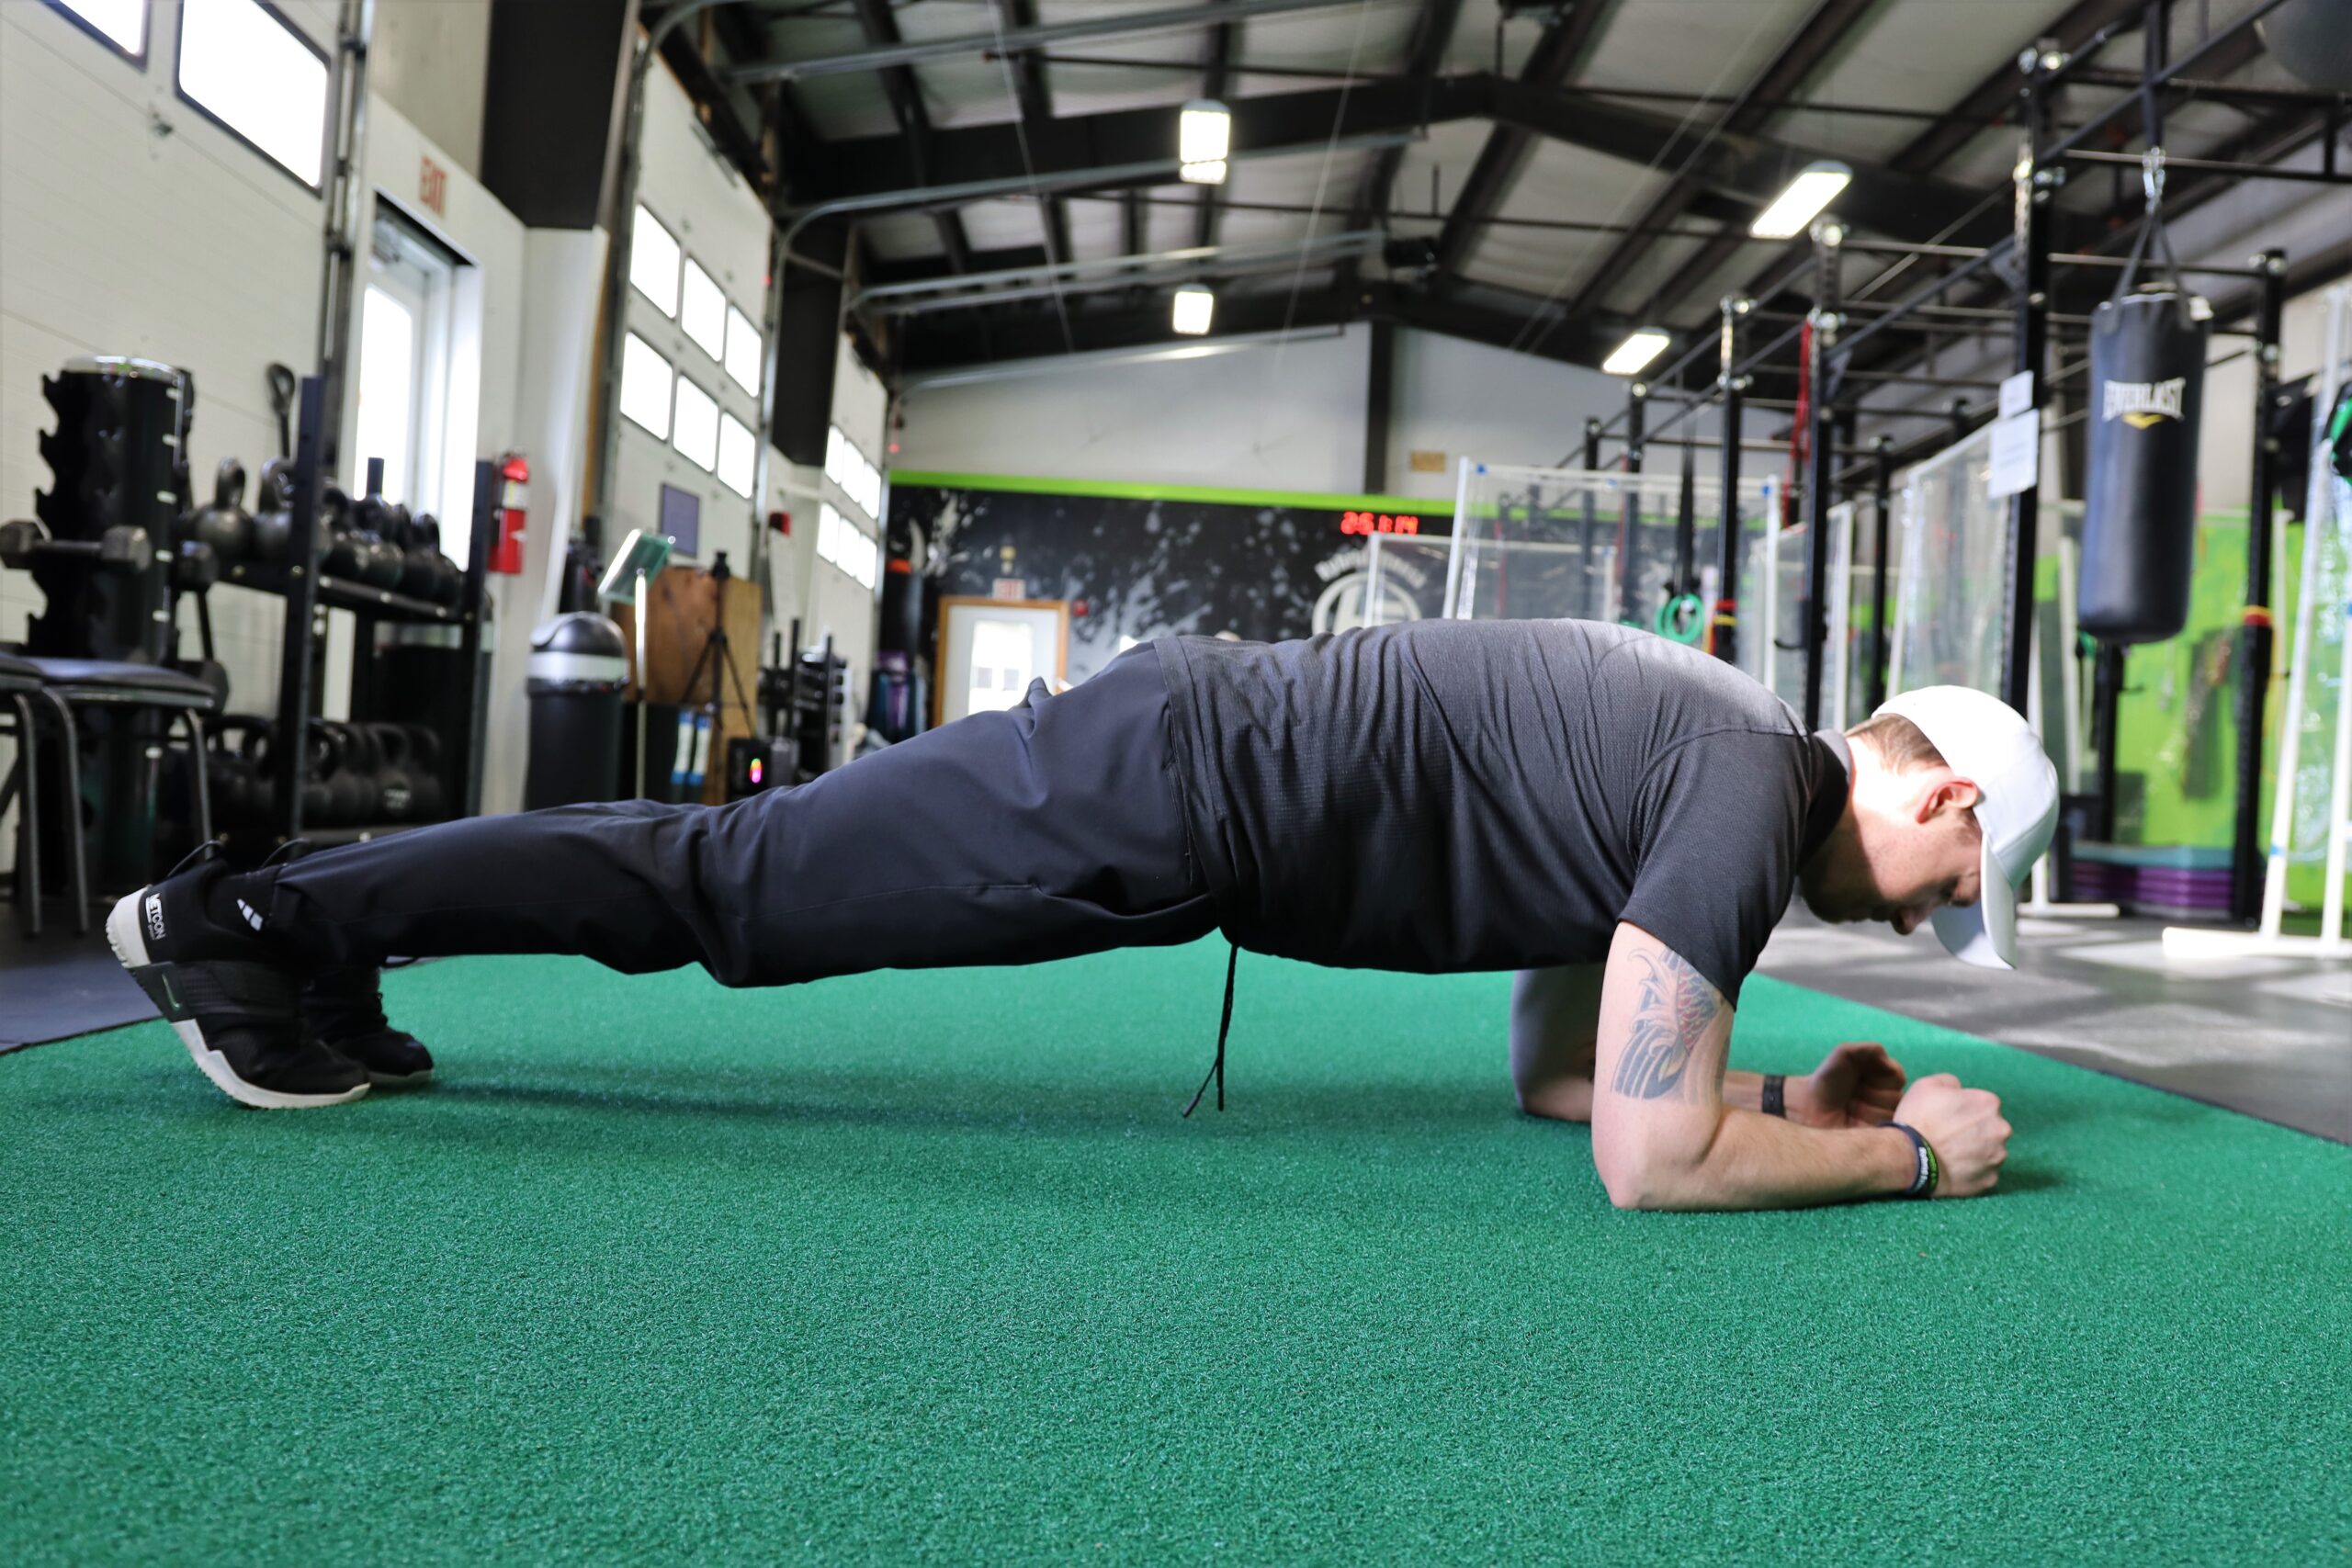
Plank
Something often overlooked when it comes to push-ups is core strength. Having a strong core will help protect your back when doing push-ups. To begin kneel onto the floor and place hands directly underneath your shoulders. Move onto your toes and remember the couple golden rules of planks below:
- Brace your core to keep your hips from sagging towards the floor.
- Keep hands directly underneath your shoulders
- Breathing! Don’t hold your breath. Continue breathing at a controlled rate
Hold this position for 20-30 seconds while starting out. Once you can hold this for a full minute move from being on your hands down onto your forearms and begin again at 20-30 seconds.
Bonus Tip!
To further intensify the plank and further assist your push-up goals, mix in some plank up-downs. To do this start in the high plank position form earlier and slowly lower yourself to the low plank and then return to the high plank by extending one arm at a time. Repeat this as many times as you can before your form begins to digress.
Wrap-Up
Gaining the strength to increase your push-ups can be just as frustrating as getting your very first push-up. The exercises above will assist any push-up goals you may have, but always remember that consistency is key. Get into the gym, stay consistent, and be patient. With determined and consistent effort you WILL improve!
If you enjoyed this article, swing over to our YouTube channel to check out our latest videos here – Hybrid Fitness YouTube Channel
Brandon started working out as an athlete in high school, striving to push his limits and reach his full athletic potential. As he spent more and more time working on his own goals, he found a passion in the science of strength & conditioning, and using that new-found knowledge to help others. Brandon is exceptional at giving his clients the extra push to get stronger in a safe manner, while going above and beyond to making sure they feel comfortable and safe.
January 25, 2021
How To Get Your First Pull-Up: A Step-By-Step Guide
The pull-up has long been one of the main lifts in regards to testing pound for pound strength. But, getting to the point of being able to do a pull-up can be a very long, and grueling road. The pull-up had once been explained to me as just grabbing the bar and simply pulling myself up. Sounds simple and easy, right? Well it’s not. There’s much more that goes into obtaining your first pull-up. Follow the step-by-step guide on how to get your first pull-up below, and you’ll be repping them out before you know it!
Nutrition

Before we step into the gym, we need to get into the kitchen. The path to your first pull-up starts here. The heavier a person is, the harder it’s going to be for that person to perform a pull-up. Getting control of yourself here is the make or break moment for people with a goal of pull-ups. You will never train hard enough to overcome poor eating habits. If you’ve already overcome this stage and nutrition is not an issue, then wonderful, it’s time to hit the gym.
Rows
Rows are a great way to start building the muscle and strength needed to achieve your first pull-up, and luckily there are multiple rows at your disposal to achieve this. Below is a list of rows, and the order in which I would suggest progressing through them.
The 3-Point Row
The first row I would suggest is the 3-point row. This is a great way to start building the muscle and strength that will be needed later on. It also provides a little more stability for the back for beginners who may have lower back issues. To perform this row, follow the checklist below:
- Stand with feet shoulder width apart
- Lean forward placing one hand on a flat surface while keeping a straight back
- Grab a dumbbell/kettlebell with the opposite hand
- Pull the weight up to your side, while keeping your elbows in close to the body
- Slowly return to the starting position
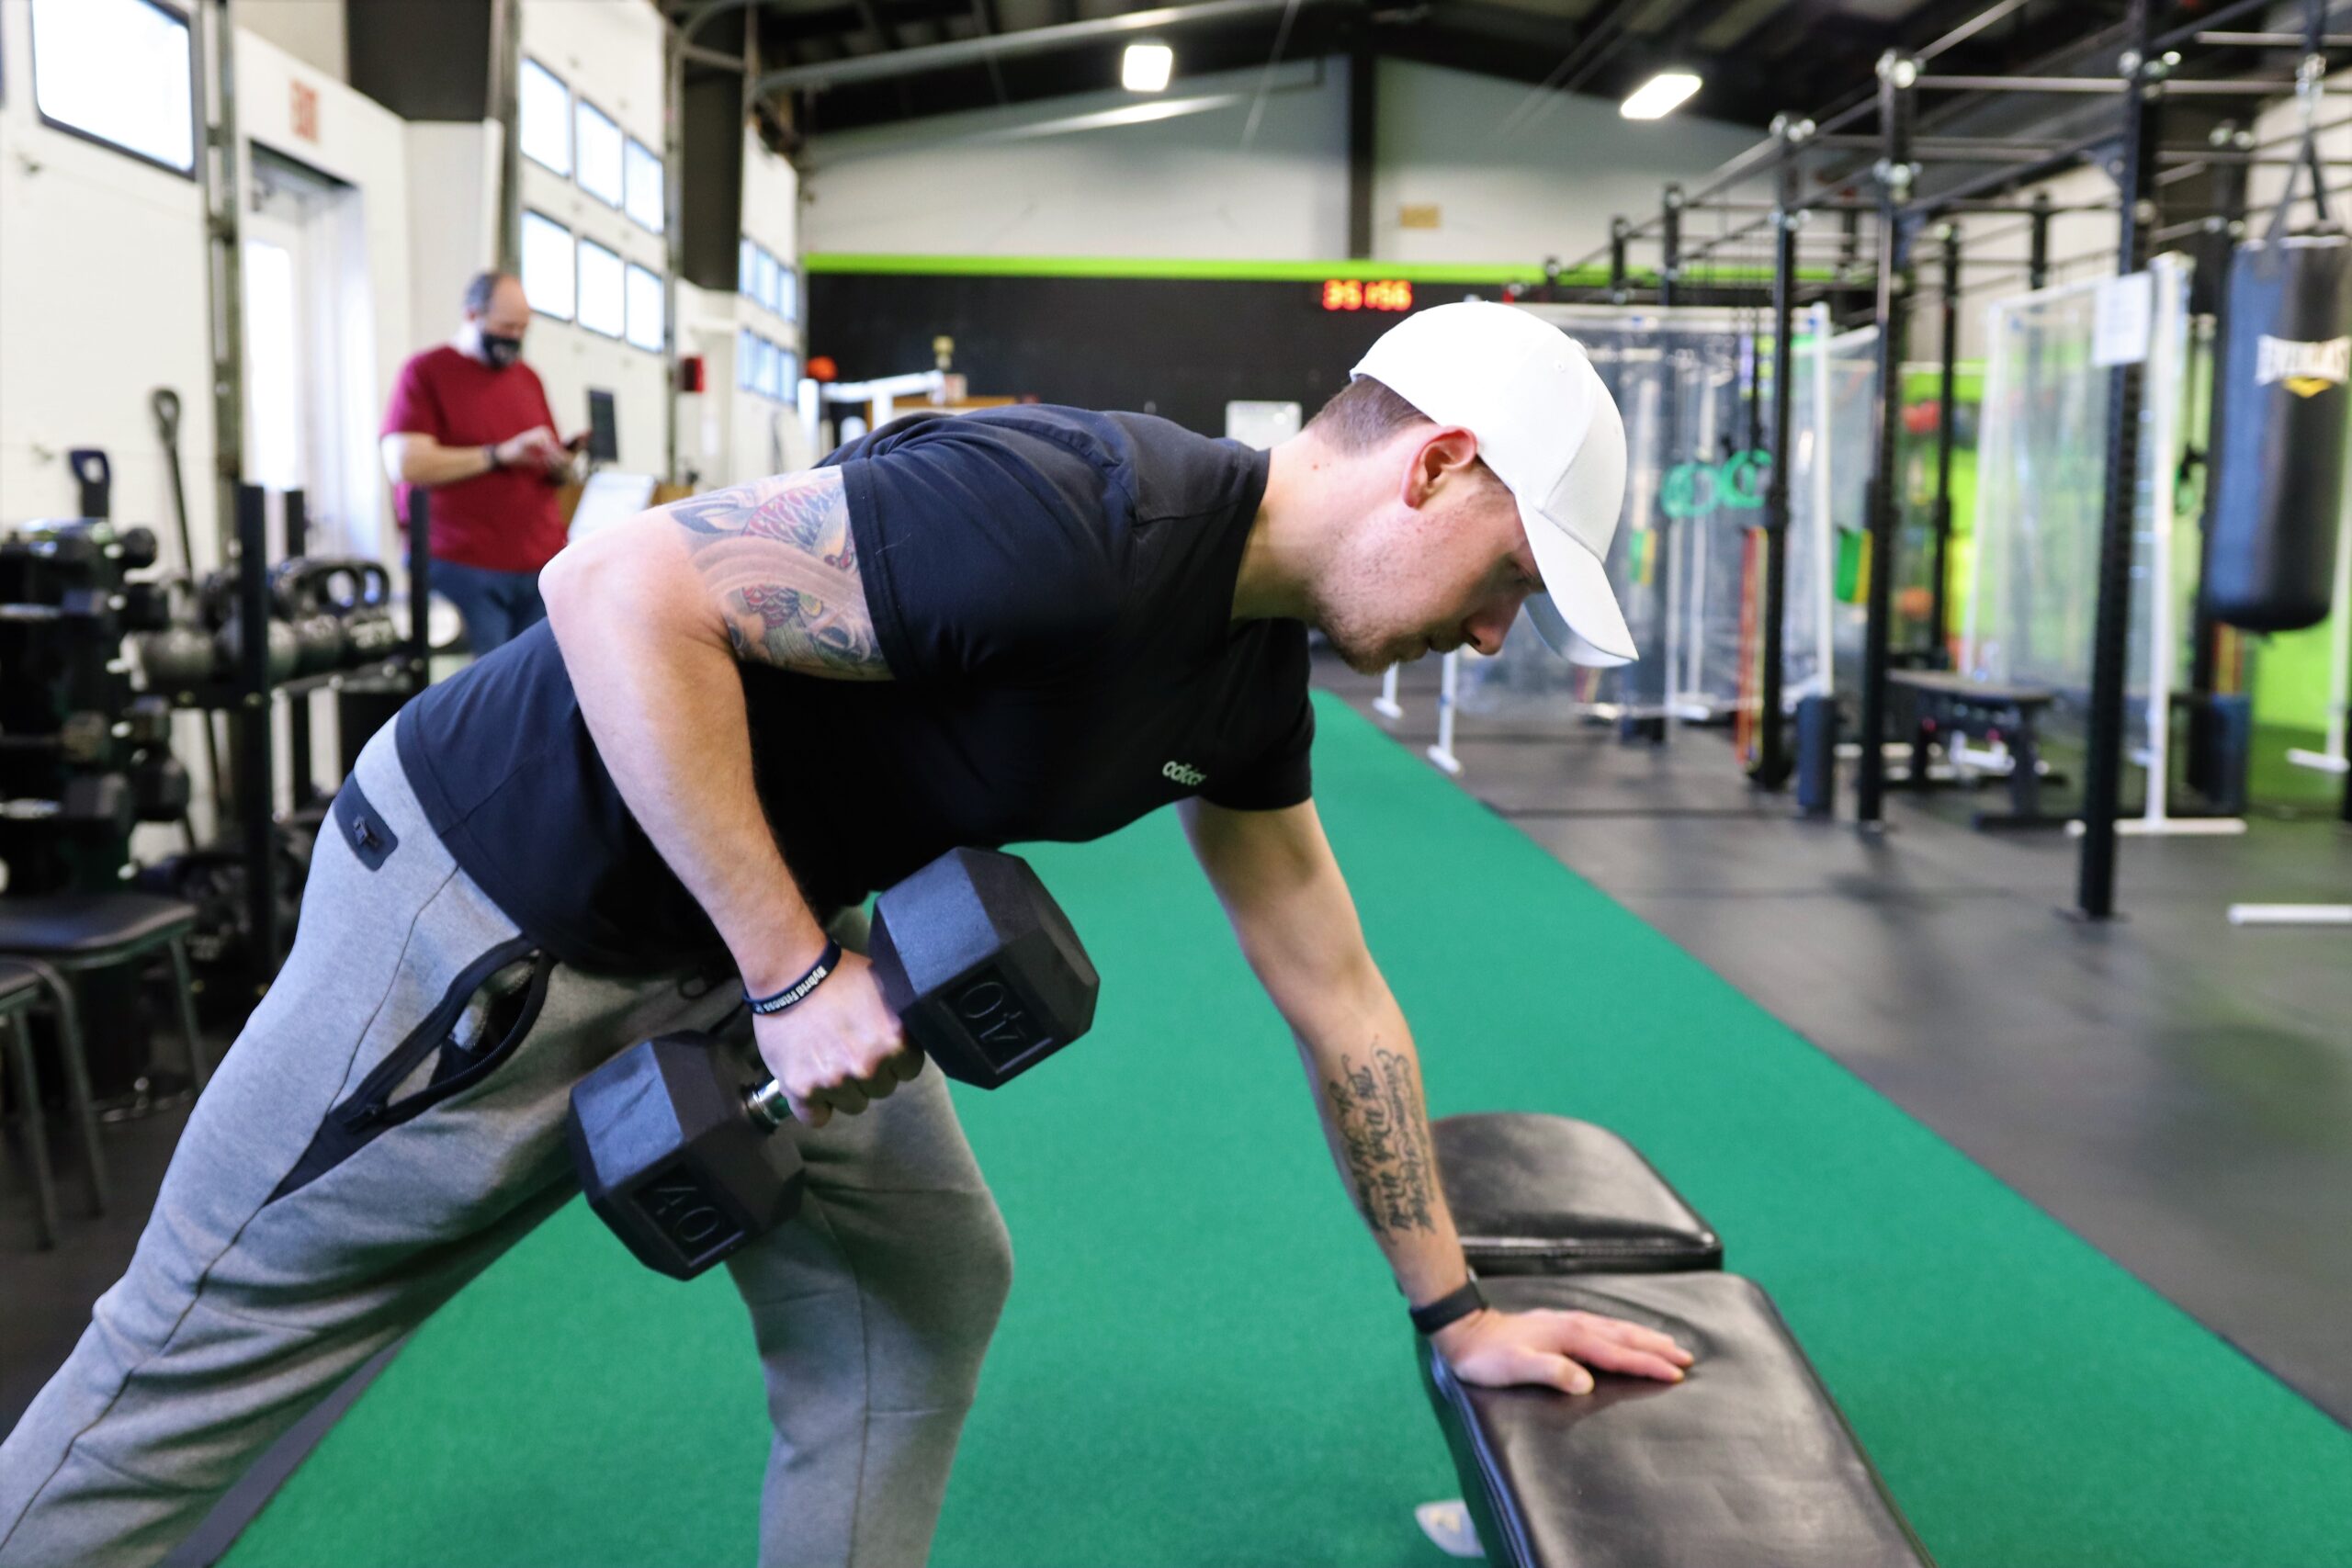
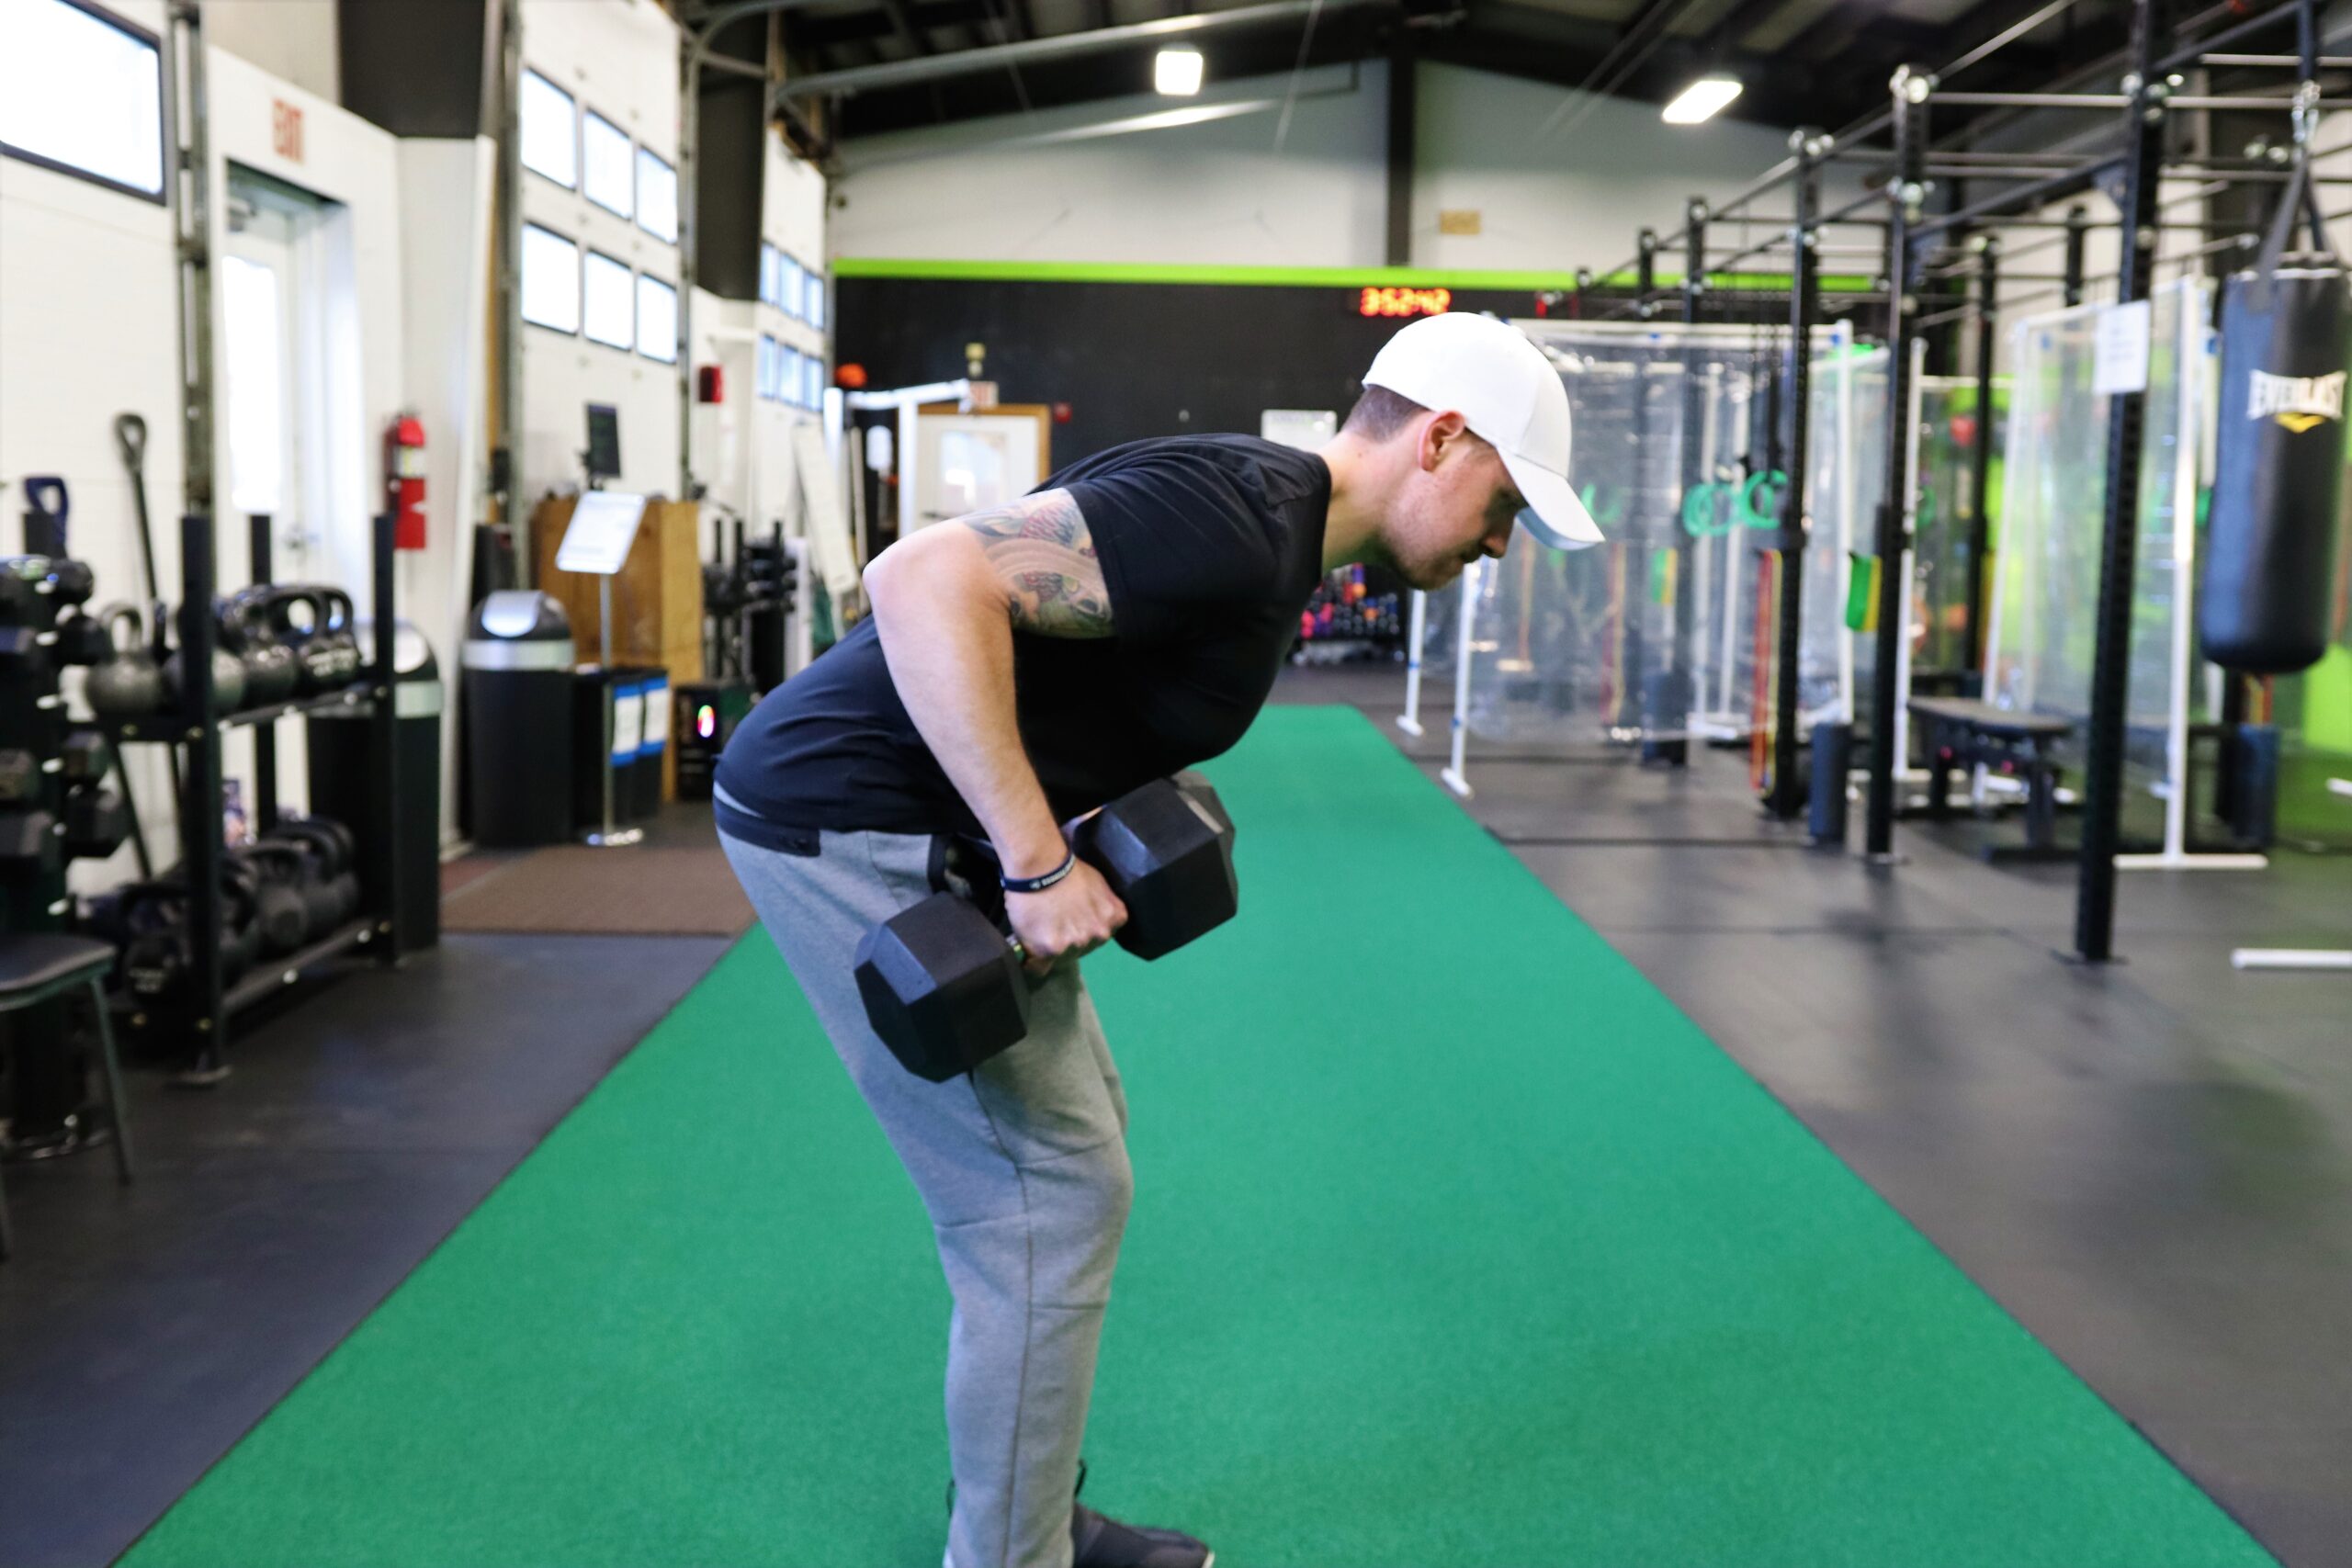
DB Bent-Over Row
After you’ve gained some strength and have learned how to control your body while under load in the bent over position, it’s time to remove the surface that your hand was using as support. By doing this we’ll be able to start building strength and support in the lower back. Follow these steps:
- Stand with feet shoulder width apart
- Lean forward, this time grab a dumbbell/kettlebell in both hands
- Pull the weight up to your side while keep elbows in close
- Slowly return to the starting position
Bodyweight Row
For bodyweight rows, you can use either a barbell set up on j-hooks attached to a squat rack, or some type of suspension trainer (rings for example). Whichever you decide to use, the set up will be close to the same. Start by laying on the floor underneath the bar or suspension trainer. From here, reach up and grab whichever you are using with your grip wider than shoulder width. Continue through with this checklist:
- Pull yourself up onto your heels
- Back and hips are straight, with no sagging
- Shoulders are braced

Once you are ready, start pulling your body to either the bar or the rings while keeping your elbows in close. Before moving on from the bodyweight rows make sure you can perform multiple sets and 10-12 reps
Pull-Ups
After progressing through the different variations of rows, it’s time to move on to the next step! Achieving that pull-up still may be a little out of reach, so in order to replicate the motion we’re going to go through some regressions of the pull-up. Doing so will give you the upper hand in reaching the strength needed to reach the ultimate goal of getting your first pull-up. Let’s go!
Assisted Pull-Ups
After you can successfully complete multiple sets of 10-12, full range of motion bodyweight rows, it’s time to advance to the pull-up bar. BUT, we still have a couple steps before we advance to full pull-ups. As we begin on the pull-up bar, we will start with a band assisted pull-up. Wrap a band through the pull-up bar so that it is dangling in front of you. Stretch it down and place one or two of your feet in it depending on the amount of assistance needed (two feet for more assistance; one foot for less assistance). Grab the pull-up bar and start pulling your body to the bar. While doing this remember these cues:
- Tuck shoulders back
- Keep the rest of the body tight
- Instead of pulling yourself up, pull the bar to you
- Expand your chest the closer you get to the bar
- Control your body as you lower back to the starting position
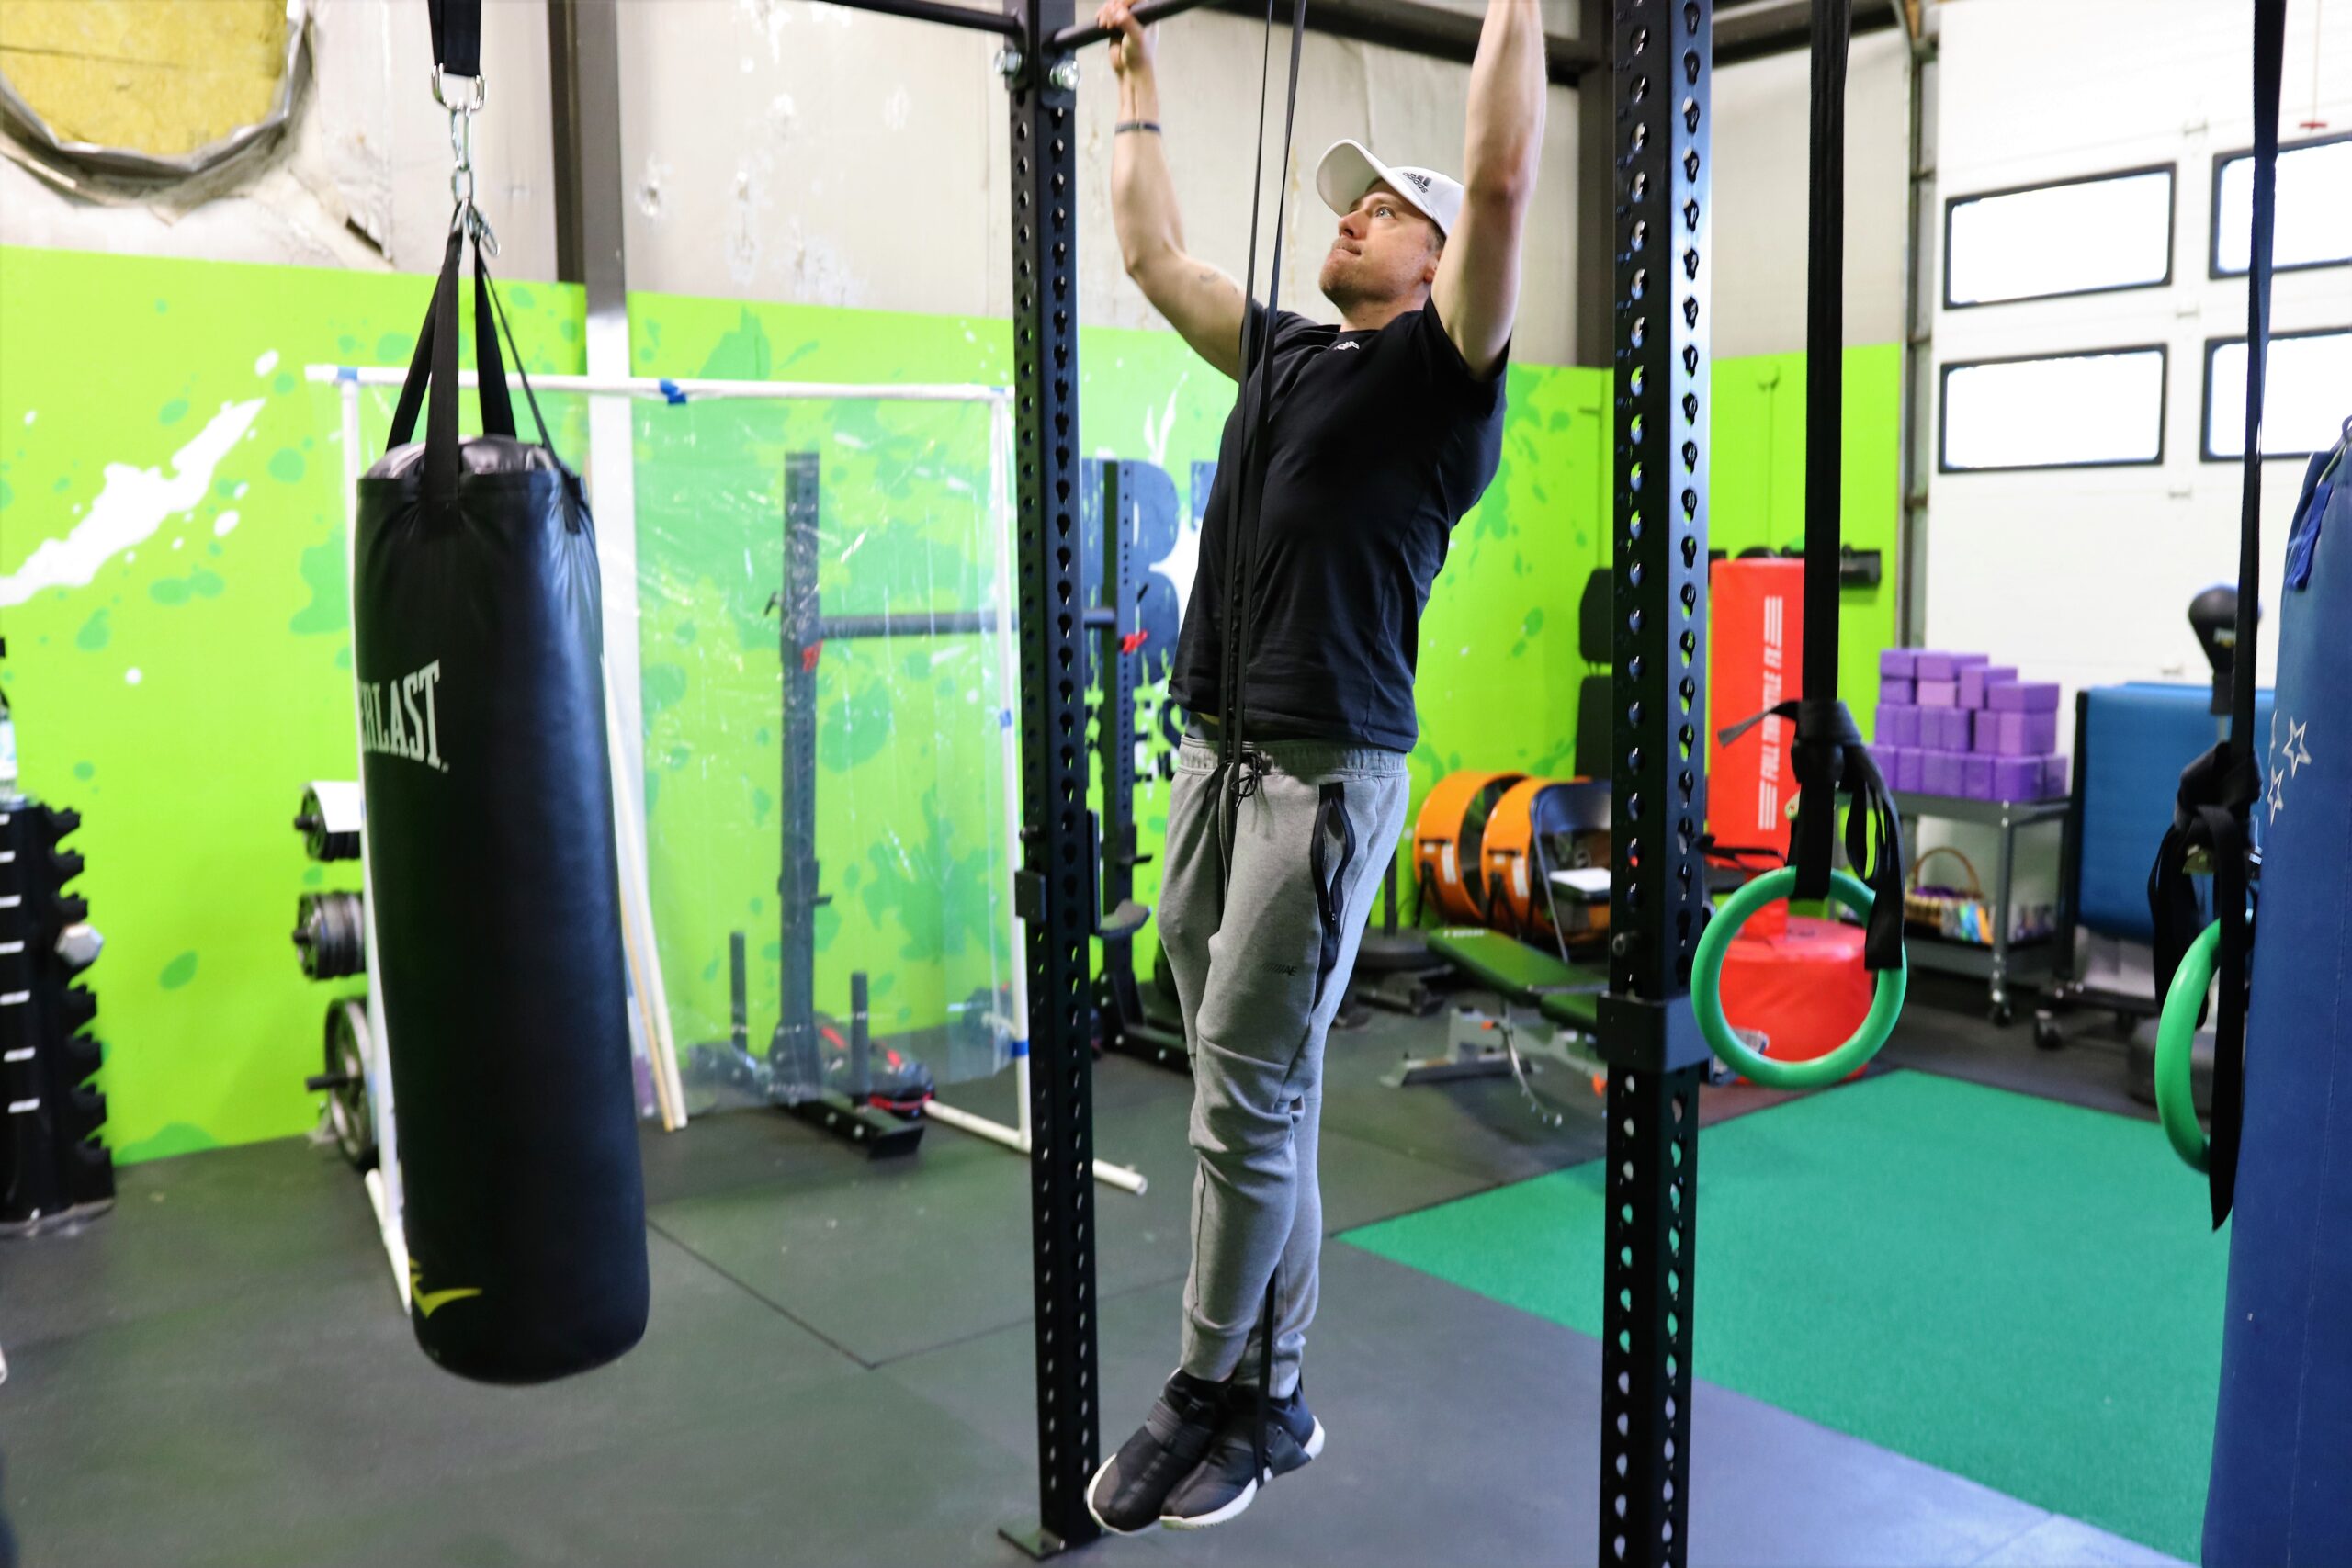
It is important during this phase to keep your patience. If people get stuck at a certain phase of pull-up training for a long period of time, it’s usually during this phase. This is the first part of the training where we are using the pull-up bar. It takes time to progress past this part. Patience is key. Keep at it!
Eccentric Pull-Ups
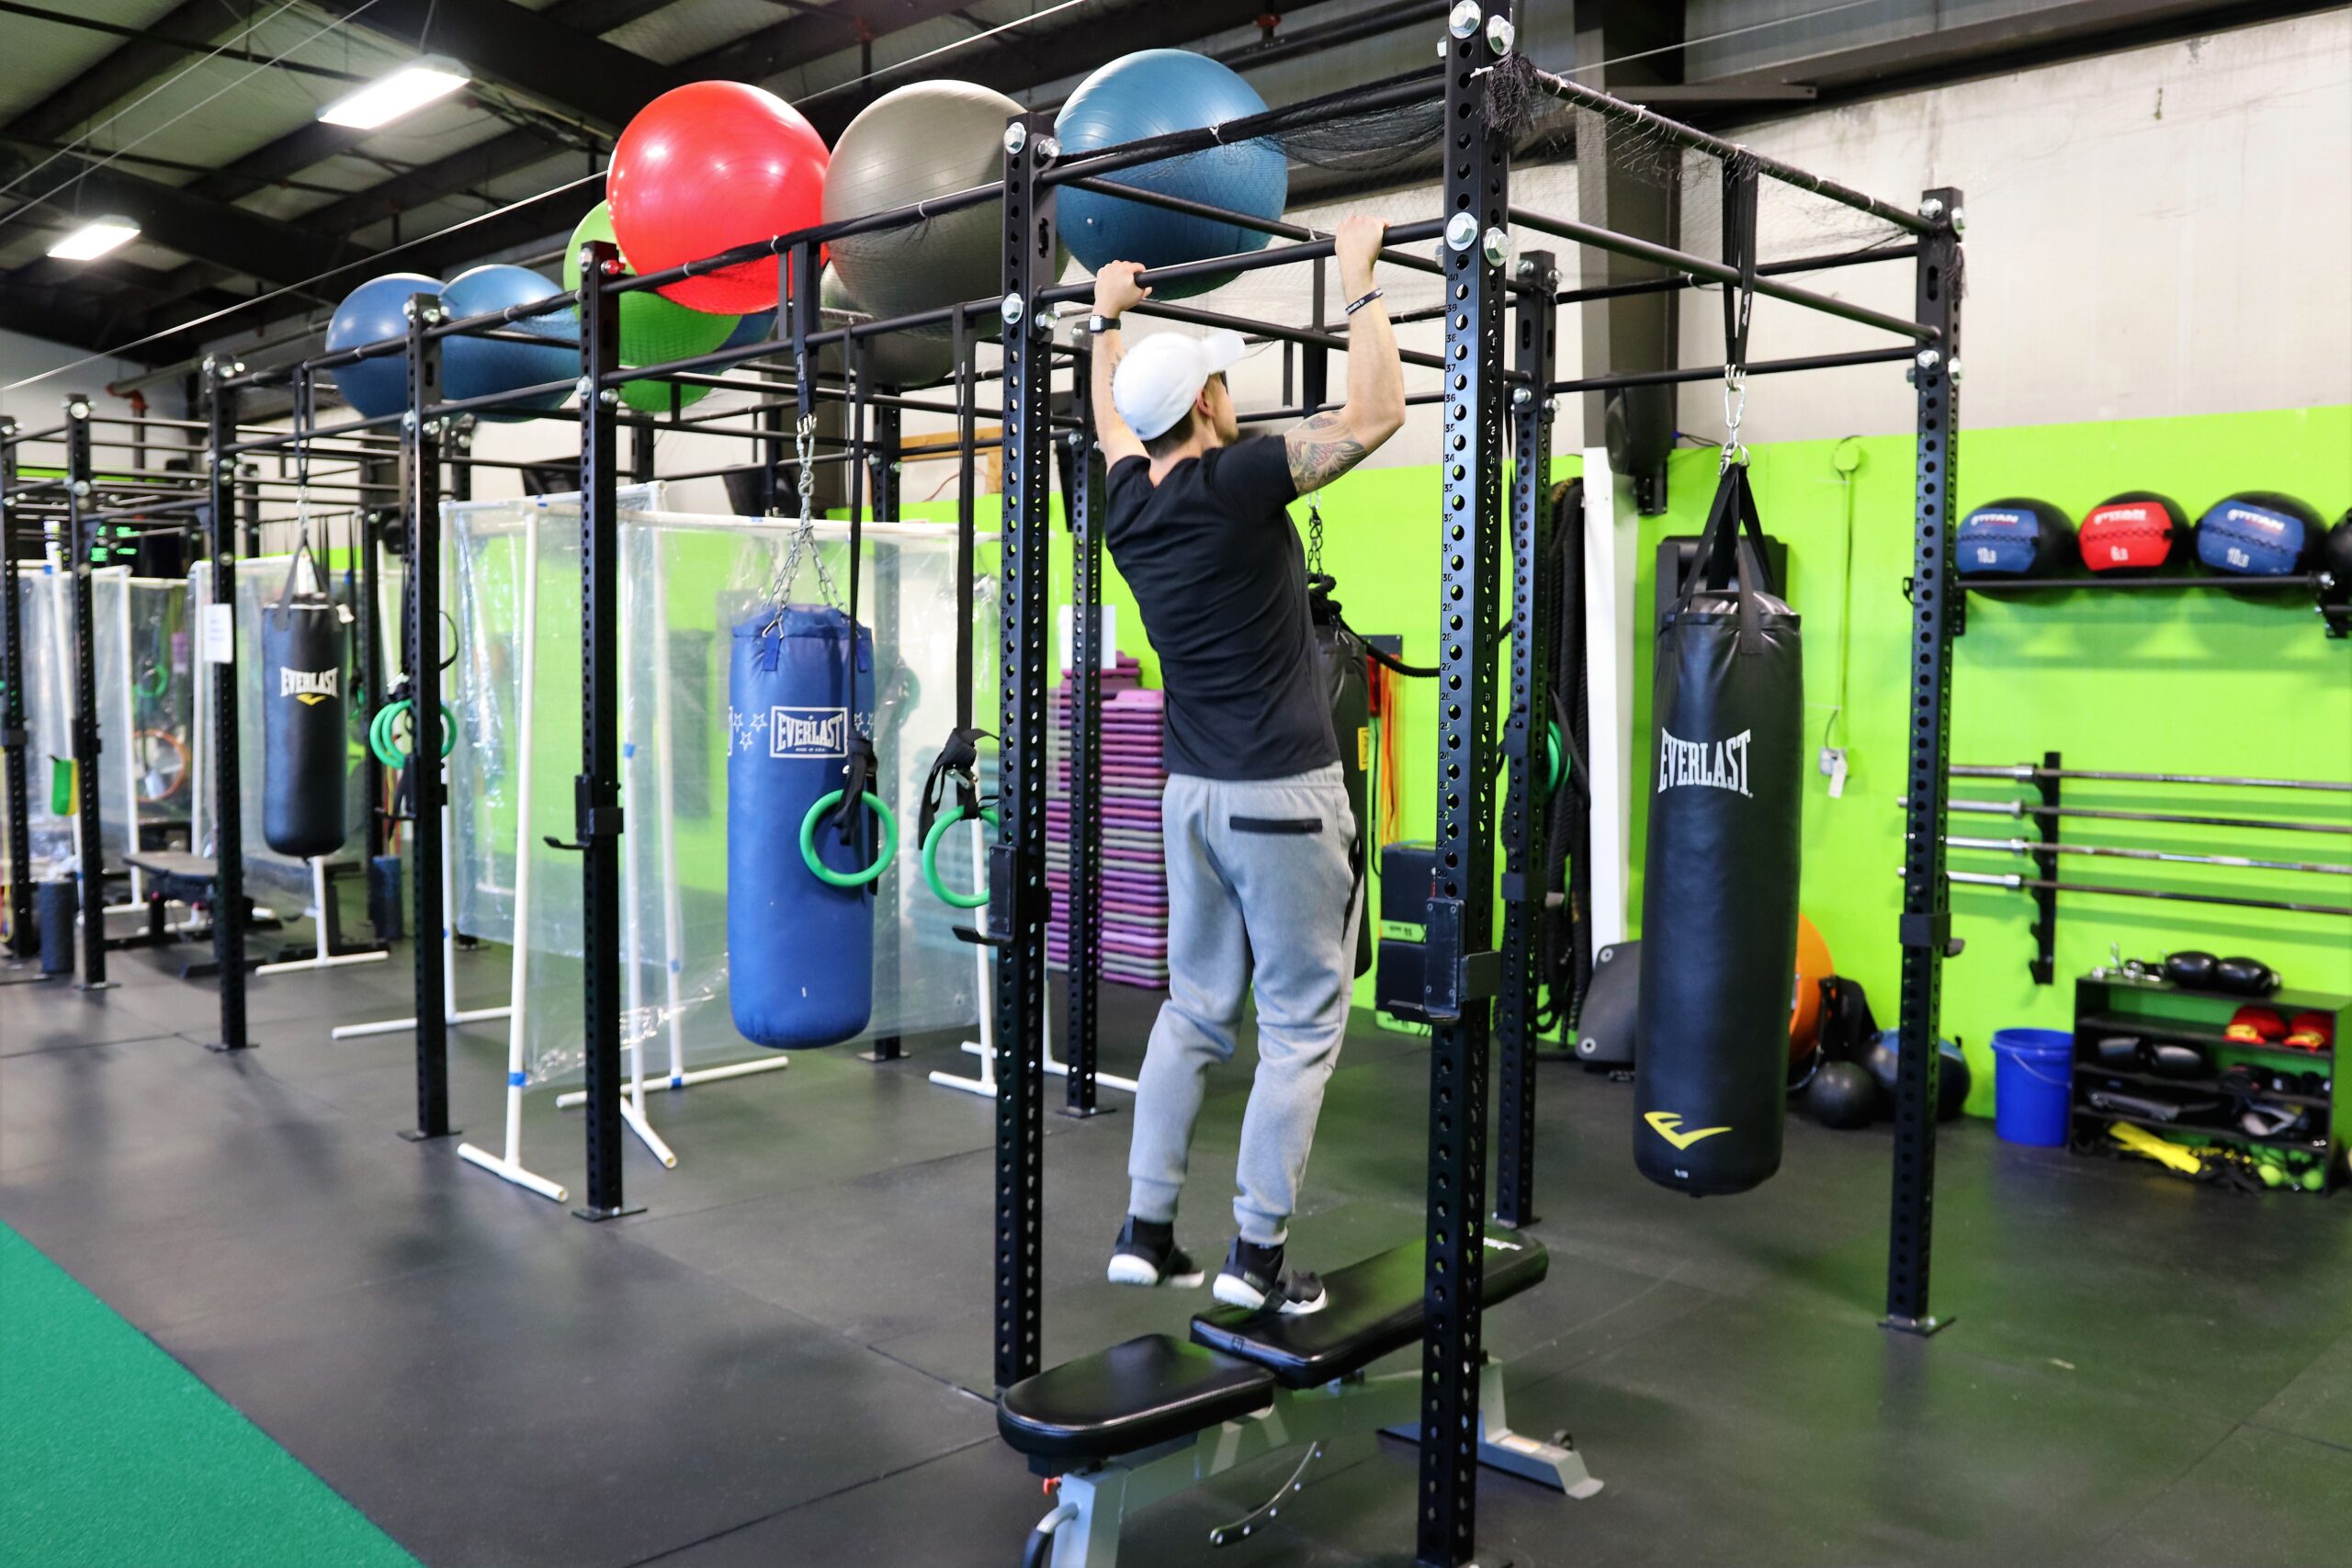
If you’ve been doing the assisted pull-ups for a while, and really feel that it’s time to progress, then this is the next phase. To do this, I recommend using a chair or box of some sort to stand on, as we want to start at the top of the movement. So, with our chest at the bar we will slowly lower ourselves back to the ground. Stand back on the chair or box, and repeat.
Pull-Ups
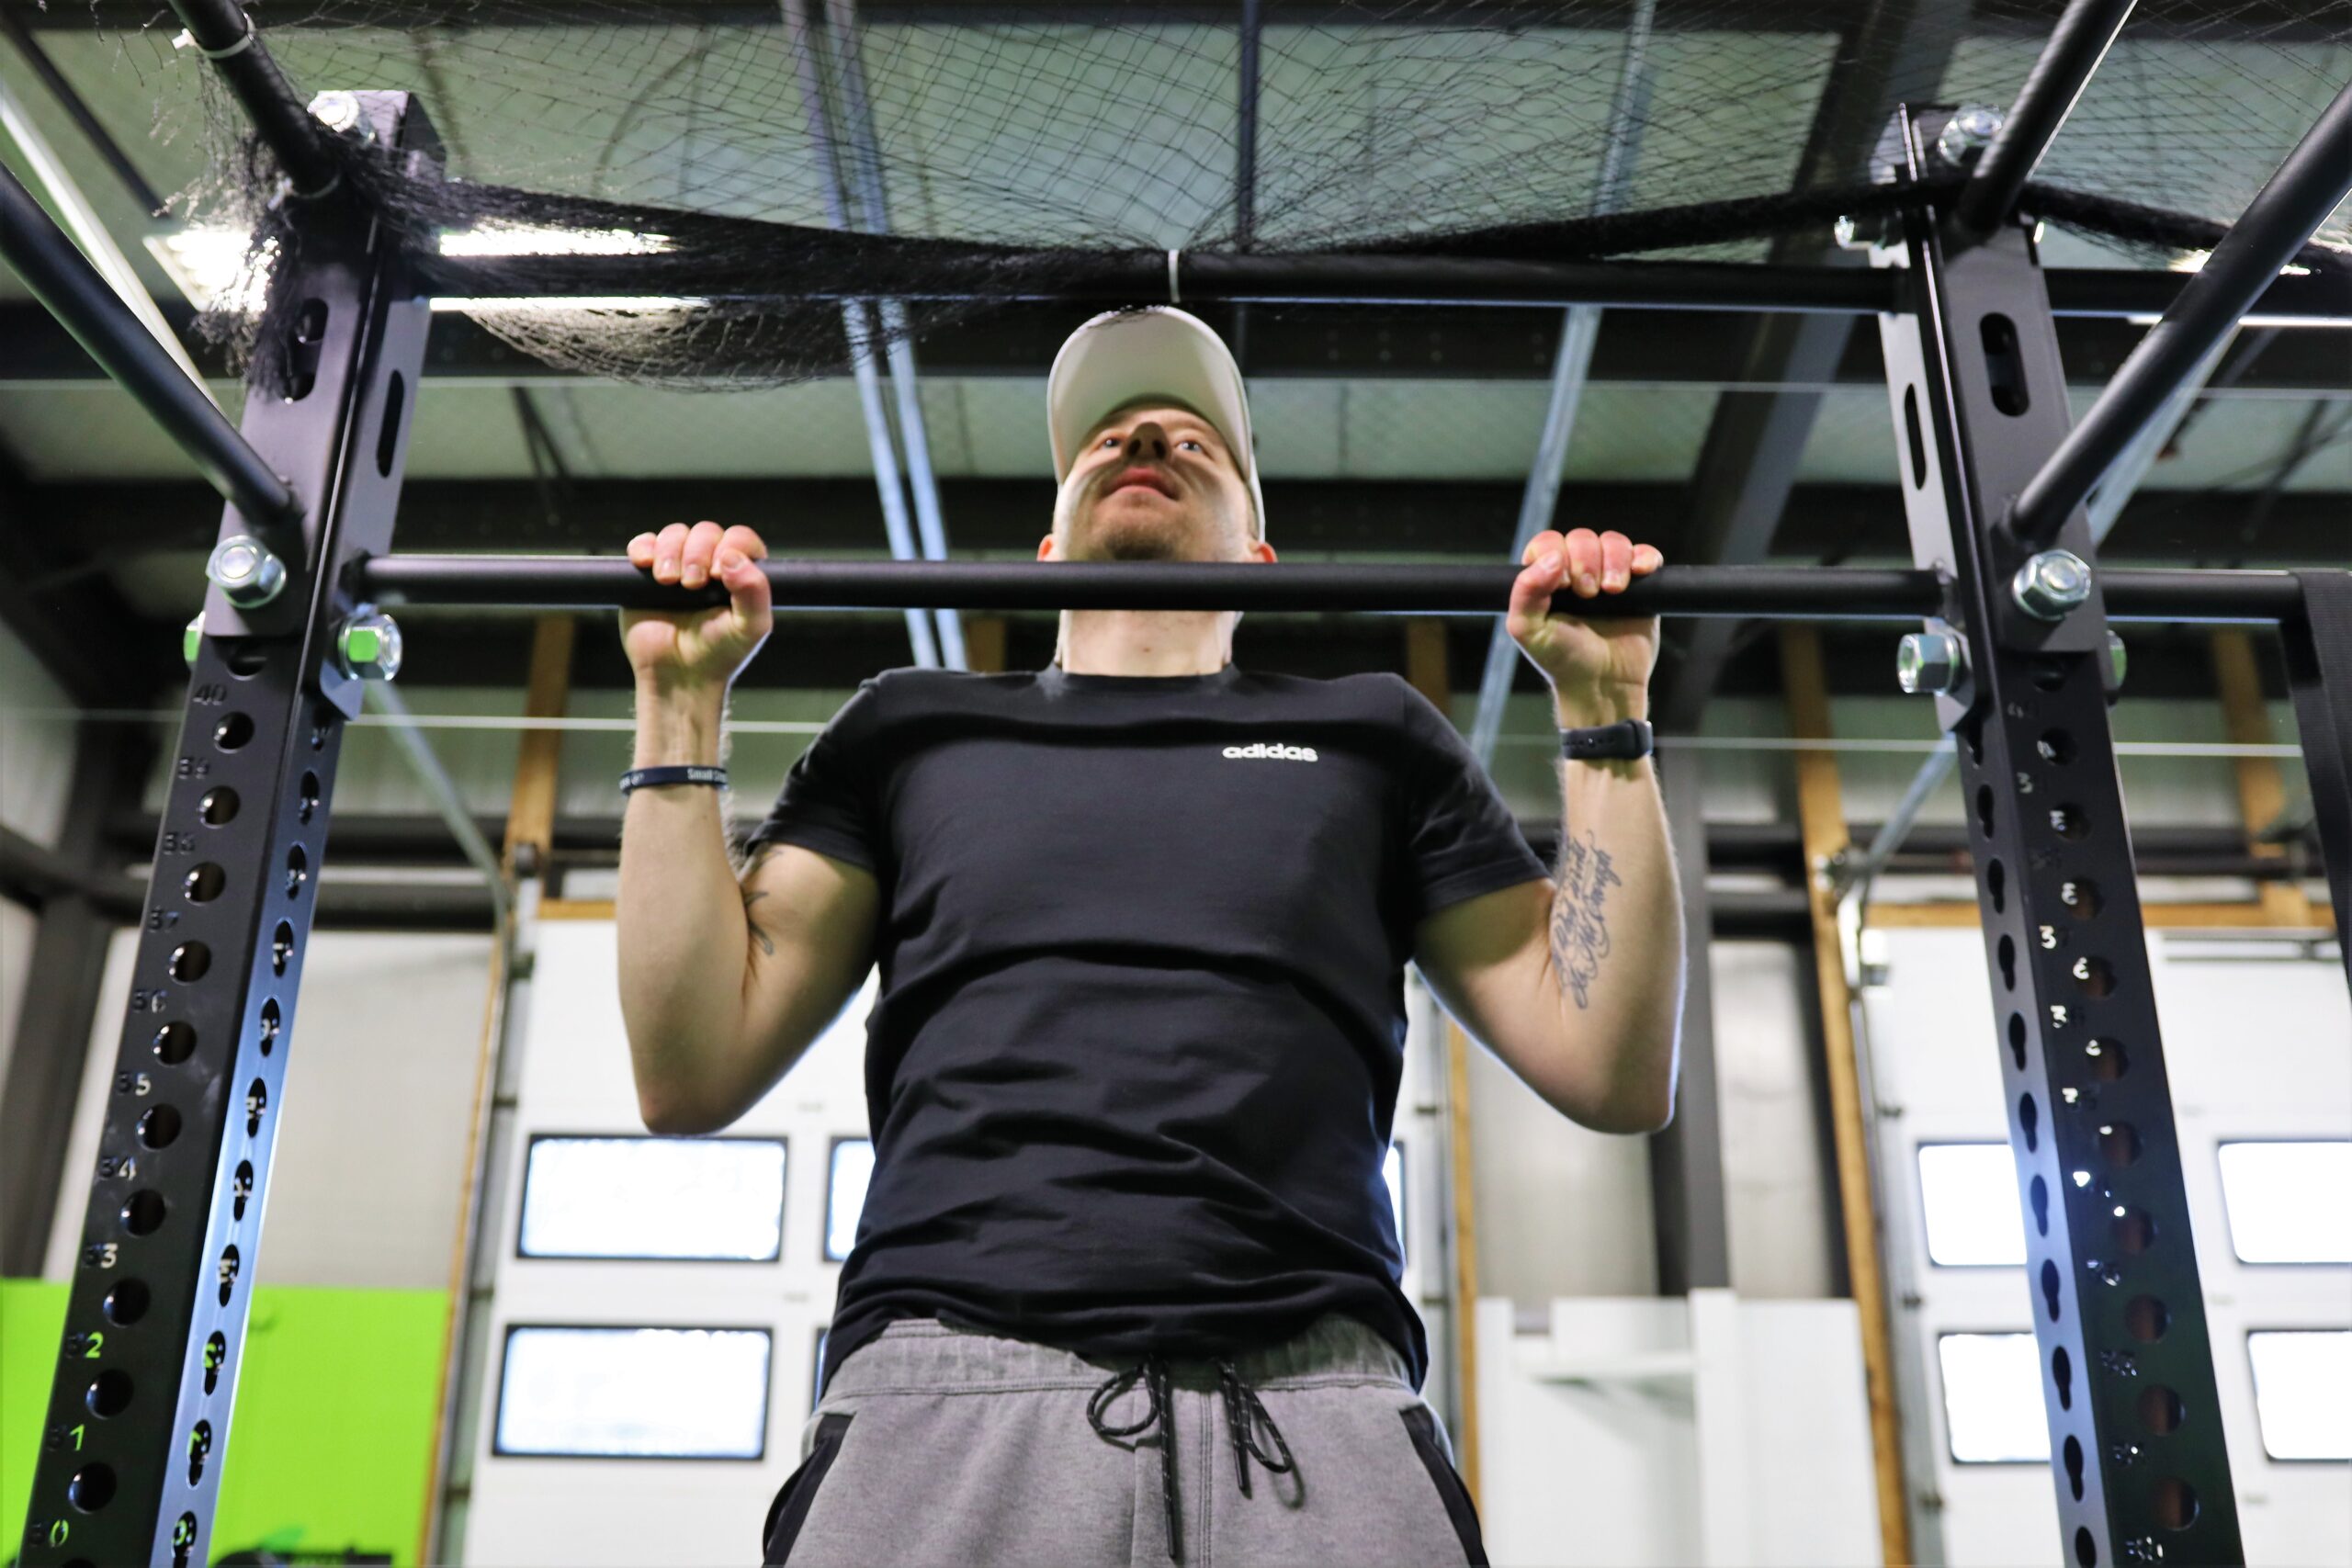
Here it is! The moment you have worked so hard for! Jump up, grab the bar, get into the ready position, and remember to:
- Tuck shoulders back
- Keep rest of body tight
- Pull the bar to you; not you to the bar
- Expand your chest to the bar
- Slowly lower yourself to the ground
- Celebrate!
Your first pull-up! Take a moment to congratulate yourself. A lot of hard work went into this process. It’s not easy, so don’t just shrug it off. Take this moment and be proud of yourself. A whole new world of training has just opened up for you!
If you enjoyed this information, please check out our other fitness & health articles here:
https://hybridfitnessgym.com/articles/
Swing over to our YouTube channel to check out our latest videos here:
Hybrid Fitness YouTube Channel
Brandon started working out as an athlete in high school, striving to push his limits and reach his full athletic potential. As he spent more and more time working on his own goals, he found a passion in the science of strength & conditioning, and using that new-found knowledge to help others. Brandon is exceptional at giving his clients the extra push to get stronger in a safe manner, while going above and beyond to making sure they feel comfortable and safe.
January 12, 2021
The Ultimate Guide to Your First Push Up
The Ultimate Guide to Your First Push Up
When asking a new member at the gym what some of their goals are, a common response is that they want to be able to do their first push up. That’s a fantastic goal to have! The push up was first popularized in the early 1900’s, but has been seen to date back to the Roman Emperor Constantine all the way back in 300 AD! It’s been around for so long for good reason. Not many movements that involve just body weight can put the amount of stress on the upper body and core simultaneously as the push up can, and few exercises can match how awesome you look and feel while repping out a set. When used properly the push up can, and should be a staple of any strength training program. Here’s a step by step guide to assist you on your journey of strength and awesomeness, by helping you achieve your first push up!
Regardless of its popularity, the push up can be one of the most daunting and challenging movements to learn and progress towards. The reason for most people struggling to achieve their first push up is rooted in that word, “progress”. I see too many people who can’t do a push up just lay on the floor and start pushing hoping that they will magically be able to do one someday. Unfortunately, it doesn’t work like that. In order to get better at push ups, one must have a set plan in place to achieve this goal, just like with any other exercise.
The High Plank
The first step you should take on your path to push ups should be looking at the health and stability of the shoulders and core. By starting with a High Plank, you’ll be able to build the strength and stability in your shoulders and core that will be crucial further down the road. To do a proper High Plank, get into a push up position and make sure you are checking off all of these boxes:
- Hands are directly underneath your shoulders.
- Your body is staying in a straight line. No sagging in the hips.
- Breathing is controlled. Inhale through the nose and exhale through your mouth.
- Hold this position for 45-60 seconds
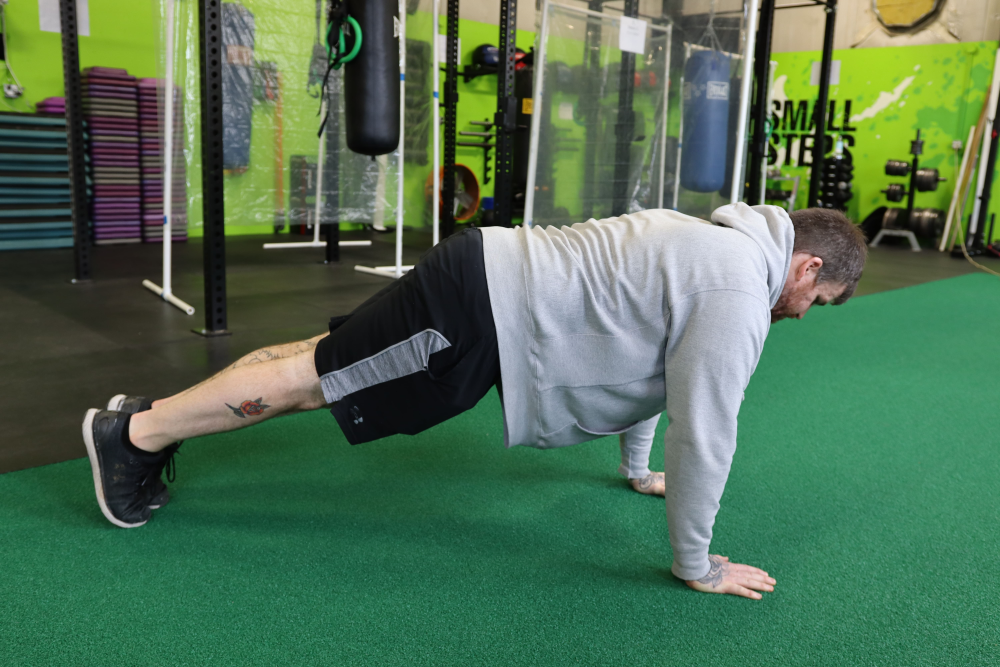
If you can do all of those things consistently while staying in that High Plank position, then it is time to move on to the next step.
Hand Elevated Push-Up
The next thing we want to do is to start incorporating the pushing motion. Instead of staying in the high plank position for this one, let’s elevate the hands onto a higher surface. This can be anything like a chair, bed, bench, table or even a wall. Whatever surface you choose to use, place your hands onto it. From there, we will use all of the principles of the high plank listed above, but now we are going to start lowering our bodies to our hands and checking off these boxes:
- Lead with your chest first. Don’t let your head or hips take control.
- Keep your elbows slightly tucked into your body at around a 45-degree angle.
- Use shoulders, chest and triceps while keeping the core engaged to push back to the starting position.
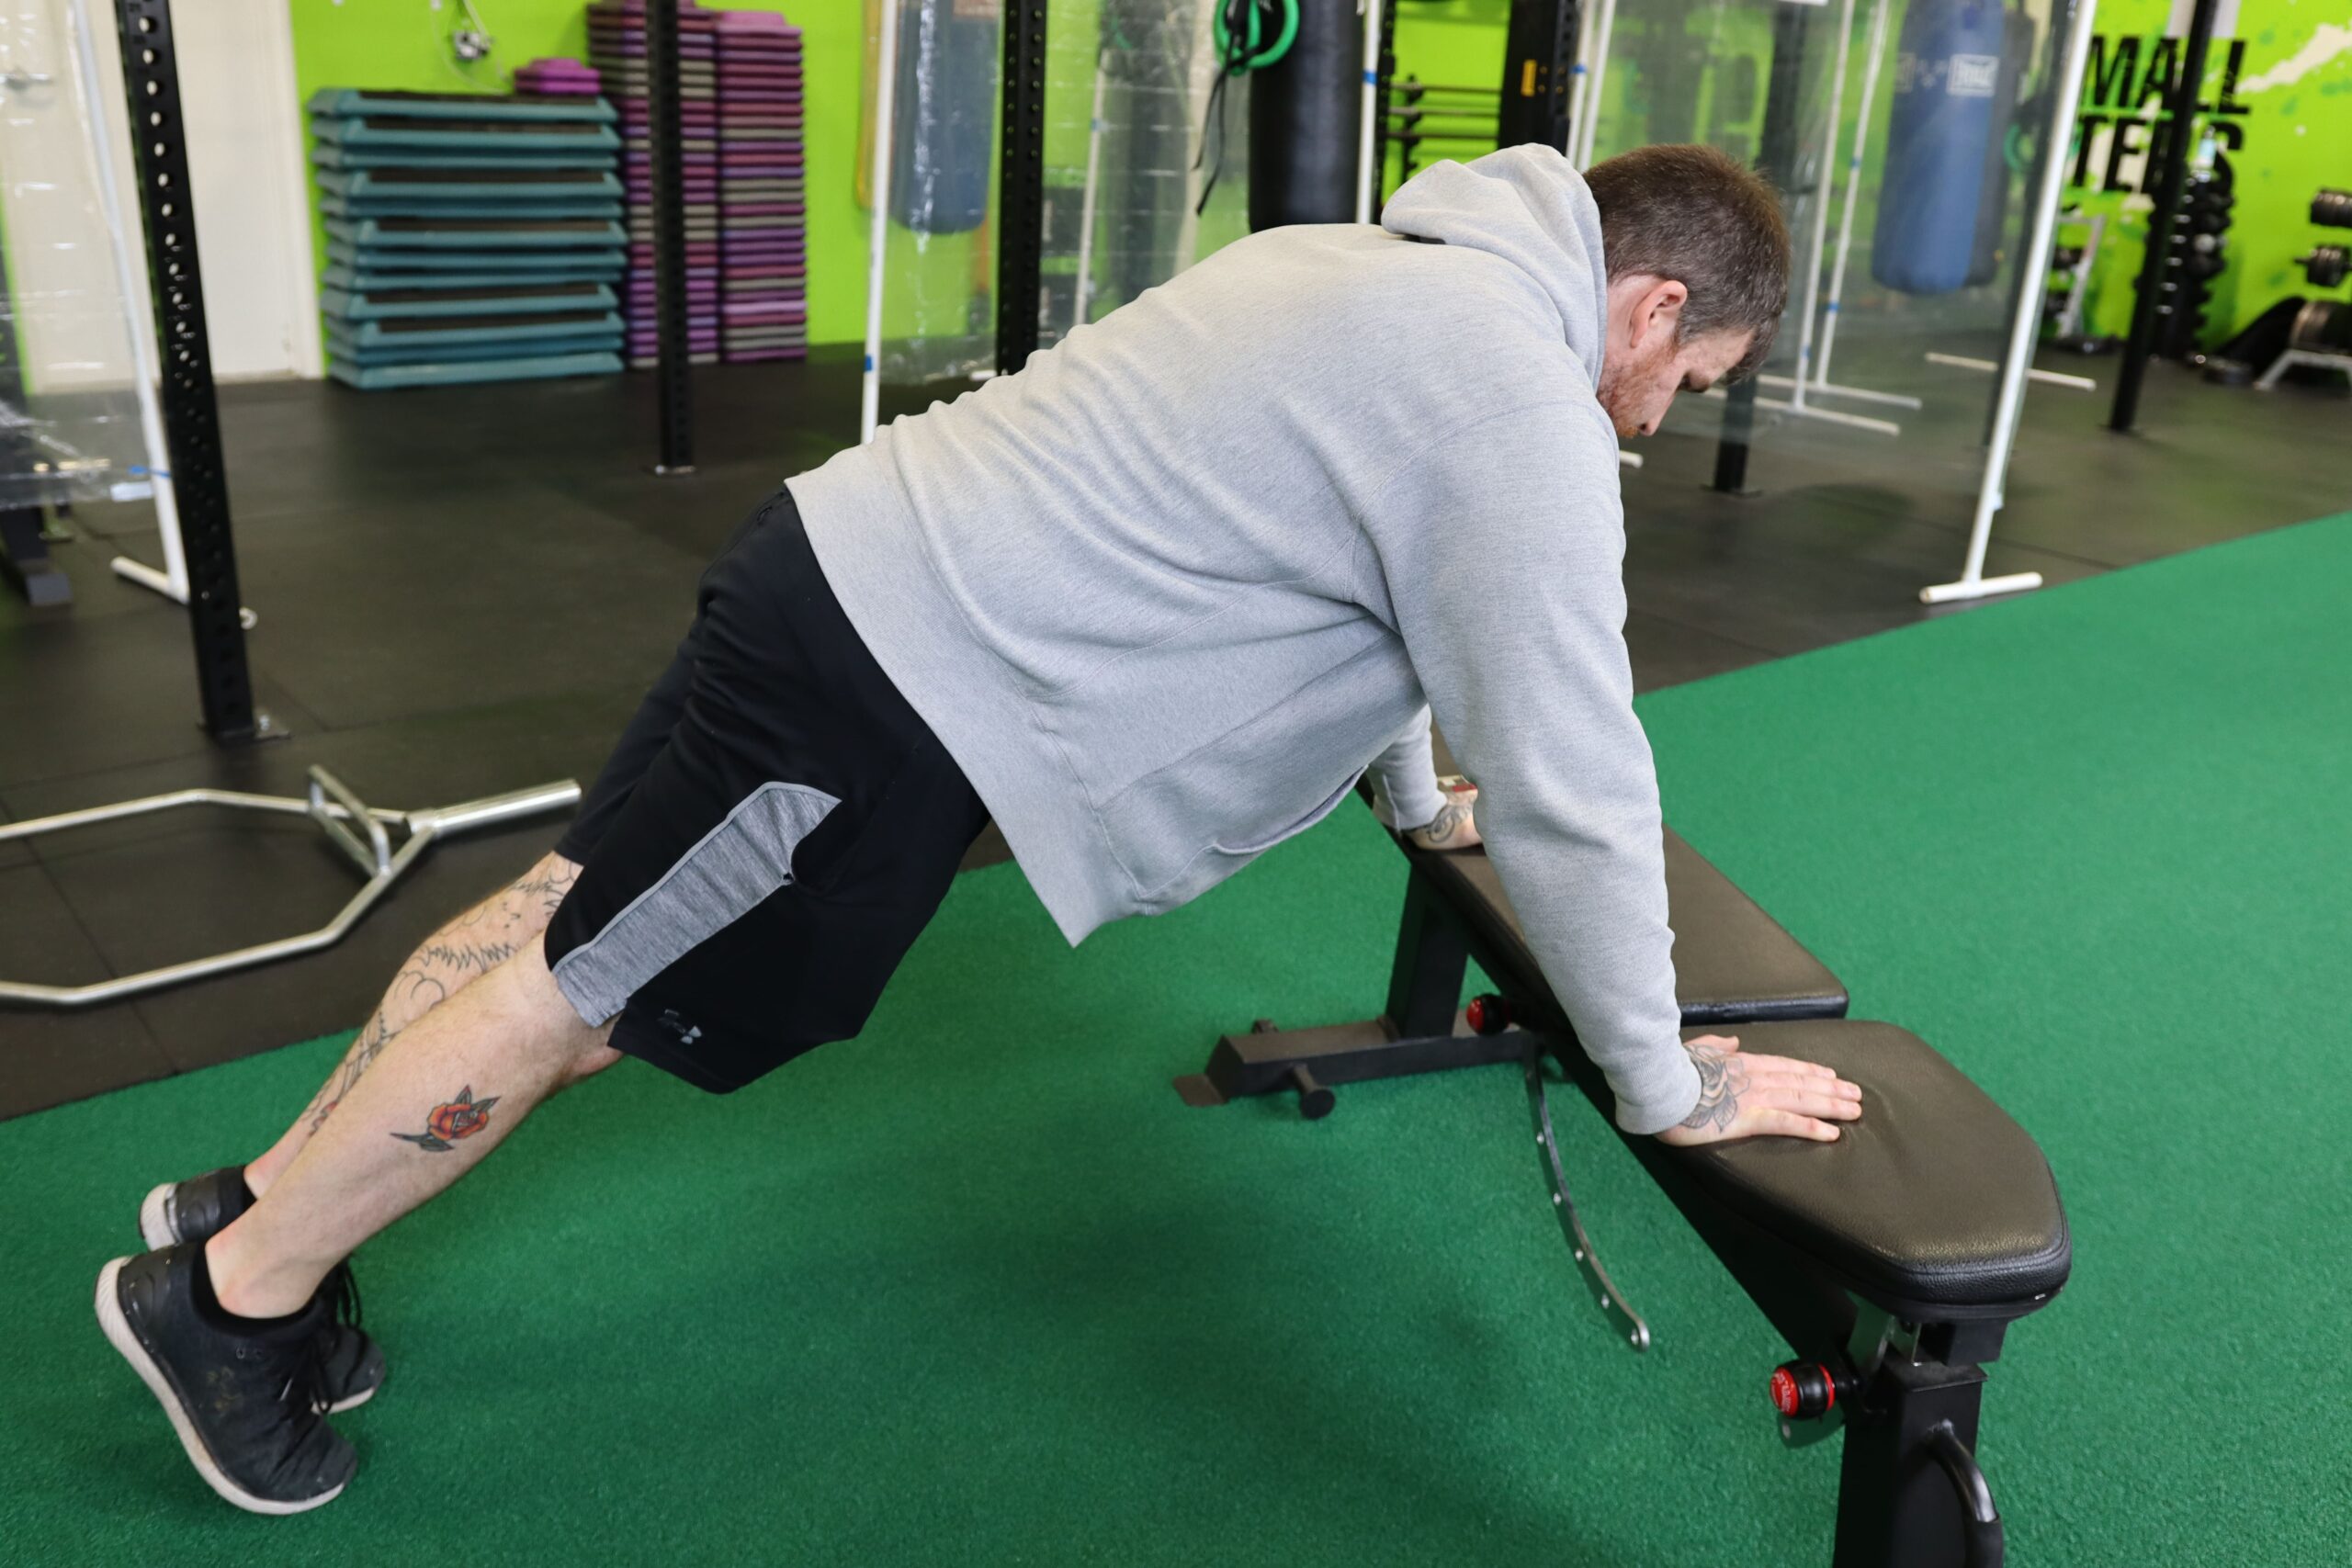
Perform 10-12 reps at this height. Once you can perform those 10-12 reps consecutively, move to a lower surface and repeat.
Knee Push-Ups
So, by now we should be getting closer to the floor. From here, we are going to drop down to our knees and place our hands directly onto the floor. Now we will slowly lower our upper body to the floor. Before we begin to push up, let’s make sure we are keeping the same form requirements as we did on the Hand Elevated Push Ups.
- Keep your elbows slightly tucked into your side at around a 45-degree angle.
- Keep your body straight without any sagging in the hips.
- Slowly lower your upper body to the floor and return to starting position by pushing off the floor
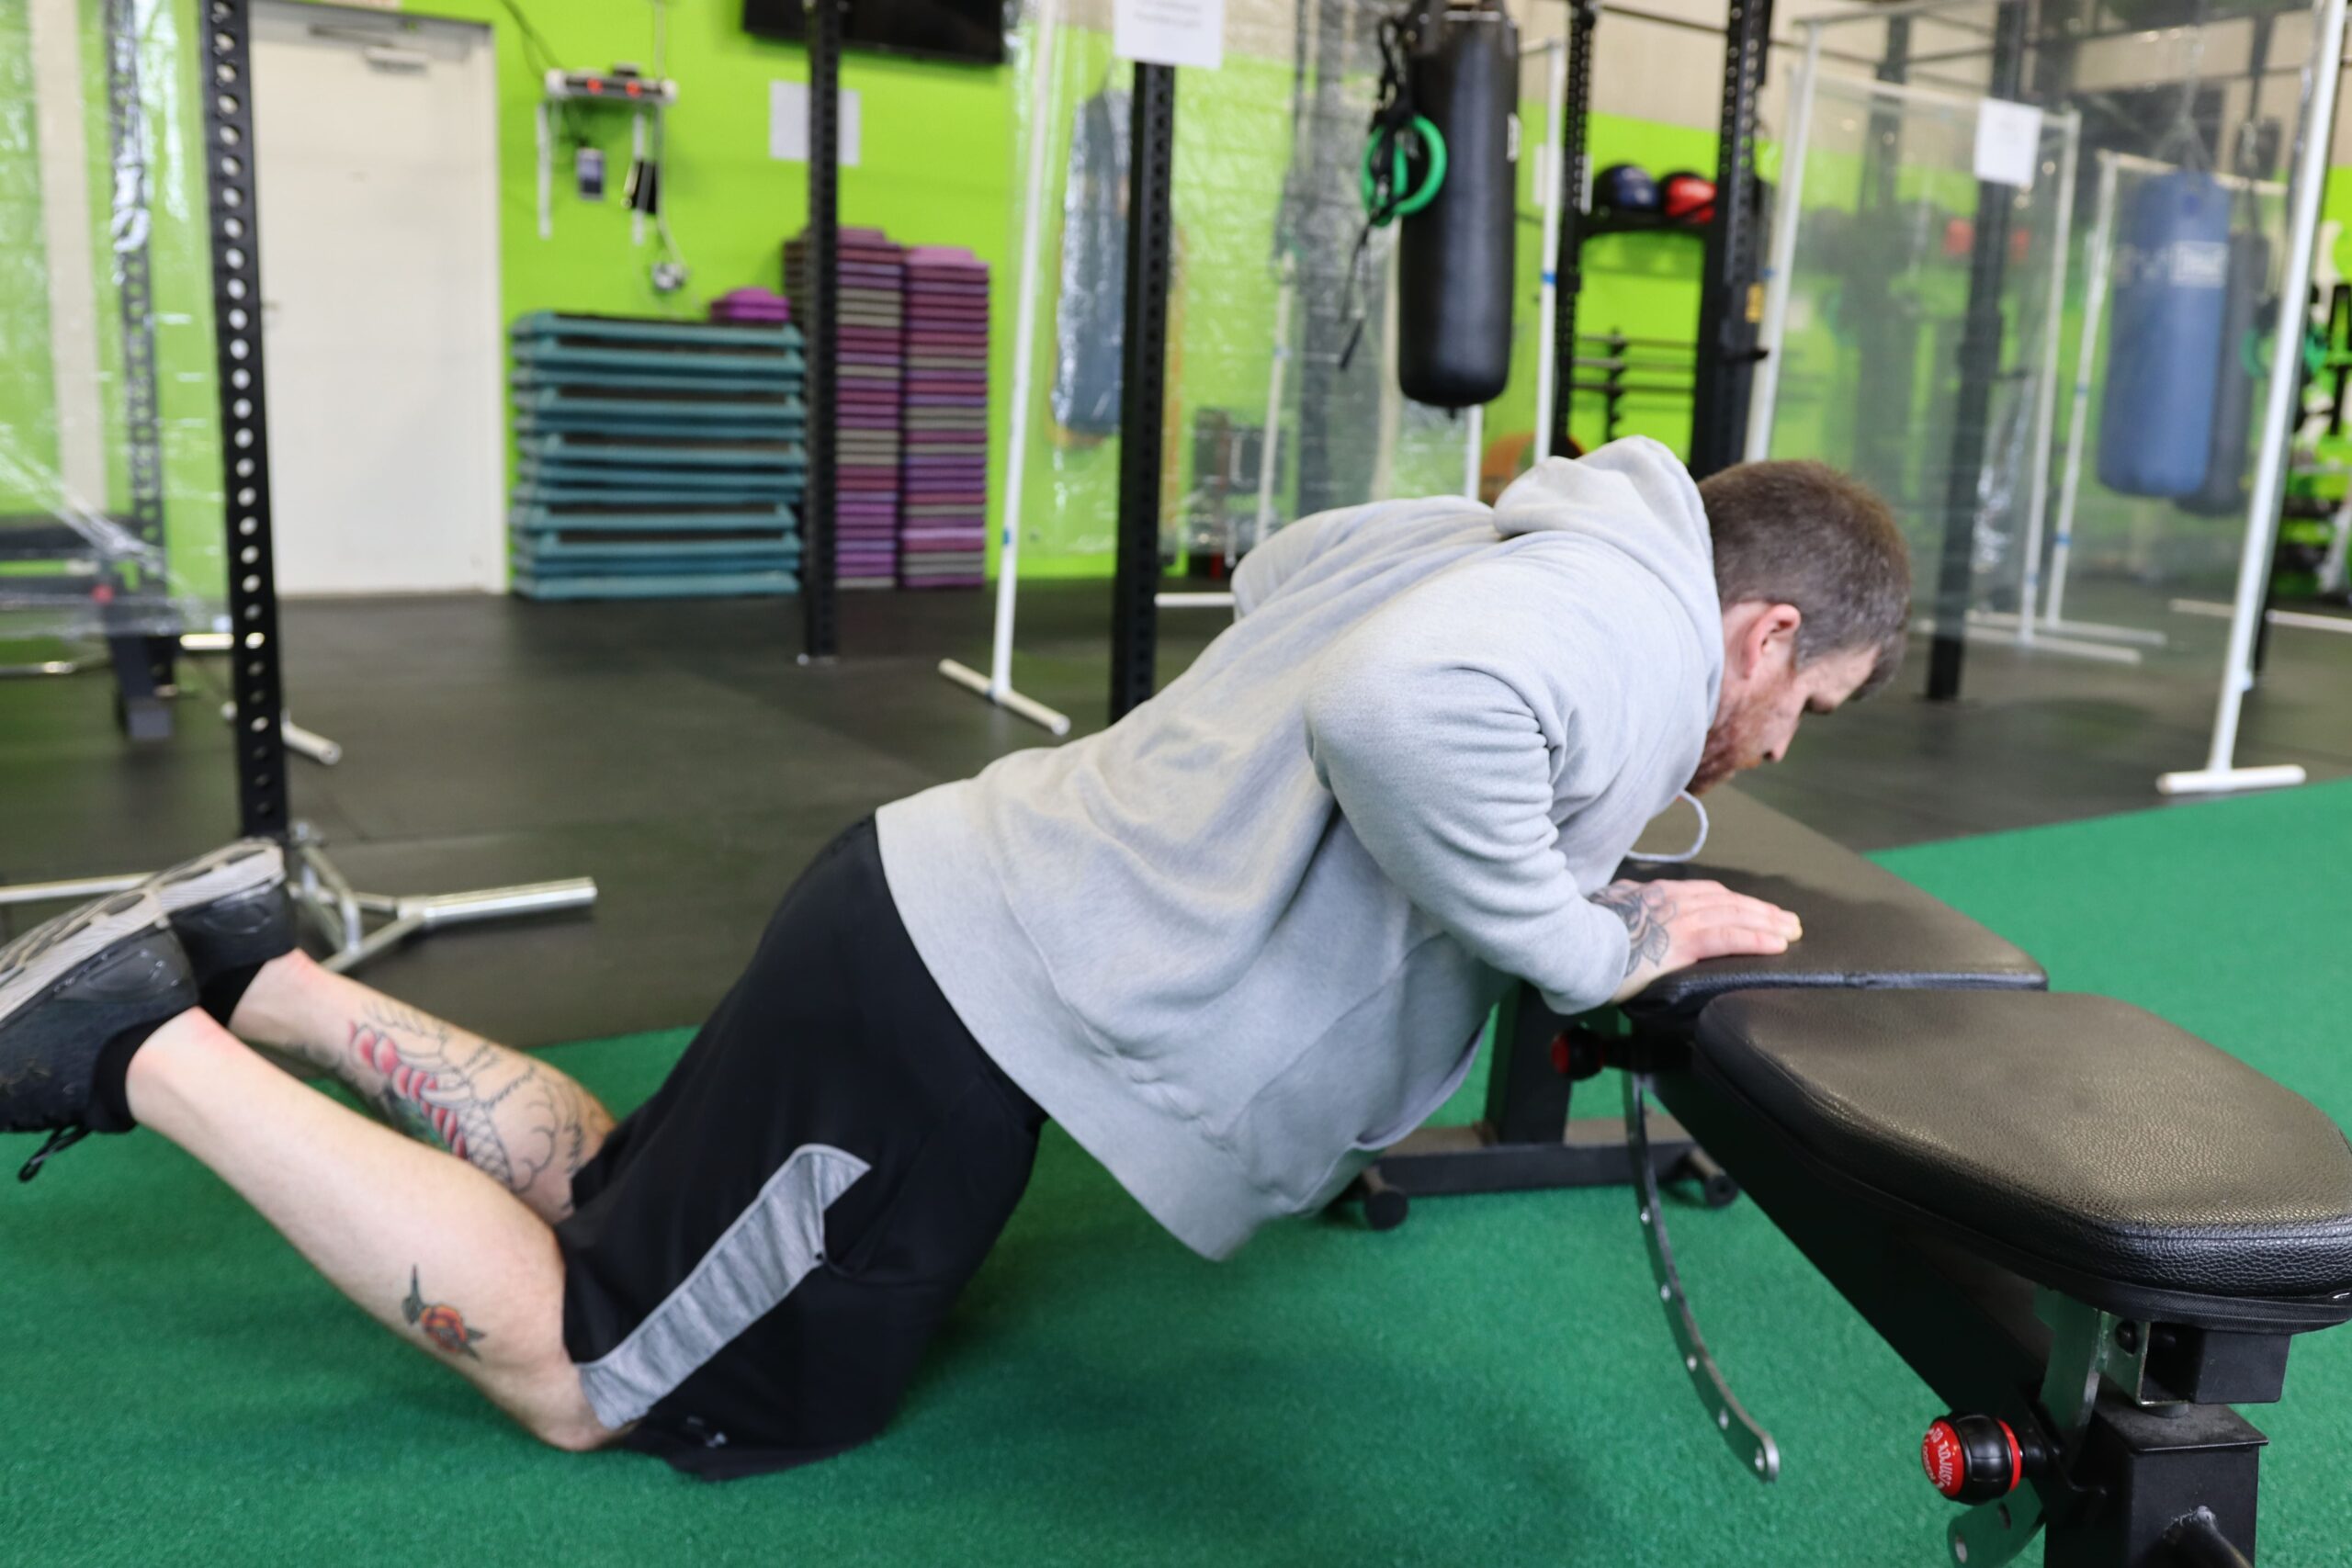
To make this move either more difficult, or slightly easier, change the position of your knees. Move them closer to your hands to make the move easier and move them further back to increase difficulty.
Eccentric Push-Up
After spending time and mastering the Knee Push Up, you should be ready to start working from the High Plank position again. BUT, there is still more work to do before rushing into full push ups. One part of the push up that people tend to do incorrectly is properly lowering themselves to the floor, so here we will work on just that and that alone. To start, get into the High Plank position same as before. Now, we will simply take 3-5 seconds to lower ourselves to the floor, all while maintaining the checklist we had on both the high plank and the hand elevated push ups. Once you reach the floor, instead of pushing yourself back up, drop to your knees and return to the starting position. This can become very strenuous and if time needs to be taken in between reps, then do so. We are working on perfecting form here, not how many reps we can get. Once you can perform 10-12 continuous reps of these slow eccentric push ups, it’s time to move on.
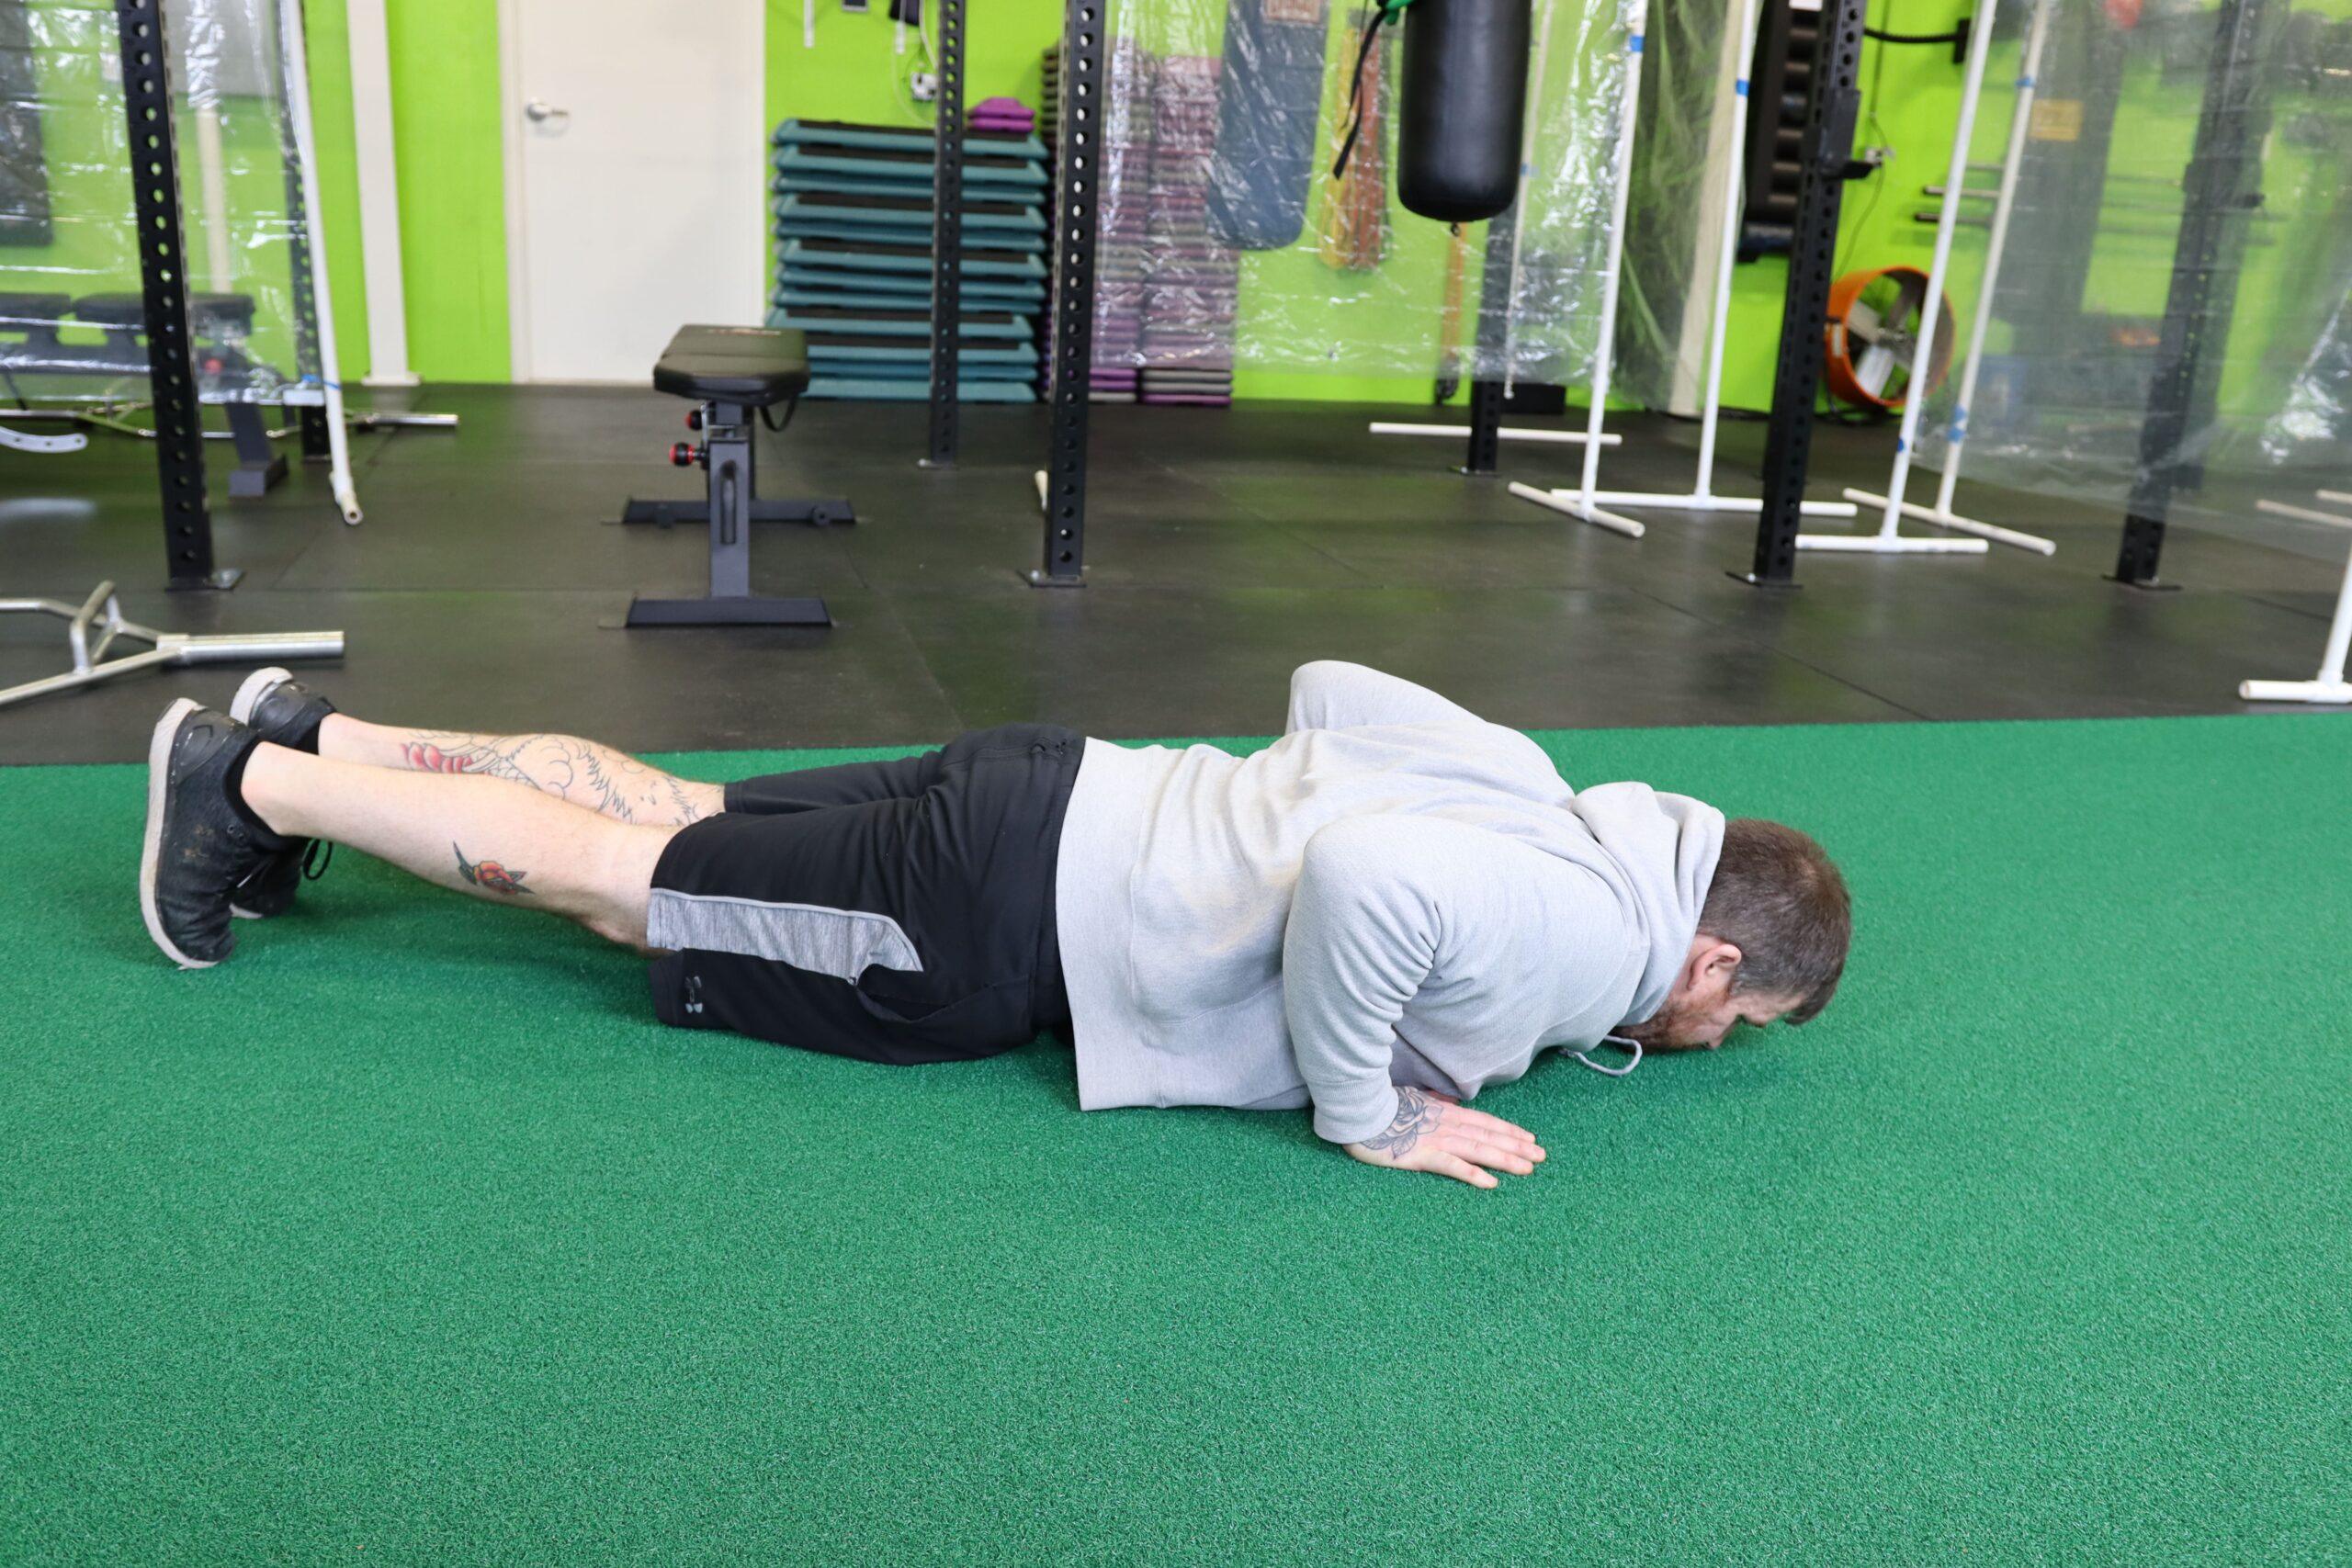
Push-Ups
After all the hard work, the sweat, and the sore muscles, it’s time to get it! Set up in the High Plank position and remember to follow all the ques that we’ve previously gone over.
- Hands are directly underneath the shoulders.
- Body is in a straight line without any sagging in the hips.
- Take a big breath in.
- Slowly lower your upper body to the floor while keeping elbows at a 45-degree angle.
- Exhale and push yourself off the floor back to the starting position.
- Give yourself a high five!

You’ve done it! Don’t try to play it cool. Your first push up is an incredible accomplishment that you should be proud of. Boast a little. You’ve earned it!
If you enjoyed this information, please check out our other fitness & health articles here:
https://hybridfitnessgym.com/articles/
Swing over to our YouTube channel to check out our latest videos here:
Hybrid Fitness YouTube Channel
Brandon started working out as an athlete in high school, striving to push his limits and reach his full athletic potential. As he spent more and more time working on his own goals, he found a passion in the science of strength & conditioning, and using that new-found knowledge to help others. Brandon is exceptional at giving his clients the extra push to get stronger in a safe manner, while going above and beyond to making sure they feel comfortable and safe.