-

The Ultimate Guide to Your First Push Up
January 12, 2021
January 12, 2021
The Ultimate Guide to Your First Push Up
The Ultimate Guide to Your First Push Up
When asking a new member at the gym what some of their goals are, a common response is that they want to be able to do their first push up. That’s a fantastic goal to have! The push up was first popularized in the early 1900’s, but has been seen to date back to the Roman Emperor Constantine all the way back in 300 AD! It’s been around for so long for good reason. Not many movements that involve just body weight can put the amount of stress on the upper body and core simultaneously as the push up can, and few exercises can match how awesome you look and feel while repping out a set. When used properly the push up can, and should be a staple of any strength training program. Here’s a step by step guide to assist you on your journey of strength and awesomeness, by helping you achieve your first push up!
Regardless of its popularity, the push up can be one of the most daunting and challenging movements to learn and progress towards. The reason for most people struggling to achieve their first push up is rooted in that word, “progress”. I see too many people who can’t do a push up just lay on the floor and start pushing hoping that they will magically be able to do one someday. Unfortunately, it doesn’t work like that. In order to get better at push ups, one must have a set plan in place to achieve this goal, just like with any other exercise.
The High Plank
The first step you should take on your path to push ups should be looking at the health and stability of the shoulders and core. By starting with a High Plank, you’ll be able to build the strength and stability in your shoulders and core that will be crucial further down the road. To do a proper High Plank, get into a push up position and make sure you are checking off all of these boxes:
- Hands are directly underneath your shoulders.
- Your body is staying in a straight line. No sagging in the hips.
- Breathing is controlled. Inhale through the nose and exhale through your mouth.
- Hold this position for 45-60 seconds
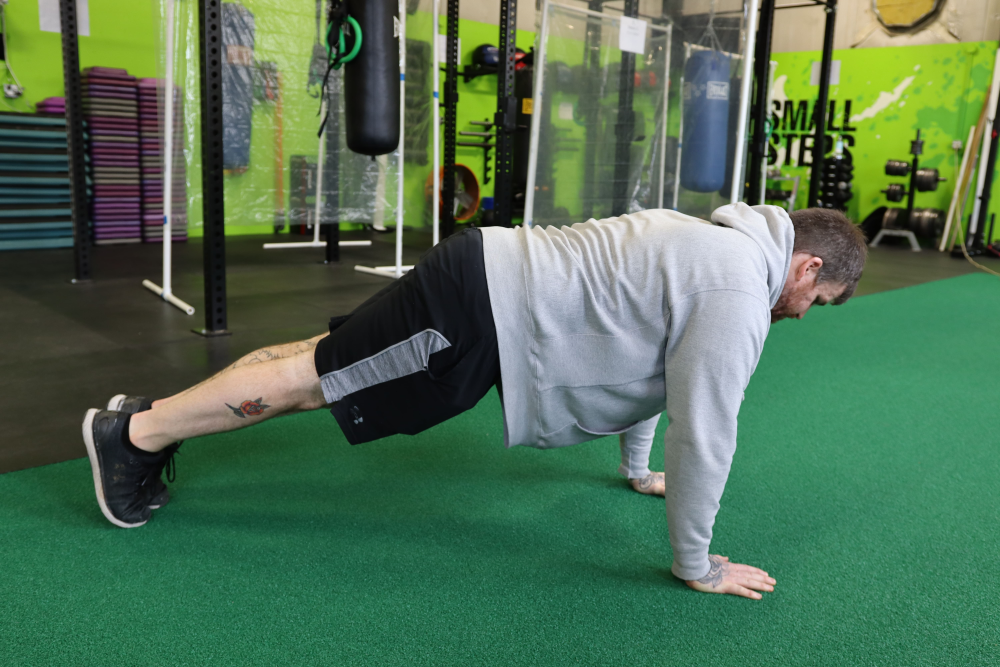
If you can do all of those things consistently while staying in that High Plank position, then it is time to move on to the next step.
Hand Elevated Push-Up
The next thing we want to do is to start incorporating the pushing motion. Instead of staying in the high plank position for this one, let’s elevate the hands onto a higher surface. This can be anything like a chair, bed, bench, table or even a wall. Whatever surface you choose to use, place your hands onto it. From there, we will use all of the principles of the high plank listed above, but now we are going to start lowering our bodies to our hands and checking off these boxes:
- Lead with your chest first. Don’t let your head or hips take control.
- Keep your elbows slightly tucked into your body at around a 45-degree angle.
- Use shoulders, chest and triceps while keeping the core engaged to push back to the starting position.
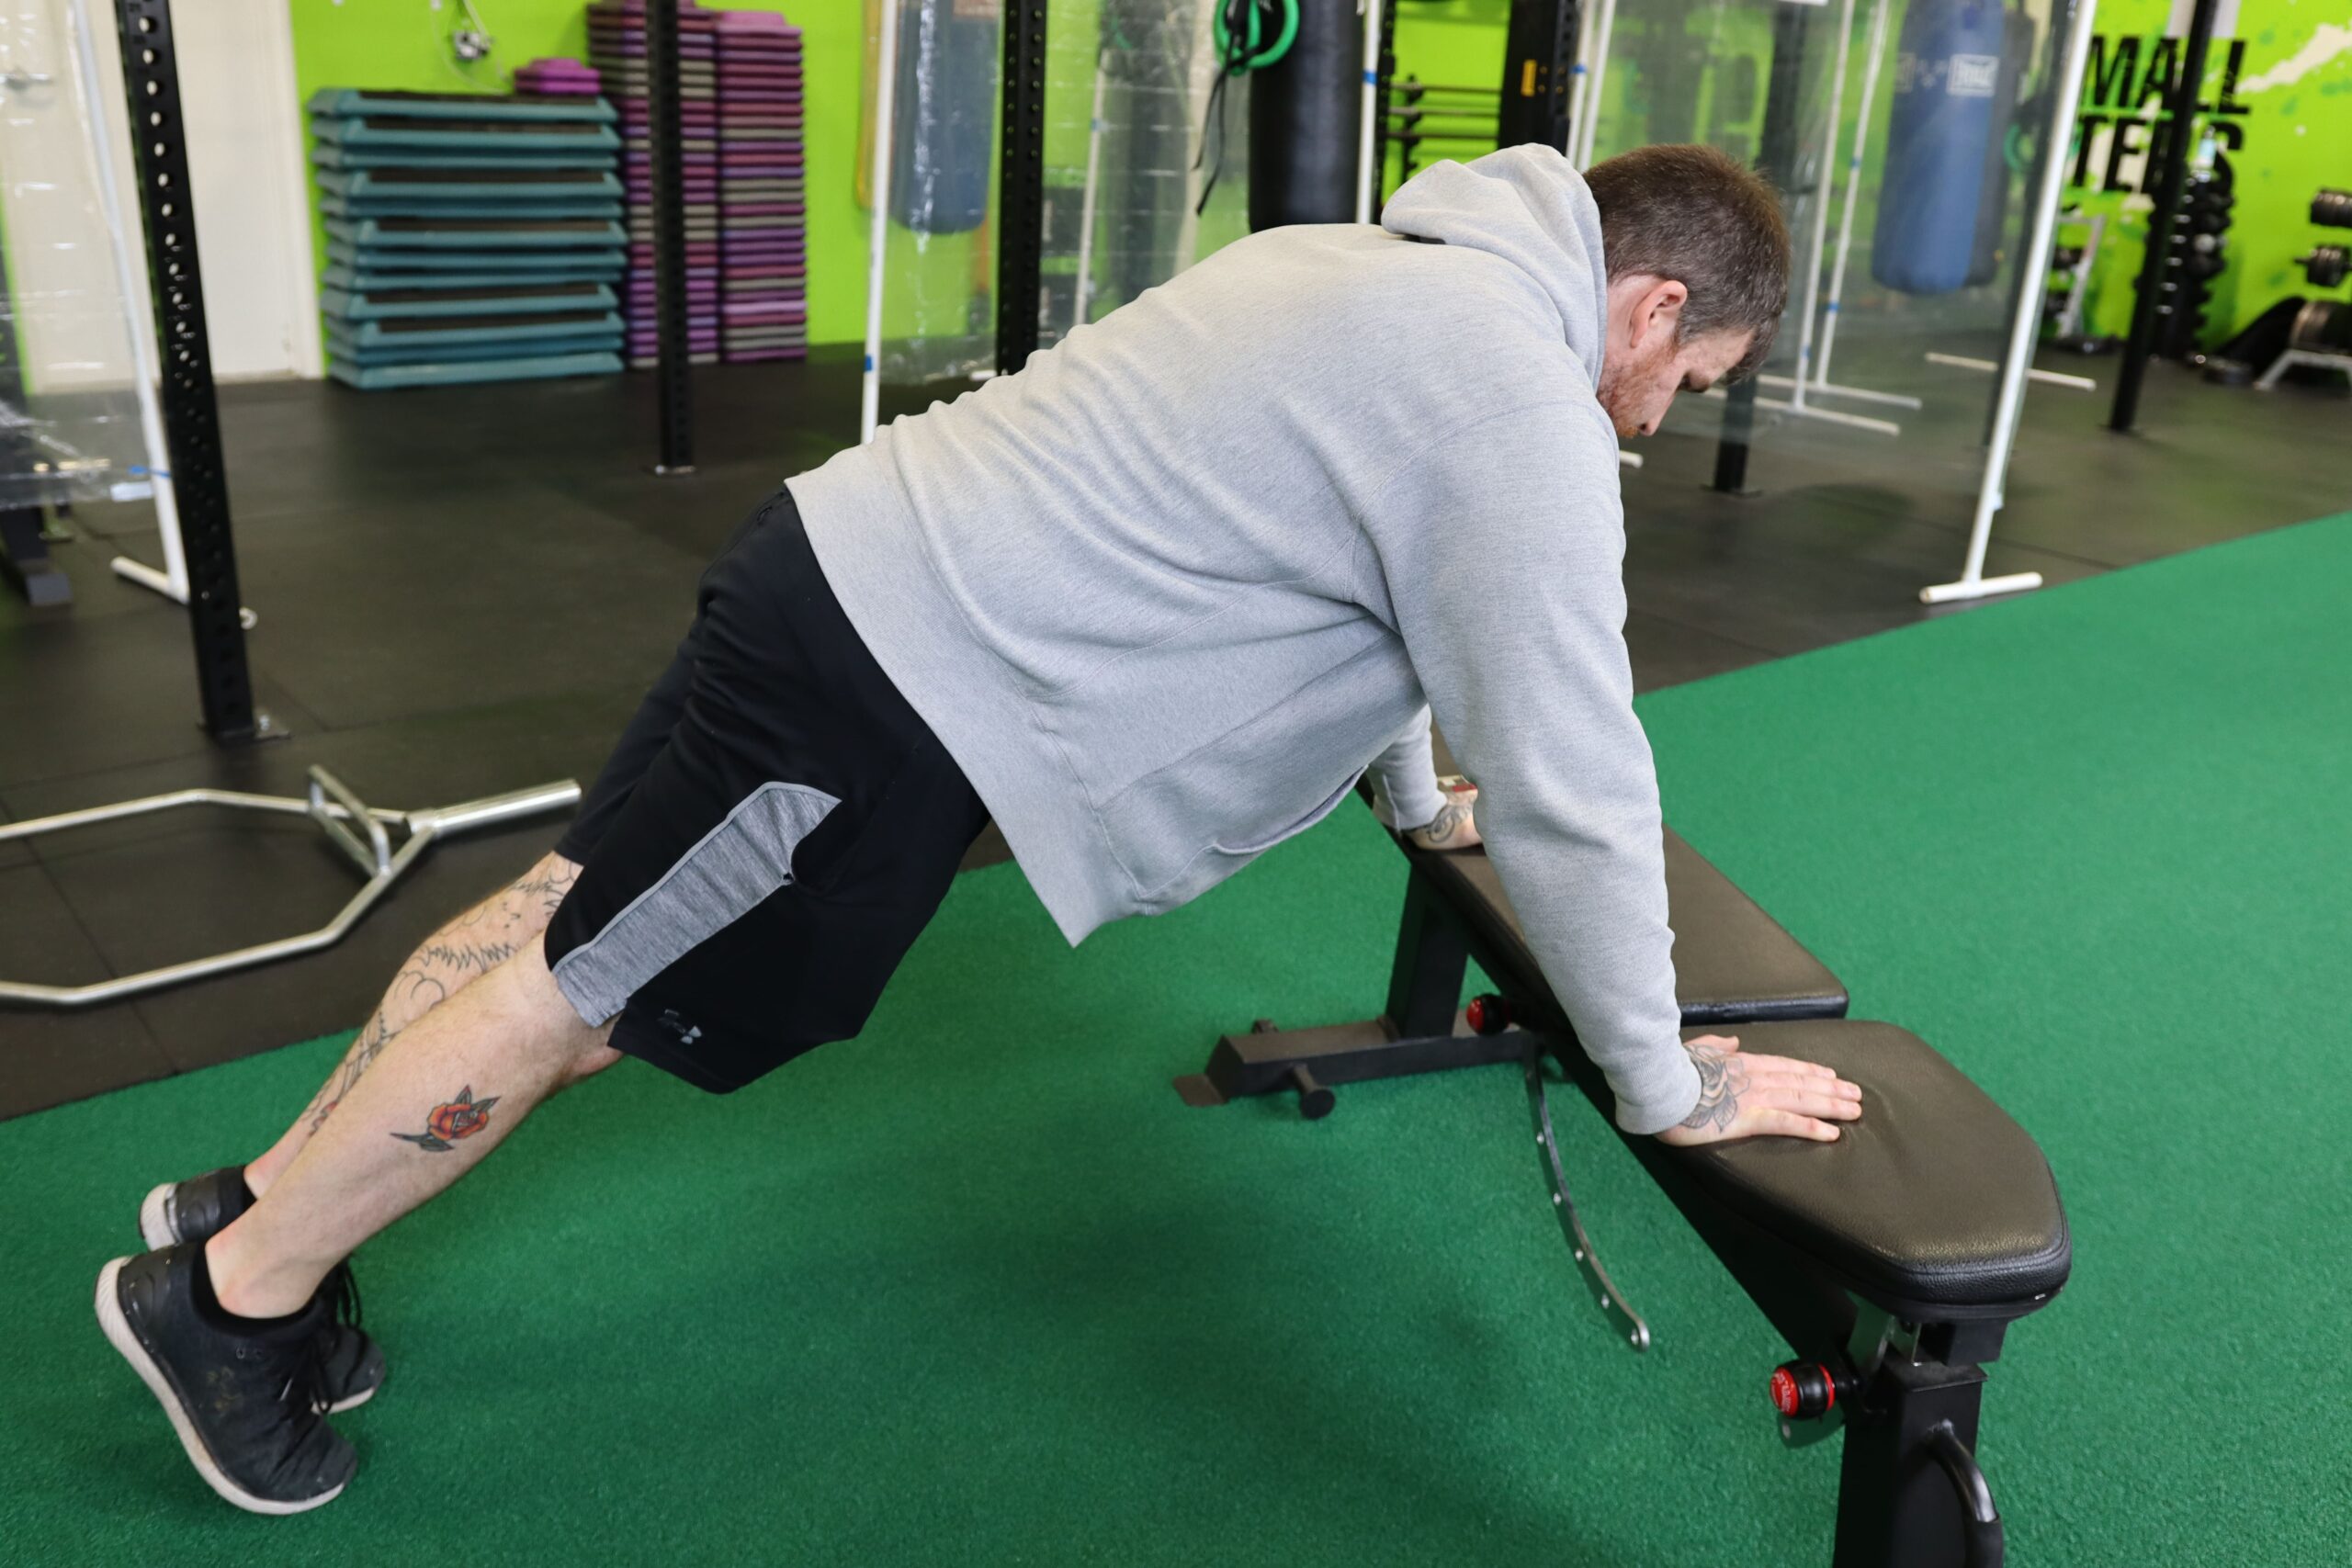
Perform 10-12 reps at this height. Once you can perform those 10-12 reps consecutively, move to a lower surface and repeat.
Knee Push-Ups
So, by now we should be getting closer to the floor. From here, we are going to drop down to our knees and place our hands directly onto the floor. Now we will slowly lower our upper body to the floor. Before we begin to push up, let’s make sure we are keeping the same form requirements as we did on the Hand Elevated Push Ups.
- Keep your elbows slightly tucked into your side at around a 45-degree angle.
- Keep your body straight without any sagging in the hips.
- Slowly lower your upper body to the floor and return to starting position by pushing off the floor
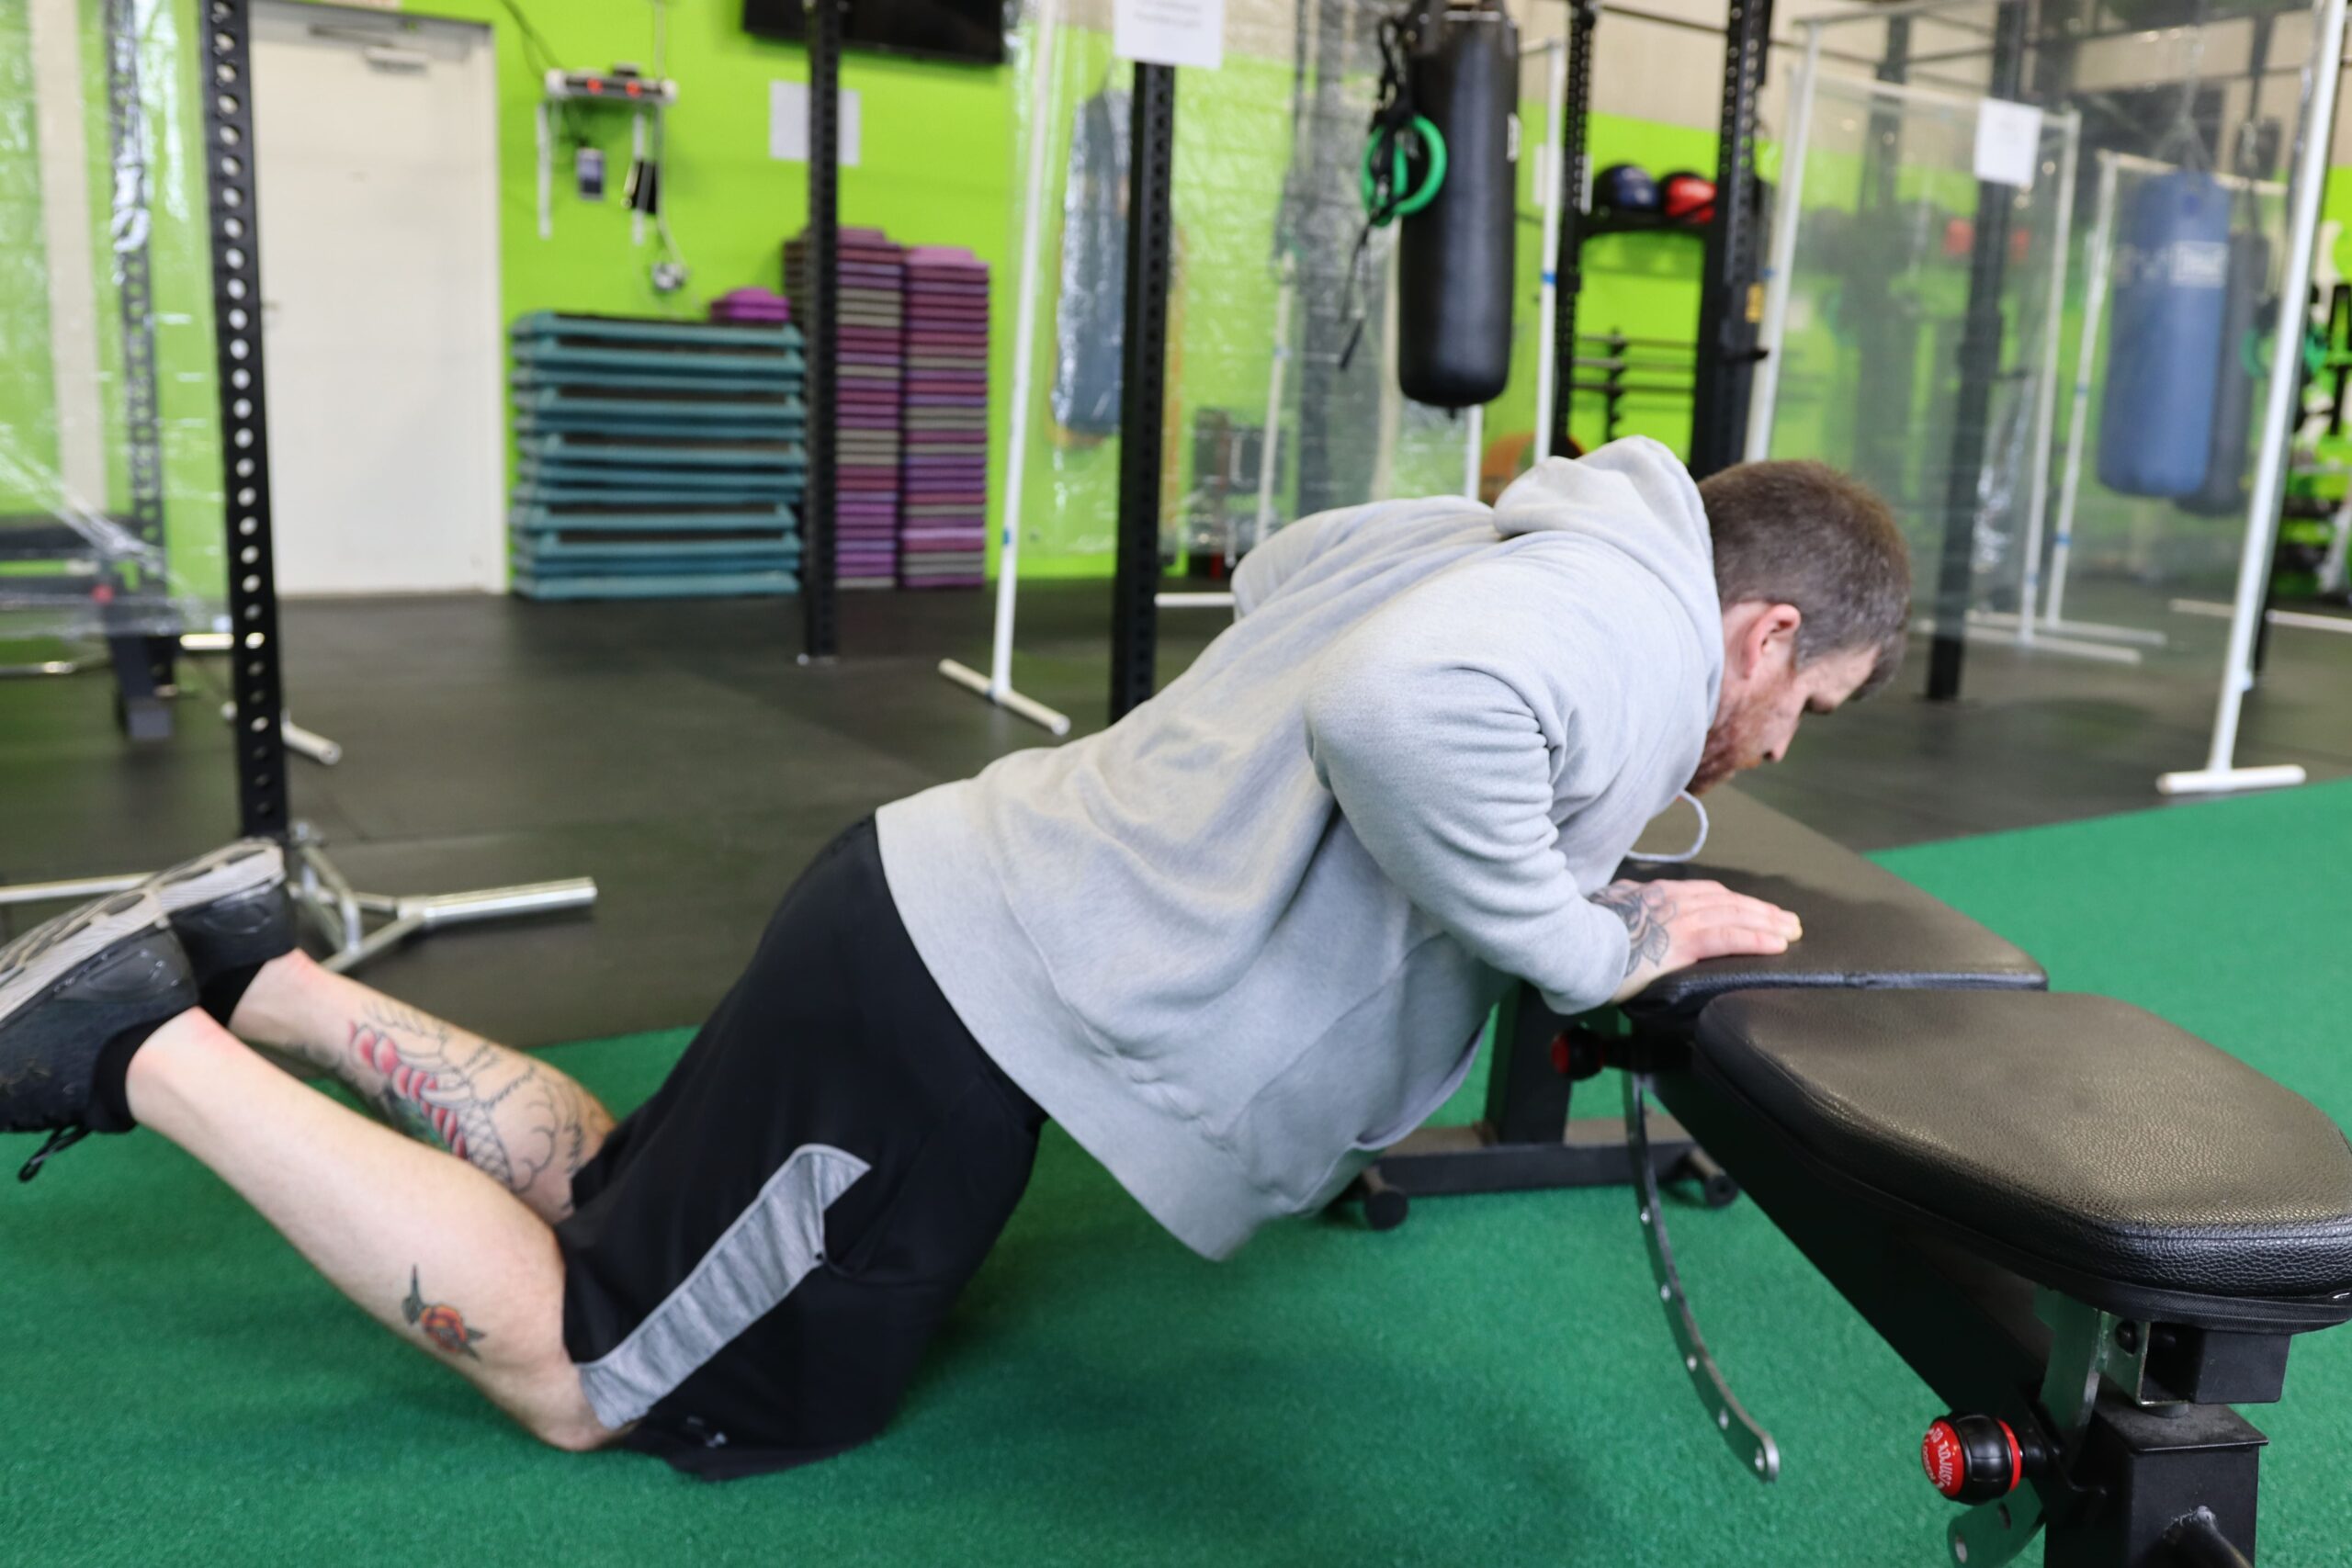
To make this move either more difficult, or slightly easier, change the position of your knees. Move them closer to your hands to make the move easier and move them further back to increase difficulty.
Eccentric Push-Up
After spending time and mastering the Knee Push Up, you should be ready to start working from the High Plank position again. BUT, there is still more work to do before rushing into full push ups. One part of the push up that people tend to do incorrectly is properly lowering themselves to the floor, so here we will work on just that and that alone. To start, get into the High Plank position same as before. Now, we will simply take 3-5 seconds to lower ourselves to the floor, all while maintaining the checklist we had on both the high plank and the hand elevated push ups. Once you reach the floor, instead of pushing yourself back up, drop to your knees and return to the starting position. This can become very strenuous and if time needs to be taken in between reps, then do so. We are working on perfecting form here, not how many reps we can get. Once you can perform 10-12 continuous reps of these slow eccentric push ups, it’s time to move on.
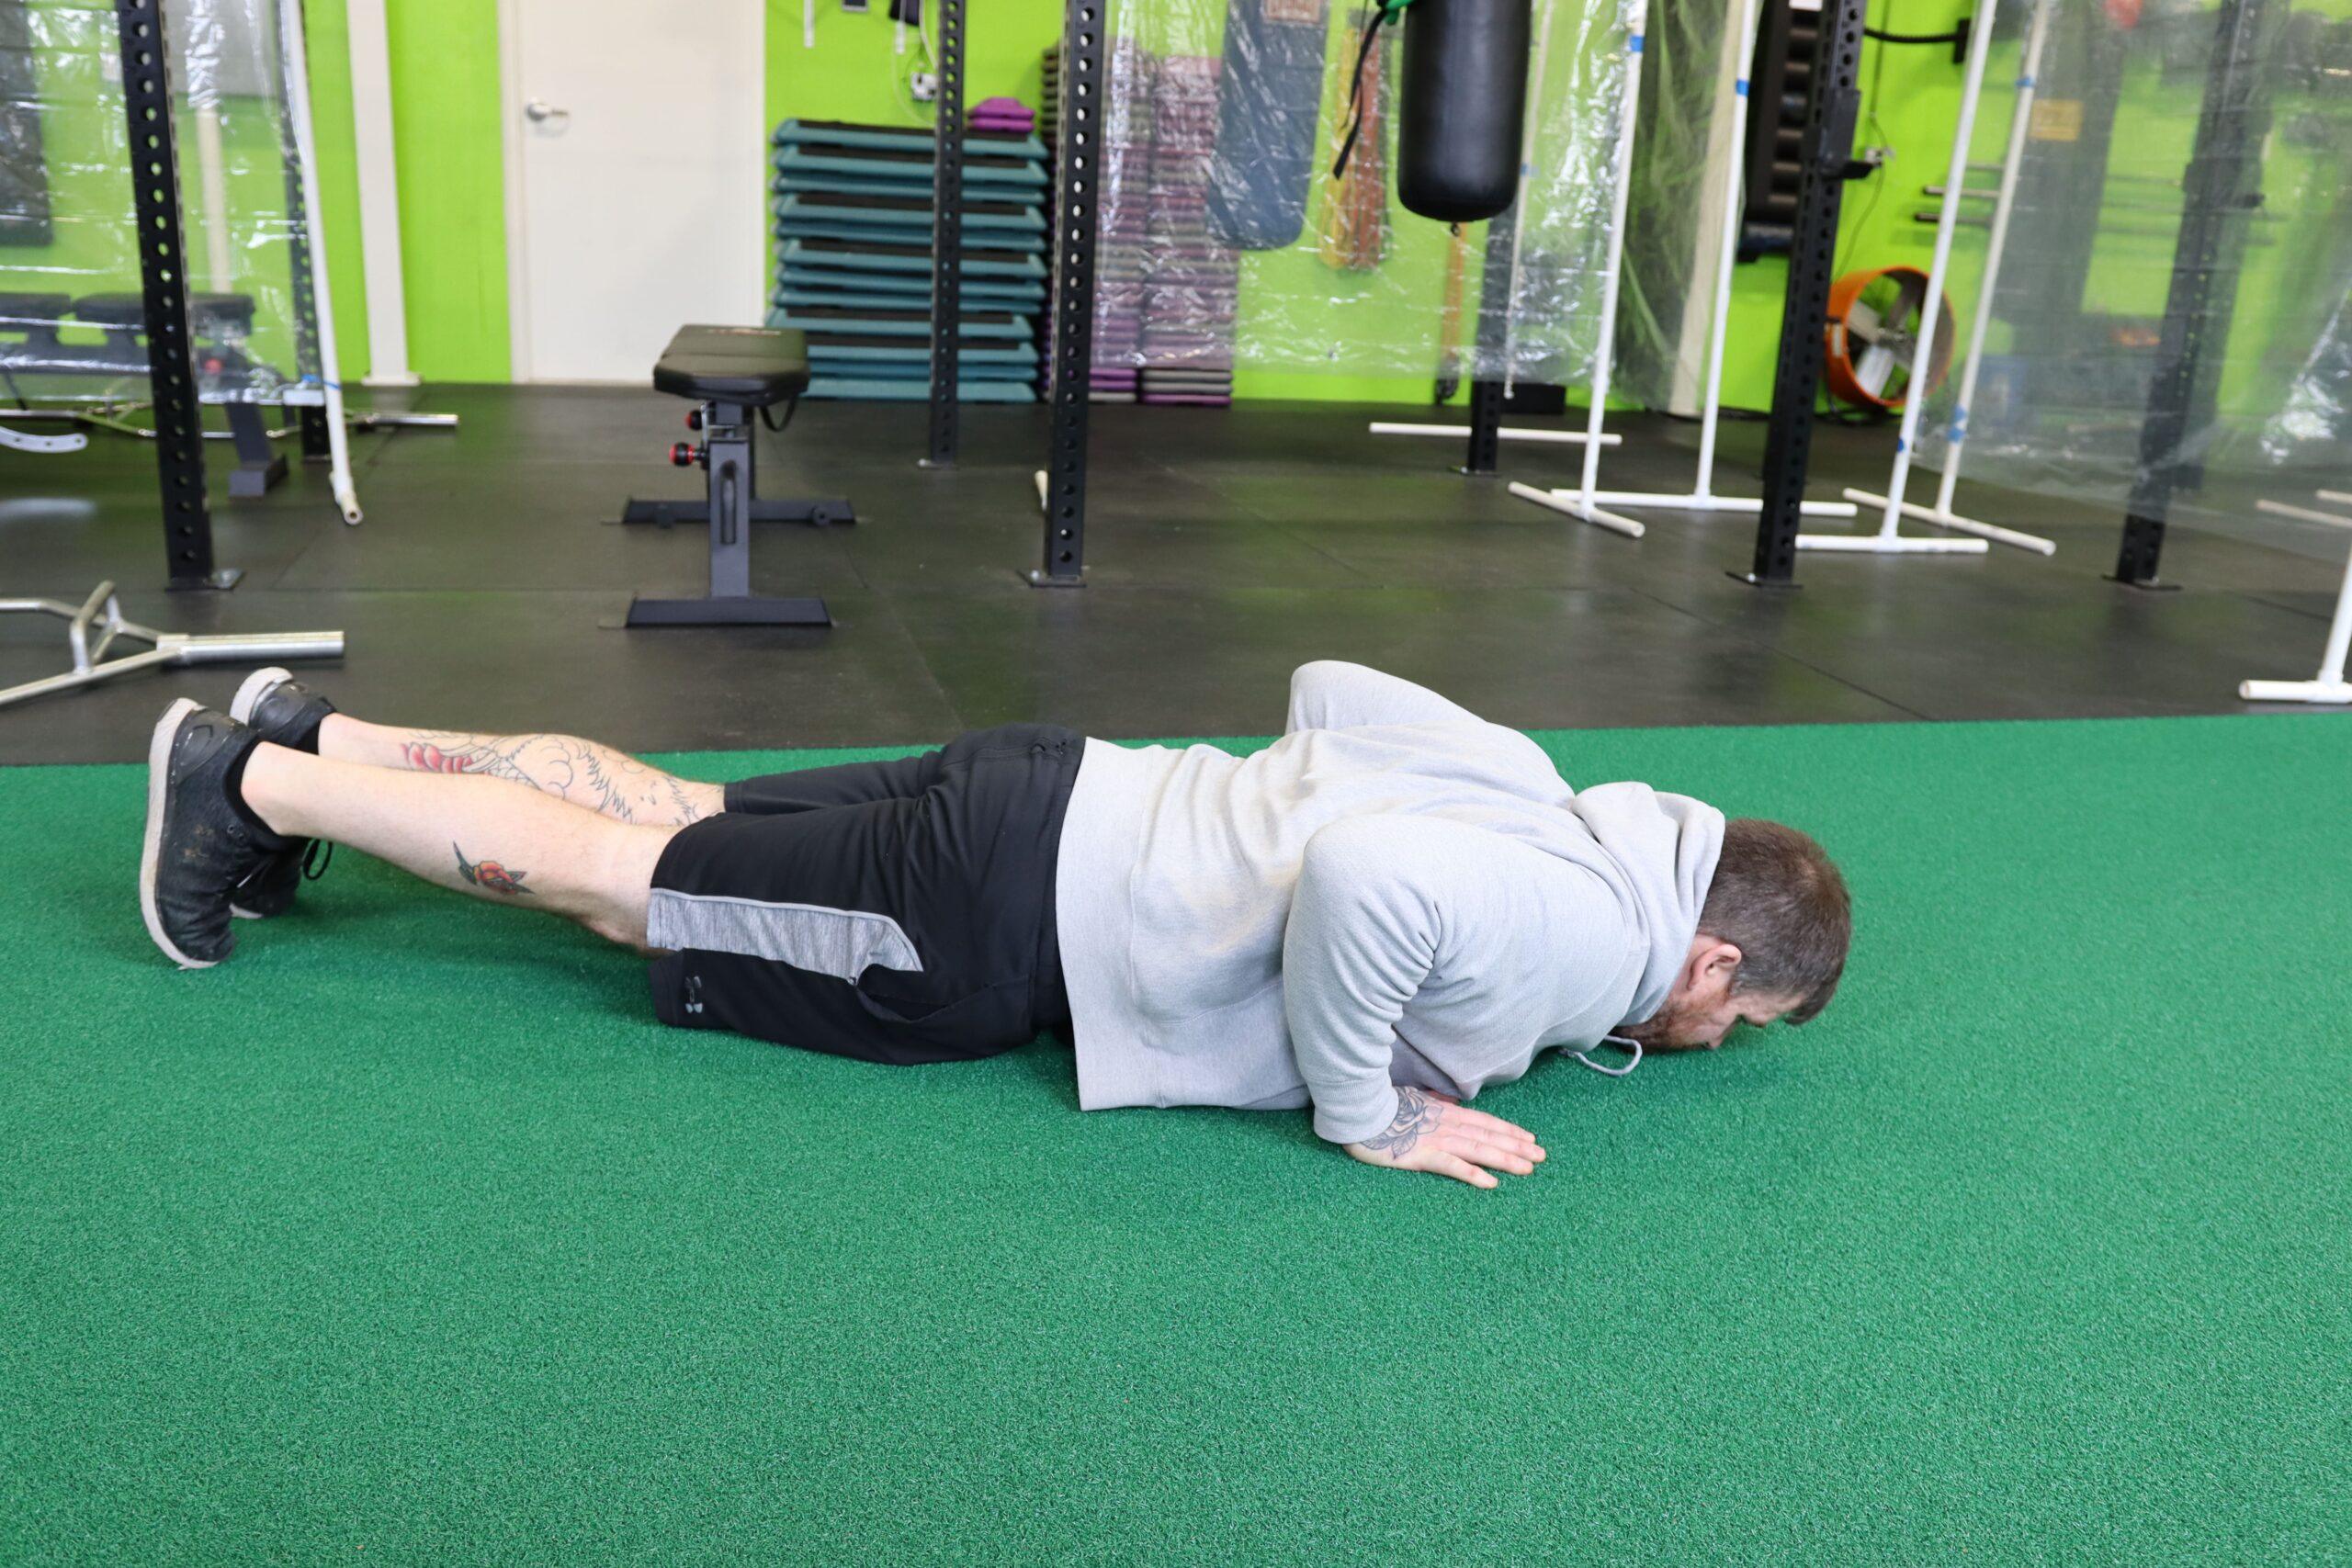
Push-Ups
After all the hard work, the sweat, and the sore muscles, it’s time to get it! Set up in the High Plank position and remember to follow all the ques that we’ve previously gone over.
- Hands are directly underneath the shoulders.
- Body is in a straight line without any sagging in the hips.
- Take a big breath in.
- Slowly lower your upper body to the floor while keeping elbows at a 45-degree angle.
- Exhale and push yourself off the floor back to the starting position.
- Give yourself a high five!

You’ve done it! Don’t try to play it cool. Your first push up is an incredible accomplishment that you should be proud of. Boast a little. You’ve earned it!
If you enjoyed this information, please check out our other fitness & health articles here:
https://hybridfitnessgym.com/articles/
Swing over to our YouTube channel to check out our latest videos here:
Hybrid Fitness YouTube Channel

Brandon started working out as an athlete in high school, striving to push his limits and reach his full athletic potential. As he spent more and more time working on his own goals, he found a passion in the science of strength & conditioning, and using that new-found knowledge to help others. Brandon is exceptional at giving his clients the extra push to get stronger in a safe manner, while going above and beyond to making sure they feel comfortable and safe.


0 Comments
Leave A Comment